
User Manual

Quality Wooden Children’s Furniture and Accessories
Made in America • Established 1987
www
.littlecolorado.com
®
Inc.
Revised 07/10
Page 1 of 1
N. Tommer
Care and Cleaning:
If this Chair is unfi nished, it must be totally protected by an outdoor/exterior rated stain or house paint BEFORE
being used outside. Exposure to any weather or even sun can cause rapid deterioration, cracking, warping,
splitting and discoloration of unfi nished wood.
If this Chair is painted, the fi nish is designed to provide long lasting protection when exposed to the harshness
of weather. But no matter how durable, painted wooden furniture should not be left outdoors continually. It is
best to store it inside when not in use. Even in mild conditions, painted wood furniture left outdoors will eventually
fade and show the effects of exposure to weather. To clean your painted furniture, use a mild detergent such as a
dishwashing liquid and a soft cloth.
Never use any type of abrasive cleanser.
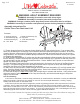
1. Please inspect all parts for damage during shipping and for any missing items. If you suspect that
there may be damage or a shortage, call us and we will send replacement parts if needed. At this time,
visualize how the components fi t together per the above drawing and make sure that you have every-
thing identifi ed. You will need a standard phillips screwdriver, a fl at head screwdriver and a pair of pliers
to complete this assembly.
2. Slide the Back Assemblies (C) all the way into the slots behind the Seat Assembly (B) so that it looks
like the drawing. Hold the Arm/Leg Sets (A) and the Seat Assembly (B) in position so that the holes line
up (tapered arms on the outside) and install the Bolts. Start a Washer and Cap Nut on each Bolt and
tighten only hand tight at this point.
3. Align the holes in the backs of the Arms with the holes in the braces on the rear of the Back Assem-
blies (C). Put Bolts through the holes and add a Washer and a Cap Nut to each, then hand tighten.
Install the four Bolts in the Table Assembly (D) as shown.
4. Make sure the lower braces of both the right and left side Back Assemblies (C) are fully seated in the
slots. Start four Wood Screws into the pre drilled holes. Screw in the Wood Screws until tight and the
heads are slightly below the surface of the wood.
5. Place the Chairs on a hard level surface with all eight legs in contact with the fl oor. Using a fl at screw-
driver and a pair of pliers, tighten all of the Cap Nuts securely until the bolt heads begin to be pulled
slightly into the wood.
All of us at Little Colorado, Inc hope that you and your little ones enjoy these Tete-a-Tete Chairs for many years.
Please call us if you have any questions.
Manufactured in America by:
Little Colorado, Inc. 4450 Lipan Street Denver, Colorado 80211
Phone 303-964-3212 Fax 303-964-3213 info@littlecolorado.com
4- Arm/Leg Sets (A) 1- Table Top Assembly (D)
2- Seat Assembly (B) 16- Cap Nuts
2- Back Assembly(C) 4- 1 5/8” Wood Screws
16- 1 3/4” Bolts 16- Washers
Contents:
Assembly Instructions For
Child's Tete-a-Tete Chair Item # 143
WARNING: ADULT ASSEMBLY REQUIRED
WARNING: Assembly kit contains parts with sharp edges.
WARNING: Assembly kit contains parts with sharp points.
WARNING: Package contains plastic bags that present suffocation risks for children.
WARNING: Assembly kit contains small parts that present choking hazards for children.
B
C
A
B
C
D
A
AD