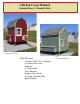
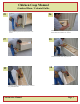
Chicken Coop Manual Gambrel Barn / Colonial Gable 4x6 Gambrel Barn Coop Tools Needed: -Cordelss Drill (12V or higher) -#2 Square Drive Bit -Hammer -6’ Step Ladder -Tape Measure -Square utility knife w/ blade & hook blade -Speed Square 6x8 Colonial Gable Coop
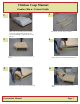
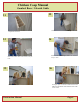
Chicken Coop Manual Gambrel Barn / Colonial Gable 2 1 Now layout your 4x4 runners as shown. Thank your for purchasing! Now locate and review your packaging list adn identify all construction materials. Quantities may avry by unit size. 3 4 Now locate the floor and in set on 4x4 runners as shown. Secure with 2 1/2” screws shown from the side. 6 5 Secure with 2 1/2” screws as shown from the end. Construction Manual Next install the walls in alpabetical order as shown.
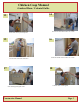
Chicken Coop Manual Gambrel Barn / Colonial Gable 8 7 secure the wall with 2 1/2” screws as shown. 9 Continue securing the wall as shown. 10 Continue with the walls as shwon and secure with 2 1/2” screws. 11 Now install the gable wall with the door. Construction Manual Fasten the other end with 2 1/2” screws. After corners are secure, make sure the wall is in place all the way and secure with 2 1/2” screws every 16” to 24”.
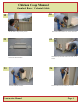
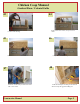
Chicken Coop Manual Gambrel Barn / Colonial Gable 14 13 Next secure the bottom with 2 1/2” screws. Do the same as the previous picture. 15 16 You can now remove the door brace. Fasten the inside corners with 2 1/2” screws. 18 17 Now install opposite gable wall. Construction Manual Continue same as other gable.
Chicken Coop Manual Gambrel Barn / Colonial Gable 20 19 Do the same as the previous picture. 21 Secure the bottom with 2 1/2” screws as shown. 22 Now locate the nest boxes. Install them by the letters and secure with 1 1/4” screws. 24 23 Continue with the nest box. Construction Manual Secure inside as shown with 2 1/2” screws.
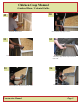
Chicken Coop Manual Gambrel Barn / Colonial Gable 26 25 Now install side panels and secure with 1 1/4” screws. 27 Make sure the small wall is in against the wall as shown and secure with 2 1/2” screws. 28 Do the same as picture #26. Continue with the same as picture #27. 30 29 Install the inside dividers and insert the screws in the predrilled holes. Construction Manual Continue with dividers.
Chicken Coop Manual Gambrel Barn / Colonial Gable 32 31 Now install the lid with the 3” t-hinges as shown. Completed nest boxes. 33 34 Secure all corners with 1 1/4” screws, every 6” to 8” . Secure outside bottom edges, with 1 1/4” screws every 6” to 8”. 36 35 Now install trusses. Construction Manual Use angle square as shown to make sure the truss is flush on the outside of the 2x6 and secure with 2 1/2” screws.
Chicken Coop Manual Gambrel Barn / Colonial Gable 38 37 Next install the door latch. 39 See the box for installation. 40 Secure with 1 1/4” screws as shown. Install the aluminum corners with 1 1/4” screws. 42 41 Continue with the corners... Construction Manual Next install the roof sheeting and secure with 1 1/4” screws.
Chicken Coop Manual Gambrel Barn / Colonial Gable 44 43 Continue with sheeting. 45 Secure with 1 1/4” screws, every 6” to 8” on center. 46 Completed with the sheeting. Install the bottom section as shown. 48 47 Install the chicken ramp as shown and secure with 1 1/4” screws. Construction Manual Install the small piece of siding on the inside as shown to keep the eggs from rolling out.
Chicken Coop Manual Gambrel Barn / Colonial Gable 50 49 Install the chicken roost. 51 Now install the drip edge as shown. 52 Secure with 1 1/4” screws. Cut the drip edge with tin snips as shown to make it fit. 54 53 Next install starter strip and secure 3/4” nails. Construction Manual Continue with starter strip.
Chicken Coop Manual Gambrel Barn / Colonial Gable 56 55 Shingle in a staggered fashion as shown. 57 Continue with shingles. 58 Nail tabs down where there is a break in the roof, as shown, nail with the 3/4” nails. Now install the ridge caps, as shown and use the 2” nails. 60 59 Continue with caps as shown.