
How to Guide


6
WARNING: ALWAYS MAKE SURE BOTH RUNG LOCKS ARE COMPLETELY
LOCKED BEFORE CLIMBING THE LADDER. FAILURE TO DO SO MAY RESULT
IN INJURY OR DEATH.
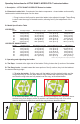
C. The Feet - Located at the bottom ends of the ladder. They can be used in a flat position
(Fig. A) with slip-resistant rubber pads for hard surfaces, or in a “pick” or “spike” position (Fig. B)
to penetrate soft surfaces, such as dirt or grass. To set the feet in the desired position, simply lift
them from the ground and flip them into position with your toe. Patent Pending SURE-SET, if
equipped, are spring-assisted to help keep the feet in the desired position while setting up the
ladder.
WARNING: ALWAYS MAKE SURE BOTH FEET ARE IN THE SAME POSITION. NEVER USE
THE PICK POSITION ON HARD IMPENETRABLE SURFACES. FAILURE TO FOLLOW
THESE INSTRUCTIONS MAY RESULT IN INJURY OR DEATH.
1. Nail Slots - The feet have slots at the front, which give you the option of nailing the
feet in position, giving extra protection against slip outs. Do not hit your ladder’s feet
with a hammer. We recommend driving in the nails outside of the feet and then sliding
the ladder into position.
D. The Bubble Levels - Located in the leg brace at the bottom of the base section on all
HYPERLITE and HYPERLITE SUMOSTANCE models, and on the outside of the right side rail
on select models. They inform you when your ladder is level side-to-side and at the proper 75.5°
climbing angle, respectively.
WARNING: ALWAYS MAKE SURE YOUR LADDER IS LEVEL SIDE-TO-SIDE BEFORE
CLIMBING. FAILURE TO DO SO MAY RESULT IN INJURY OR DEATH.
A B
SIDE-TO-SIDE CLIMBING ANGLE*
* on select models