
Installation Guide


INTRODUCTION
EN
This instruction sheet provides you with the information required
to safely own and operate your product. Retain these instructions
for future reference.
The product you have purchased is of the highest quality work-
manship and material, and has been engineered to give you
long and reliable service. This product has been carefully tested,
inspected, and packaged to ensure safe delivery and operation.
Please examine your item(s) carefully to ensure that no damage
occurred during shipment. If damage has occurred, please con-
tact the place of purchase. They will assist you in replacement or
repair, if required.
READ THESE INSTRUCTIONS CAREFULLY BEFORE
ATTEMPTING TO INSTALL, OPERATE, OR SERVICE
YOUR PRODUCT. KNOW THE PRODUCT’S APPLICATION,
LIMITATIONS, AND POTENTIAL HAZARDS. PROTECT
YOURSELF AND OTHERS BY OBSERVING ALL SAFETY
INFORMATION. FAILURE TO COMPLY WITH THESE
INSTRUCTIONS COULD RESULT IN PERSONAL INJURY
AND/OR PROPERTY DAMAGE!
SAFETY GUIDELINES
RISK OF ELECTRIC SHOCK—This pump is supplied with a
grounding conductor and grounding-type attachment plug. To
reduce the risk of electric shock, be certain that it is connected only
to a properly grounded, grounding-type receptacle. As a safety
measure, each electrical outlet should be checked with an
Underwriters Laboratory Listed circuit analyzer. This will indicate if
the power, neutral and ground wires are properly connected. If
they are not, call a qualified licensed electrician.
1. CAUTION: To reduce the risk of electrical shock, pull plug
before servicing this pump.
2. Check local electrical and building codes before installation.
The installation must be in accordance with their regulations.
3. During normal operation the sump pump is immersed in
water. Also, during rain storms, water may be present in the
surrounding area of the pump. Caution must be used to pre-
vent bodily injury when working near the pump:
a. Electrical power should be disconnected prior to touching,
servicing or repairing the pump.
b. To minimize possible fatal electrical shock hazard, extreme
care should be used when changing fuses. Do not stand
in water while changing fuses or insert your finger into the
fuse socket.
4. Do not run the pump in a dry sump. If the pump is run in a
dry sump, the surface temperature of the pump will rise to a
high level. This high level could cause skin burns if the pump
is touched and will cause serious damage to your pump.
5. Do not oil the motor. The pump housing is sealed. A high
grade dielectric oil devoid of water has been put into the motor
housing at the factory. Use of other oil could cause serious
electric shock and/or permanent damage to the pump.
6. This pump’s motor housing is filled with a dielectric lubricant
at the factory for optimum motor heat transfer and lifetime
lubrication of the bearings. Use of any other lubricant could
cause damage and void the warranty. This lubricant is non-
toxic; however, if it escapes the motor housing, it should be
removed from the surface quickly by placing newspapers or
other absorbent material on the water surface to soak it up, so
aquatic life is undisturbed.
7. In any installation where property damage and/or personal
injury might result from an inoperative or leaking pump due to
power outages, discharge line blockage, or any other reason,
a backup system(s) and/or alarm should be used.
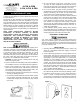
ELECTRICAL CONNECTIONS
Your sump pump is supplied with a 3-prong electrical plug
(Figure 1). The third prong is to ground the pump to prevent pos-
sible electric shock hazard. Do not remove the third prong from
the plug. A separate branch electrical circuit is recommended. Do
not use an extension cord.
INSTALLATION
1. Clean any debris from sump pit and set pump in center of pit
(Figure 2). A solid bottom will prevent clogging of the pump
from sand and dirt.
2. Connect discharge piping and run it to the nearest sewer or
surface outlet. Use pipe joint compound at all connections.
Sump pumps can be piped to discharge into the house drain-
age system, to a dry well, splash block or to a storm drain,
depending on local plumbing codes. The discharge pipe
should be as short as possible and contain as few elbows as
possible. The discharge pipe should be the same diameter
as the discharge size to reduce pipe friction losses. Smaller
pipe will restrict capacity and reduce pump performance. The
sump pump comes with 1½” female pipe thread discharge,
and 1-1/4” FNPT reducing bushing.
3. Always install a union in the discharge line, just above the sump
pit to allow for easy removal of the pump for cleaning or repair.
4. In situations where the piping is long, vertical discharge is
above 7 or 8 feet, or a small pit has been provided, use of a
check valve is recommended to prevent backflow of water into
the sump. When a check valve is used, drill a relief hole (1/8”
1
8-CIM, 8-CBM
6-CIA, 8-CIA, 8-CBA
Franklin Electric Co., Inc.
P. O. Box 12010
Oklahoma City, OK 73157-2010
405.947.2511 • Fax: 405.947.8720
www.LittleGiantPump.com
CustomerService-WTS@fele.com
Figure 1