Men’s Grooming Gift Set INSTRUCTION MANUAL CL-2037A & CL-NT312
CONTENTS PRODUCT OVERVIEW 2 PARTS DESCRIPTION 2 IMPORTANT SAFETY INSTRUCTIONS 3 GETTING STARTED 4 CHARGING YOUR HAIR CLIPPER 5 FITMENT OF BATTERY TO THE NOSE AND EAR HAIR TRIMMER TIPS FOR BEST RESULTS REMOVAL AND FITMENT OF TRIMMER HEADS AND ACCESSORIES 5 6 6 CLIPPER COMBS 8 CLEANING AND MAINTAINING YOUR HAIR CLIPPER 9 HOW TO USE YOUR HAIR CLIPPER 10 HOW TO USE YOUR EAR AND NOSE HAIR TRIMMER 12 WARRANTY 13
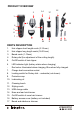
PRODUCT OVERVIEW 14 2 17 12 1 4 8 13 15 5 6 7 3 PARTS DESCRIPTION 16 4 9 11 10 1. Hair clipper short length comb (3-15 mm) 2. Hair clipper long length comb (18-30 mm) 3. Beard comb (1-12mm) 4. Rotary dial (for adjustment of the cutting length) 5. On/Off switch of hair clipper 6. LED indicator light (battery status when charging) - Red colour illuminated when charging, Blue when fully charged. 7. Charge lead connection socket 8.
IMPORTANT SAFETY INSTRUCTIONS Warning to Reduce the Risk Hazard or Injury to Persons: An appliance should never be left unattended while charging. Keep the charge lead away from heated surfaces. Ensure the charge lead and plug of the hair clipper do not get wet. Do not plug or unplug the product with wet hands. Do not use the product with a damaged charge lead. Charge, use and store the product at a temperature between 15℃ and 35℃. Only use the parts supplied with the appliance.
GETTING STARTED Our products are designed to meet a high standard of quality, functionality and design. We hope you enjoy using your new appliance. Please read the instructions for use carefully and keep for future reference. Protect the Environment DO NOT DISPOSE OF THE PRODUCT IN HOUSEHOLD WASTE AT THE END OF ITS USEFUL LIFE. DO NOT PLACE IN A FIRE OR ATTEMPT TO OPEN THE INTERNAL BATTERY PACK AS IT MAY BURST OR RELEASE TOXIC MATERIAL.
CHARGING YOUR HAIR CLIPPER: Before using your clipper, you will need to fully charge the internal battery. Ensure the product is switched off. Connect the charging adaptor lead to a USB outlet (5V with a supply of at least 800mA), then connect the outlet lead to the product connection socket. The charging indicator will light up (red in colour) to indicate charging has commenced. The indicator will light up blue when fully charged, the charge time is approximately 1.5hrs.
TIPS FOR BEST RESULTS Beard, mustache and sideburns hairs should be dry. Avoid using lotions before using your hair clipper. Comb your hair in the direction that it grows. Remove trimmer comb attachment if you are defining hairline edges such as sideburns, trimming the nape of your neck, trimming your beard line on front of neck. Before Starting the Cut: Inspect the hair clipper making sure that it is free from hair and dirt.
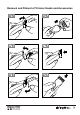
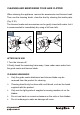
Removal and Fitment of Trimmer Heads and Accessories 2 A U 130 0 886 649
Clipper Combs Press down on the arrow button with your thumb and pull upward with index finger to remove the guide comb. (Fig.7-8) The two hair clipper combs (short and long) can each provide 12 different trim lengths (#1:3-15mm, #2:18-30mm) simply by turning the rotary adjustment dial to the desired setting.
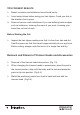
CLEANING AND MAINTAINING YOUR HAIR CLIPPER When cleaning the appliance, remove the accessories and trimmer head. Then use the cleaning brush, clear the dust by cleaning the inside parts. (Fig. 9-10). The trimmer heads and accessories can be gently rinsed with water, but it is recommended to immediately dry using a lint free cloth. Fig.9 Fig.10 Fig. AFTER EACH USE 1.Turn the trimmer off. 2.Gently brush the remaining hairs away / rinse under warm water from the guide comb and trimmer blade.
HOW TO USE YOUR HAIR CLIPPER For general hair cutting: Note: For even cutting, allow the comb attachment/blade to cut its way through the hair. Do not force it through quickly. If you are cutting for the first time, start with the largest comb attachment. STEP 1 – Nape of the neck Set the comb to 3mm or 6mm. Hold the clipper with the blade teeth pointing upwards. Begin starting at the centre of the head at the base of the neck.
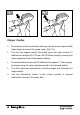
To Thin and Taper the Beard / Moustache (Fig.11-12) Attach a guide comb to the trimmer. If you are trimming for the first time start with the maximum trimming length setting. Turn the unit on. Place the flat top of the trimmer comb against the skin. Slowly slide the personal groomer through the hair. Repeat from different directions as necessary. If hair builds up in the trimmer comb during the trimming process, switch the unit off, pull off the comb and brush/rinse off. Fig.11 Fig.
HOW TO USE YOUR EAR AND NOSE HAIR TRIMMER Operation Ensure a charged battery is fitted, Refer earlier section “FITMENT OF BATTERY TO THE NOSE AND EAR HAIR TRIMMER”. Do not use if the battery is near flat, as the trimmer will not cut hairs efficiently and may tend to grab and pull hairs. Trimming operation: Remove the protecting cap by pulling it from the unit. Switch the trimmer on, the indicator LED light will activate.
Warranty We pride ourselves on producing a range of quality home appliances that are both packed with features, and completely reliable. We are so confident in our products, we back them up with a 2 year warranty. Now you too can relax knowing that you are covered. Customer Helpline NZ: 0800 422 274 This product is covered by a 2 year warranty when Accompanied by proof of purchase. IM Version 1.