Tākiwira Desk INSTRUCTION MANUAL Job no.
Assembly Details 40 Floor Area 3m x 2m Min Approximate Assembly Time 1 Person Assembly Required Assembly Space Tools Required 1 AFTER SALES SUPPORT support@compacfurniture.co.
Tips before you start 1. For the protection of your furniture, we recommend that the product is placed on a protected surface during assembly to prevent damage 2. Please check that all parts are present before you start the assembly of your furniture 3. For ease and speed of assembly, we recommend that you identify all the parts required for each step before commencing with assembly 4. For larger items, please ensure that you have sufficient space (as indicated on page 1) 5.
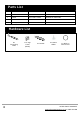
Parts List QTY PART MEASUREMENTS NOTES 1 Top 1000 x 480 x 15mm Laminate on one side. 1 LH End 720 x 396 x 15mm Laminate on both sides. 1 RH End 720 x 396 x 15mm Laminate on both sides. 1 Modesty 390 x 958 x 15mm Laminate on both sides Hardware List 8x Connecting Bolts 3 8 x Large Cams (15mm) 4 x Dowels 4 x Nail on Glides 8 x Stick-on Cam Covers AFTER SALES SUPPORT support@compacfurniture.co.
Cam Installation & Operation Guide The Cam and Connecting Bolt system is used to put your unit together. Below is an explanation of how this system works. 4 AFTER SALES SUPPORT support@compacfurniture.co.
Assembly STEP 1: Top • • To begin assembly, lay the top finished side down on a clean and clear surface Screw four Connecting Bolts into the holes as shown Connecting Bolt Connecting Bolt Connecting Bolt Connecting Bolt Connecting Bolt STEP 2: LH End • • • Insert two Large Cams as shown (make sure the arrow on the top of the Cam points towards the top edge of the End).
STEP 3: RH End • Repeat the previous steps to install the hardware in the RH End. Connecting Bolt Large Cam Dowel Connecting Bolts Cam Dowel Dowel Cam STEP 4: Modesty • Install 4 Large Cams into the Modesty as shown below (ensure the arrow on the top of the Cam points towards the edge. Large Cam Cam Cam 6 Cam Cam AFTER SALES SUPPORT support@compacfurniture.co.
STEP 5: Attach the RH End • • Attach the RH End by fitting the Connecting Bolts with the corresponding pre-drilled holes as shown below. Lock the pieces together by turning the Cams ¼ - ½ of a turn in a clockwise direction. Turn Cam ¼ - ½ of a turn Turn Cam ¼ - ½ of a turn STEP 6: Attach the Modesty • • Attach the Modesty by fitting the Connecting Bolts with the corresponding pre-drilled holes as shown below.
STEP 7: Attach the LH End • • Attach the LH End by fitting the Connecting Bolts with the corresponding pre-drilled holes as shown below. Lock the pieces together by turning the Cams ¼ - ½ of a turn in a clockwise direction. Turn Cams ¼ - ½ of a turn Turn Cams ¼ - ½ of a turn STEP 8: Attach Nail on Glides • Tap the four Nail on Glides into the bottom of the Ends as indicated below. Space them about 50mm in from the front and back edges. Nail on Glide 8 AFTER SALES SUPPORT support@compacfurniture.co.
STEP 9: Cover Caps Put the finishing touch on your Tākiwira desk by using the stickers provided to cover the cams. 89 AFTER SALES SUPPORT support@compacfurniture.co.
WARRANTY We pride ourselves on producing a range of quality products that are both packed with features and completely reliable. We are so confident in our products, we back them up with a five-year warranty. Now you too can relax knowing that you are covered. For parts and assistance, call the manufacturer direct on 0800 100 858. Please do not call the store you purchased the cabinet from as they will be unable to help you.