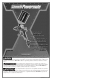
Read and understand all safety precautions in this manual before operating. Failure to comply with instructions in this manual could result in personal injury, property damage and/or voiding of your warranty. The manufacturer WILL NOT be liable for any damage because of failure to follow these instructions. Lisez et veillez à bien comprendre toutes les consignes de sécurité de ce manuel avant d'utiliser l'appareil.
SAFETY GUIDELINES - DEFINITIONS This manual contains information that is important for you to know and understand. This information relates to protecting YOUR SAFETY and PREVENTING EQUIPMENT PROBLEMS. To help you recognize this information, we use the following symbols. Please read the manual and pay attention to these sections. This is the safety alert symbol. It is used to alert you to potential personal injury hazards. Obey all safety messages that follow this symbol to avoid possible injury or death.
PERSONAL SAFETY (continued) RISK OF HEARING LOSS. Always wear ANSI S3.19 approved ear protection when using the tool. Prolonged exposure to high intensity noise is able to cause hearing loss. RISK OF EYE INJURY. Always wear ANSI Z87.1 approved safety goggles when using an air tool. Air powered equipment and power tools are capable of propelling materials such as metal chips, sawdust, and other debris at high speed which could result in serious eye injury. RISK OF INJURY. Do not overreach.
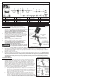
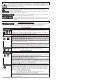
TYPICAL INSTALLA TION INSTALLATION Figure 1 Key Description Key Description Key Description Key Description A Air hose D In-line Oiler G Quick Coupler J Female Connector B In-line Filter E Air Hose H Male Connector K Spray Gun C Tee Fitting F Whip Hose I Air Tool OPERATING OPERATING INSTRUCTIONS Before Spraying 1. 2. 3. 4.
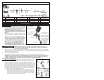
OPERATING OPERATING INSTRUCTIONS (continued) Spraying Instructions (continued) c. Spray pattern shape (see Figure 4) - loosen the lock ring and turn the air cap for the desired spray pattern. Hand tighten the lock ring after adjustment. Round pattern used to draw fine lines with the gun close to the work surface, for touch up work and for painting surfaces in difficult to reach areas. To achieve this pattern, turn the air cap at a 45 degree angle.
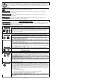
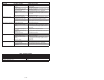
TROUBLESHOOTING GUIDE SYMPTOM Gun does not spray POSSIBLE CAUSE(S) Air hose connection at compressor loose Paint cup loose Fluid tube, fluid tip or air caps loose, clogged or damaged Air pressure too low Material is too thick or needs straining Fluid control knob closed Material sags or runs Material improperly thinned Movement of gun is too slow Gun held too close to work surface Spray pattern is distorted Fluid tip partly blocked Clogged air nozzle Material is too thick or needs straining Gun not hel
LIMITED WARRANTY WARRANTY ONE YEAR LIMITED WARRANTY: Powermate Corporation (the Company) warrants that for a period of twelve (12) months from the date of purchase, it will replace or repair, free of charge, for the original retail purchaser only, any part or parts, manufactured by the Company, found upon examination by the Company or its assigned representatives, to be defective in material or workmanship or both.
LIGNES DIRECTRICES DE SÉCURITÉ—DÉFINITIONS Le présent guide contient des renseignements importants que vous devriez connaître et comprendre. Ces renseignements traitent de VOTRE SÉCURITÉ et de la PRÉVENTION DE PROBLÈMES DE MATÉRIEL. Pour vous aider à reconnaître les renseignements, nous avons utilisé les symboles suivants. Veuillez lire ce guide et porter une attention particulière à ces sections. Voici le symbole d'alerte sécurité. Nous l'utilisons pour vous avertir d'un risque potentiel de blessure.
SÉCURITÉ PERSONNELLE (suite) RISQUE DE PERTE AUDITIVE. Portez toujours des protecteurs auriculaires approuvés ANSI S3.19 lorsque vous utilisez cet outil. Une exposition prolongée à un bruit de forte intensité peut causer une perte auditive. RISQUE DE BLESSURE AUX YEUX. Portez toujours des lunettes de sécurité approuvées ANSI Z87.1 lorsque vous utilisez un outil pneumatique.
INSTALLA TION TYPE INSTALLATION Figure 1 Key Description Key Description Key Description Key Description A Tuyau flexible d'air D Huilier sur canalisation G Raccord rapide J Raccord femelle B Filtre sur canalisation E Tuyau flexible d'air H Raccord mâle K Pistolet pulvérisateur C Raccord en T F Flexible de raccordement I Outil pneumatique MODE D'EMPLOI Avant de pulvériser : 1.
MODE D'EMPLOI (suite) b. c. Bouton de contrôle de fluide (voir la figure 2) : tournez dans le sens des aiguilles d'une montre pour réduire la quantité de peinture et dans le sens contraire pour augmenter les quantités de peinture. Ce bouton contrôle la quantité de peinture mélangée avec l'air. REMARQUE : si le bouton de contrôle de fluide est tourné jusqu'au bout, le pisto let dégagera seulement de l'air.
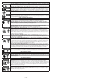
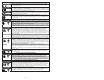
GUIDE DE DÉPANNAGE DÉPANNAGE SYMPTÔME CAUSES POSSIBLES MESURE CORRECTIVE Le pistolet ne pulvérise pas Le pistolet ne pulvérise pas Le tuyau d'air est mal branché sur le compresseur Godet de peinture desserré Serrez et scellez les raccords qui fuient à l'aide de ruban d'étanchéité en téflon. Le tube de liquide, la buse ou le chapeau sont mal branchés, obstrués ou endommagés.
GARANTIE LIMITÉE GARANTIE LIMITÉE D'UN AN : Powermate Corporation (la Société) garantit contre tout vice de fabrication et de main-d'œuvre, au premier acheteur au détail seulement, et ce pour une période de douze (12) mois à compter de la date d'achat, qu'elle remplacera ou réparera, sans frais, toute pièce fabriquée par la Société jugée défectueuse, après examen de la Société ou de ses représentants autorisés.
PAUTAS AUTAS DE SEGURIDAD - DEFINICIONES Es importante que usted conozca y entienda la información contenida en este manual. Esta información está relacionada con la protección de SU SEGURIDAD y la PREVENCIÓN DE PROBLEMAS DE EQUIPOS. Como ayuda para reconocer esta información, utilizamos los siguientes símbolos. Por favor, lea el manual y preste atención a estas secciones. Éste es el símbolo de advertencia de seguridad. Se utiliza para advertirle sobre posibles peligros de lesiones.
SEGURIDAD PERSONAL (continuación) RIESGO DE PÉRDIDA DE CAPACIDAD AUDITIVA. Utilice siempre protección auditiva con aprobación ANSI S3.19 cuando utilice la herramienta. La exposición prolongada a ruidos de alta intensidad puede causar pérdida auditiva. RIESGO DE LESIÓN OCULAR. Utilice siempre gafas de seguridad con aprobación ANSI Z87.1 cuando utilice una herramienta neumática.
INSTALACIÓN INSTALACIÓN TÍPICA Figura 1 Key Description Key A Manguera de aire D Engrasador en línea Description Key G Acoplador rápido Description Key J Conector hembra Description B Filtro en línea E Manguera de aire H Conector macho K Pistola aspersora C Conector en T F Manguera de conexión flexible I Herramienta neumática INSTRUCCIONES DE OPERACIÓN Antes de pintar: Figura 2 1.
INSTRUCCIONES DE OPERACIÓN (continuación) Instrucciones de aspersión (continuación): b. c. Perilla de control de líquido (ver Figura 2): gire en sentido horario para reducir la cantidad de pintura y gire en sentido antihorario para aumentar la cantidad de pintura. Esta perilla controla la cantidad de pintura que se mezcla con el aire. NOTA: si gira totalmente la perilla de control de líquido, la pistola emitirá sólo aire.
GUÍA DE SOLUCIÓN DE PROBLEMAS SÍNTOMAS POSIBLES CAUSAS MEDIDA CORRECTIVA La pistola no rocía La conexión de la manguera de aire en el compresor está suelta Cubeta para pintura suelta El tubo de líquido, la abertura de líquido o las cápsulas de aire están sueltos, obstruidos o dañados.
GARANTÍA LIMITADA LIMITADA GARANTÍA LIMITADA DE UN AÑO: Powermate Corporation (la Empresa) garantiza que durante un período de doce (12) meses a partir de la fecha de adquisición, cambiará o reparará de forma gratuita y únicamente al comprador minorista original, toda parte o partes, fabricadas por la empresa, que la empresa o sus representantes designados determinen que presentan defectos de material, mano de obra o ambos.