Halogen Oven LHO120SS INSTRUCTION MANUAL Please read and save all instructions to ensure safe and effective use of this appliance.
Dear Customer Congratulations on being the proud owner of Lloyd Halogen Oven. Your Halogen Oven comes with a Lloyd Guarantee of Quality. Lloyd takes great pride in providing its customers with perfect products that adheres to international quality standards. Lloyd is committed to provide the ultimate customer satisfaction as nothing brings us greater joy than having satisfied customers of Lloyd. At Lloyd, feedback and suggestions based on your product usage experience are greatly appreciated.
TABLE OF CONTENTS SAFETY INFORMATION AND INSTRUCTIONS PACKAGE CONTENTS OF YOUR PRODUCT 2‐3 4 UNPACKING AND FIRST USE STERLIZATION 5‐6 OPERATING INSTRUCTIONS 7‐8 CLEANING 9 STORAGE 9 RECIPES 9‐13 TECHNICAL SPECIFICATIONS 13 1
SAFETY INFORMATION AND INSTRUCTIONS In order to make the best use of this product and use it safely, please read the instruction manual carefully and keep it for future reference. 1. Never place food directly on the bottom of the bowl, as the bottom of the food will not cook evenly. Always use a rack or pan when cooking. Note: Most pans can be used in this oven as long as it is a baking pan and fits comfortably inside the bowl. 2. Do not touch hot surfaces.
16. Improper installation may result in the risk of fire, electric shock or injury to persons. 17. If the power cord or plug is damaged, do not use the appliance. 18. The appliance has no user‐serviceable parts contained within. Do not attempt to repair, disassemble or modify the appliance. 19. Always operate on a dry level surface. Operating on sinks or uneven surfaces must be avoided. 20. Do not clean with metal scouring pads. 21.
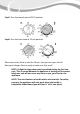
PACKAGE CONTENTS OF YOUR PRODUCT Lid Handle Micro Switch *Power off when the handle is lifted.
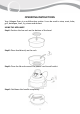
UNPACKING AND FIRST USE STERLIZATION 1. 2. 3. 4. Unpack the appliance and all accessories from the packaging box. Check all parts of your appliance before discarding any packaging materials. Peel off any adhesive label or sticker from your appliance, where necessary. We recommend you keep the original box for future storage and shipping purposes. Step1: Wash the bowl and low/grill rack in warm soapy water or in the dishwasher. Dry thoroughly before use.
Step5: Turn the temp knob to 250°C position. Step6: Turn the time knob to 10 min position. After timer ends, allow to cool for 10 min, then you can open the lid. Now your Halogen Oven is ready to cook your first meal! NOTE: A slight burning odour may be emitted during the first few uses. This is normal because the appliance is burning off the excess lubricants and will not cause any harm to you, your food or the appliance. NOTE: This oven features a handle with a micro switch.
OPERATING INSTRUCTIONS Your Halogen Oven is a multifunction cooker. It can be used to stew, roast, bake, grill, barbeque, broil, fry, steam and defrost. USING THE APPLIANCE Step1: Position the low rack on the bottom of the bowl. Step2: Place food directly on the rack. Step3: Close the lid and connect the power cord to wall outlet. Step4: Fold down the handle completely.
Step5: Set a desired temperature according to different food. Step6: And set a required time. Step7: When timer ends (Bell Sound) your food is ready to be served. NOTE: The maximum temperature setting is 250°C and maximum cooking time is 60 minutes. You can adjust the cooking time or temperature at any point during the cooking process. General guide to cook food The temperature and cooking time may vary depending on the type, the amount and the thickness of the food you are cooking.
CLEANING CAUTION: 1. Always allow the appliance to cool completely before cleaning. 2. Never immerse the lid into liquid. 3. Always unplug the power cord before cleaning. 4. It is imperative that the appliance be washed thoroughly after each use. 5. Do not use any abrasive materials for cleaning. Step1: Disconnect the power cord and allow the appliance to cool completely before cleaning. Step2: Wipe the lid clean using a damp cloth rinsed in warm soapy water.
JACKET POTATOES 4 medium‐sized potatoes Olive oil Sea salt Wash and prick the potato and place on the rack. Set the time to 40 min and the temp to 200°C. Remove and serve with topping of your choice! It's as easy as that! CHICKEN WINGS 1lb chicken wings 1/4 cup of sake or dry sherry 1/2 cup soy sauce 1 clove crushed garlic 1 tablespoon finely chopped fresh ginger Trim excess fat, remove tips from chicken wings and pat dry. Place wings in a bowl. Combine soy sauce, garlic, ginger, sake or dry sherry.
1.Remove the lid from the Halogen Oven, place the low rack inside the oven and replace the lid. Preheat the oven to 180°C. 2.Finely grate the rind from half the orange and half the lemon, cut both in half and squeeze the juice from the whole fruits (you will need about 6 tbsp). Mix the juices together in a small basin. 3.Sift the flour and baking powder into a large bowl. Break the eggs into the flour and add the ground almonds, sugar, butter, orange and lemon rinds and 3 tbsp fruit juice. 4.
paste, half of the yogurt, the cumin, ginger and seasoning to gether. Boil the potatoes in a pan of salted water for 7 mins, then drain well and tip into the tikka mixture with the paneer. Mix into the marinade, and chill for at least a couple of hours. Next, alternately thread the marinated potatoes and paneer onto the skewers with the onions and peppers, then cover on a tray until you are ready to cook.
3. Cook in the Halogen Oven for about 20 minutes at 200°C on the low rack, then add the kidney beans, vinegar and sweetener. 4. Reduce the heat to 180°C and cook for a further 10 minutes on the low rack. Check the carrots at this point to see whether they are tender and if not cook for further 5 minutes. 5. Serve with rice and salad.
LLOYD ELECTRIC & ENGINEERING LIMITED 159, Okhla Industrial Estate Phase-III, New Delhi – 110020 Correspondence Address Plot-2, Industrial Area, Kalkaji, New Delhi – 110019 Email: perfectservice@lloydmail.com Customer Care Toll Free No.