
Installation Instructions


INSTALLATION OF THE OUTDOOR UNIT
1
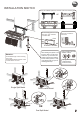
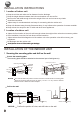
Wiring
1 Remove the self-tapping screws (2 pcs)
onthe maintenance board and take out the
maintenance board.
Maintenance
board
Terminal board
Fix the cable wire
with anchor cable
Piping cover
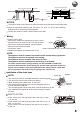
Please utilize outdoor pipe support when
the cable wire is led from the backside.
Outdoor pipe support
(Outdoor pipe support is not required
when leading the cable wire from other places).
The cable wire can be led from the back hole
of the piping hole or ejecting hole.
Maintenance
board
Piping cover
Ejecting hole
Right wiring
Back wiring
Sponge
Piping cover
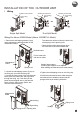
2 Loosen the self-tapping screws (2 pcs) on
the fixing clip to loosen the fixing clip.
5 Install the maintenance board. After the pipes
and cable wire are installed, please seal the
sponge block as per drawing indication.
3 Loosen the fixing screw of the wire terminal
board, pass the power wire and signal wire
through the fixing clip. Then firmly fix the
power wire and signal wire on the terminal
board with the fixing screw. (Earth wire
must be connected firmly.)
4 Tighten the self-tapping screw on the fixing clip.
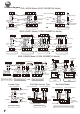
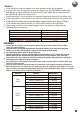
Wiring For Above 6000W Model (Above 21000BTU/h Model)
6
Single Split Model
Dual Split Model
Connecting
cable
Outdoor unit terminal
Connecting
cable
Outdoor unit terminal
Connecting
cable
Outdoor unit terminal
OR