
Instructions / Assembly


TOOLS REQUIRED (NOT INCLUDED):
Before doing assembly and installation please prepare the needed tools as below picture
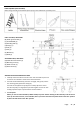
PARTS TYPE & QTY INCLUDING:
(B) Green ground screw (1)
(C) Threaded ball (2)
(F) Mounting plate (1)
(H)Canopy (1)
(I) Stud (9)
(J)Joint (3)
(K) Bracket (3)
(L) Metal (3)
ACCESSORIES & QTY ENCLOSED:
(A)Plastic Wire Connectors (3)
(D) Mounting screw (2)
(E) Plastic anchor (2)
(G) Wood screw (2)
ASSEMBLY & INSTALLATION INSTRUCTIONS:
1. Carefully remove the fixture from the carton and check that all parts and
accessories are included as shown in the above illustration
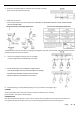
2. Unscrew the threaded balls (C) from the canopy(H) ,then gently remove
the mounting plate (F)from the canopy (H) .
Unscrew the stud (I)from the joint(J) then carefully adjust the rod till
the holes of joint(J) are aligned,then put them together and secure with
studs(I),repeat the steps to proceed other shade assemblies.
3. Turn off power
Before you start to make installation, NEVER attempt any work without shutting off the electricity until the work is
done. A). Go to the main fuse, or circuit breaker, box in your home. Place the main power switch in the “OFF” position.
B). Place the wall switch in the “OFF” position.
Page: - 2 - / 3