
Installation Guide

+1 850 296 2377 Working hours : Mon - Fri 9:00 a.m. - 16:00 p.m. EST support@ihomeangel.com
www.ihomeangel.com Page: - 3 - / 4
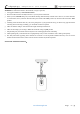
4. Unscrew the ball knobs (F) from canopy (E), then gently remove the mounting plate (A)
5. Carefully pass the wires from outlet box through the mounting plate (A) .
Then attach the mounting plate (A)to outlet box with the mounting screws (D)
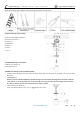
6. Make wire connections
Connect wires as below wires connecting shown. TAKE NOTE OF YOUR COLOR OF FIXTURE ,NEVER CONNECT
WIRES TO GROUND WIRES
Connect ground wire according to below chart Connect wires according to below chart
Twist plastic wire connector (C) until wires are tightly joined together,then carefully stuff all wires into the outlet box
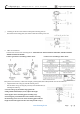
7. Align the holes in the canopy (E) with the mounting screws,
then attach the canopy (E) using the previously removed ball knobs (E).
Hand tighten until snug.
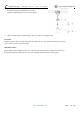
Note: The canopy (E) should be snug against the
ceiling and the knob balls(F). If not, adjust the length
of the nipples on the mounting plate assembly (A) by
unscrewing the preassembled hex nuts and then screwing
the mounting screws in or out of the mounting plate until the
length is achieved. Tighten the hex nuts and proceed to step 7