support@ihomeangel.
support@ihomeangel.com CONTENTS IMPORTANT SAFETY NOTES 1. Precaution 3 2. Notes for Using Product 4 3. Cautions for Using Product 4 LEARN ABOUT YOUR OVEN 4. Product Parts Diagram 5 5. Control Panel and Operation Guide 6 6. Display Screen Instructions 7 START TO TRY YOUR OVEN 7. Operation Instructions 10 8. Cooking Reference Guide 13 9. Other Modes 14 MAINTAIN YOUR OVEN PROPERLY 10. Cleaning and Maintenance 14 11. Accessories & Technical Specification 14 12. Circuit Schematics 15 13.
support@ihomeangel.com IMPORTANT SAFETY NOTES Warnings PLEASE READ THIS MANUAL CAREFULLY BEFORE USE. This product is specially designed for household heating and cooking food. DO NOT use your oven for anything other than its intended purpose. DO NOT use outdoors or for commercial purposes. 1. Precaution Electric Shock • To avoid electric shock, NEVER let water or any liquid enter this appliance.
support@ihomeangel.com 2. Notes for Using Product Check the Voltage To Avoid Burn • Before the power- on of this appliance, please check whether the voltage marked on the appliance matches the local power supply voltage. • The product may fail to work properly under too low or unstable voltage. Please unplug the power plug, then use it after the voltage stabilizes. • Please put the oven on a heat- resistant and horizontal table and then use it.
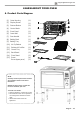
support@ihomeangel.com LEARN ABOUT YOUR OVEN 4.
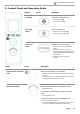
support@ihomeangel.com 5. Control Panel and Operation Guide | Buttons | Knobs | Icons | Description Fan Button When fan is enabled and off: Oven Light Button When oven light is off: Start/Pause Button When the oven is not working: | Icons Press once, fan ON. Press again, fan OFF. Press once, oven light ON. Press again, oven light OFF. • Press once, the selected mode starts. • Press again, all the activated features pause, temperature/slices and time/darkness are adjustable at this time.
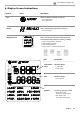
support@ihomeangel.com 6. Display Screen Instructions | Features Fan | Icons | Description When fan feature activated, you will see: Fan icon spinning. Text is always on. Preheat When preheat feature activated, you will see: Heating Element When heating element feature activated, this icon shows which heating element is working, including: This icon flashes.
support@ihomeangel.com | Mode Air Fry | Features and Heating Step 1: Step 2: 3 Heating Elements +Fan | Default Info Temperature Time Fan Wattage | Adjustable Range 400°F 18 mins on Max. 1780W Min.
support@ihomeangel.
support@ihomeangel.com START TO TRY YOUR OVEN 7. Operation Instructions Step A Put the prepared food inside your oven properly » Choose the desired position for cooking accessories: NOTE: Before starting the oven, ALWAYS keep the crumb tray below the lower heating elements to collect the grease and liquid released from the food during cooking. » To Use Basket, Rack and Pan: › First, check that the crumb tray is below the heating elements.
support@ihomeangel.com » To Install Rotisserie Fork Set: STEP 1 › Insert the longer end of Rotisserie Fork Set into the left Rotisserie Slot. STEP 2 › Slide the shorter end of Rotisserie Fork Set into the right Rotisserie Slot. Step B Plug the power cord into the outlet First time powered on, the oven enters the standby mode, and you will find: › The oven buzzer rings once. › The digital screen displays fully for 4 seconds, and enters the standby mode interface. › The screen turns blue.
support@ihomeangel.com Step D To adjust the selected mode Example 1 Example 2 First, enter Air Fry mode, and you will find: First, enter Toast mode, and you will find: › The Air Fry icon flashes. › The Toast icon flashes. › The screen displays default info: 400°F, 18 mins. › The screen displays default info: 4 slices, 5 min 55 secs. NOTE: Except Toast and Bagel mode, other modes can also refer to example 1. » Adjust the cooking temperature NOTE: Bagel mode can also refer to example 2.
support@ihomeangel.com Turn off the display screen: TIPS: Before working: To return to the main menu • Rotate the mode selection knob clockwise or counterclockwise. During working: To cancel the selected mode: • Press the mode selection knob once. • Press the mode selection knob and hold for 3 seconds. To adjust the temperature/darkness and time again: • Press the start/pause button again. • Then rotate and press Temp/ Time/Slices/Darkness knob to adjust. 8.
support@ihomeangel.com 9. Other Modes: Sleep Mode › Before starting the oven, press the mode selection knob and hold and the digital screen will enter sleep mode. for 3 seconds, › To unlock sleep mode, rotate the mode selection knob in any direction or press once. MAINTAIN YOUR OVEN PROPERLY 10.
support@ihomeangel.com 12. Circuit Schematics 13. Troubleshooting Guide | Problems | Possible Causes | Solutions The digital screen displays E:01 Sensor Circuit Problem Contact the after- sales department for maintenance Oven does not work 1. The oven is not plugged in or powered on. 2. Bad contact of outlet. 1. Plug the power cord into the outlet. Food is undercooked 1. Cooking time is too short. 2. Cooking food of different sizes. 3. Cooking temperature is too low. 1.