
User Manual


Quick Start Guide for LoadVUE-CG
1. Install LoadVUE-CG first. This will also install the drivers needed. (The drivers can also be
installed by downloading and running
http://www.ftdichip.com/Drivers/CDM/CDM20814_Setup.exe)
2. Connect all the four load cells to the computer’s USB port (using a hub if necessary).
3. This will add 4 USB Serial Port entries to the Device Manager, one for each load cell.
4. Run LoadVUE-CG by clicking on the LoadVUE–CG shortcut on the desktop.
5. LoadVUE-CG will scan the USB ports for connected load cells.
Note: A unique identifier is assigned to each load cell/interface unit. The software uses these
identifiers to locate the load cells correctly on each corner of the scale. (For example, if the
identifier begins with “BL…” then the load cell is assumed to be on the bottom left of the scale. If
the identifier begins with “TR…” then the load cell is assumed to be on the top right of the scale.)
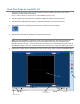
6. LoadVUE-CG main screen is then displayed. The various parts of this screen are identified below.
Toolbar
Total Load Unit
selection
Load cell identifier
CG coordinates
Serial Port Numbers
Load on each
corner of the scale
Total Load
CG
Location