
Instructions / Assembly


Installation & Assembly Instructions
Please contact our Customer Service Division with any questions at:
30700 D Carter Street ∙ Solon, OH 44139 ∙ (P) 440.248.5480 ∙ support@tritonproducts.com
For a full line of products visit www.tritonproducts.com 1
Read all instructions completely before installing. Should you have any questions about your installation, please call
Customer Service at 440-248-5480
Tools Needed
#12 Metric Socket or adjustable wrench, #4 Metric Allen Type Key Wrench
Inventory and inspect all components before starting assembly
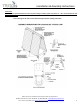
Tool Cart Parts Inventory
(1) Aluminum Bottom Tray
(1) Top Rail with ends bent upwards
(1) Cart Handle
(2) 3” Fixed Casters
(2) 3” Swivel Casters
(4) LocBoard Steel Pegboard w/ square holes 18” X 36”
(16) 5/16”"-20 X 3/4” Hex Head Bolts (For Casters)
(16) 5/16" Cut Lock Washers. (For Casters)
(16) 5/16" Flat Washers (For Casters)
(18) 12-24X 3/4" Socket Head Cap Screws (For Attachment of LocBoards.)
Note: While attaching LocBoards, it’s important to remember not to fully tighten any socket head cap screws until system is fully
assembled. Freedom of movement allows for proper alignment of cap screws and preinstalled threaded fasteners.
Assembly: (Refer to Assembly Drawings attached)
1. Position the large bottom tray with the angled sides facing up.
2. Installation of LocBoard to bottom tray: Mounting holes for LocBoard are accessed through the square holes on their front.
Starting from the outside edge of the bottom tray with the square holes in the LocBoard facing you, align the two bottom round
mounting holes in the LocBoard flange with the 2 pre-installed nuts in bottom tray. Using an Allen wrench, insert (2) socket head
cap screws. (Make sure Cap Screws go in straight and turn without restriction. You may have to move board slightly to allow
screws to turn freely.) Tighten cap screws until head is just below surface of the board. Repeat for remaining LocBoards.
3. Installation of LocBoard to Top Tray. Please Note: One end of the Top Tray has 2 sets of holes on each side without preinstalled
fasteners. This is the end where the handle will be installed to the inside of the top tray along with Swivel Caster. Starting from
the opposite end of the top tray, align mounting holes in the top of the LocBoard with preinstalled nuts in the top tray. Using the
Allen wrench, insert (2) socket head cap screws. (Make sure Cap Screws go in straight and turn without restriction. Tighten until
cap screw heads are just below surface of the LocBoard. Repeat for LocBoard on the opposite side from the one just installed.
4. Installation of Handle. NOTE: There will be one extra pre-installed nut in the handle and one extra hole in the top tray that does
not align with a mounting hole in the LocBoard flange and will require a socket head cap screw be inserted through just the
square hole in the LocBoard. Align the outside slope of the handle with the inside of the top tray and slide in. Align the 2
preinstalled nuts in the handle with 2 holes in top tray and 1 mounting hole in the flange of remaining LocBoards. Using the Allen
wrench, insert (2) socket head cap screws through the last holes in the remaining 2 LocBoards that align with preinstalled fasteners
in the top tray. (Make sure Cap Screws go in straight and turn without restriction. Tighten until cap screw heads are just below
the surface. Repeat for other side.
5. Square up all LocBoards and completely tighten all 18 cap head screws
6. Installation of Casters: Note: Swivel casters will be installed on the end of tool cart with handle. With the tool cart on its side or
hanging over a workbench, align the 4 caster mounting plate holes with holes in bottom tray. Insert hex head bolts with cut lock
washer through top tray into mounting holes in caster. Install cut lock washers and hex head nuts and tighten. (Repeat for each
caster.)
LBC-18 - 36-3/4"L x 39-1/4"H x 21-1/4"W LocBoard® Tool Cart