
User's Manual
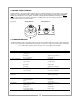


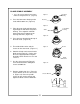


7. Using two 3/8” x 3/4" UNC threads Grade 8
capscrews, bolt the carrier wrench to the blade
carrier. (Wrench Kit 50026073) (Figure 5)
8. Put the spindle in the upright position and place
the blade carrier wrench in a vise and secure it.
(Figure 5)
THE CARRIER WRENCH AND SHEAVE
WRENCH REFERRED TO IN THESE IN-
STRUCTIONS ARE CONTAINED IN
WRENCH KIT 50026073.
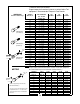
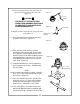
9. Place the sheave wrench on the sheave, align-
ing the two studs with the two holes in the
sheave. (Wrench Kit 5002073) THESE
THREADS ARE LEFT HANDED. TO LOOSEN,
TURN CLOCKWISE. Remove sheave. (Figure
6)
10. Remove spindle from vise and place the hous-
ing in a press with the blade carrier turned down.
Press the outer shaft, lower bearing and blade
carrier out.
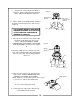
11. Place the outer shaft in a vise and remove the
blade carrier. THESE THREADS ARE LEFT
HANDED. TO LOOSEN, TURN CLOCK-
WISE. (Figure 7) You may have to heat shaft
to loosen; if so, remove inner bearing first.
12. Press the bearing off the shaft.
13. Using a punch on a flat surface, drive the top
outer bearing from the housing.
Figure 5
Blade Carrier
Wrench
3/8” x 3/4”
UNC Threads
Grade 8
Vise
Figure 6
Sheave
Wrench
Vise
Figure 7
Blade Carrier
20