
DL e72de394e97097c5e53e92f44ff9


1. For any combination style lock, it is a good idea to set the combination before installing the
safe. We recommend that the combination be set with the DOOR OPEN in order to test the
lock combination effectively without locking yourself out.
2. Clear out the contents of the center console for now
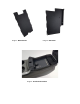
3. Place the BOTTOM PLATE at the bottom of the console compartment, making sure that the
half moon is facing the rear. (See images on back for plate descriptions)
4. Place each SIDE PLATE in the console compartment on top of the bottom plate, making sure
that the shorter end is facing towards the front and the lip is facing inward.
5. Place the TOP ASSEMBLY in the console compartment so that it sits on the tops of the lips
of the side brackets and so that the front is under the lip of the console (to do this, set the top
assembly in initially at a forward angle)
6. Using your 8mm fastening device, attach the top assembly to the side plates using the
LOCK’ER DOWN PROVIDED acorn nuts.
7. Tighten the side bolts on the safe using a T30 torques bit, DO NOT OVER TIGHTEN, THIS
COULD DAMAGE THE CONSOLE OR THE SAFE.
8. Re-insert the padding that was removed from the safe before installation.
9. Enjoy your purchase!
Tools Needed:
• IMPACT DRILL or SOCKET WRENCH
• T15 Torques Bit
• 8mm Socket bit
Contents Included: 4 Acorn Nuts.
2 Set Screws.
Security Products
INSTALLATION INSTRUCTIONS
LD2023
[2011 to 2019 Ford Explorer]