
DL 695d7bdd362da09d792418dbe9be

1. For any combination style lock, it is a good idea to set the combination before installing the
safe. We recommend that the combination be set with the DOOR OPEN in order to test the
lock combination effectively without locking yourself out.
2. Clear out the contents of the center console for now.
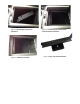
3. Set the LID ASSEMBLY diagonally into the console as shown in Figure 1 on the back.
a. Adjust the lid assembly while it is in the center console so that you can pull the lid
assembly against the top lip of the console compartment as shown in Figure 2 .
4. While holding the lid assembly against the top lip, place the 2 Side Brackets on each side of
the lid assembly, and secure them loosely with the LOCK’ER DOWN PROVIDED 13mm nuts.
(See Figure 3)
5. Place the 2 End Brackets into the front and rear end of the safe and secure loosely with the
LOCK’ER DOWN PROVIDED 13mm nuts (the large “L” bracket goes in the rear of the
console compartment, and the short 3” bracket attaches to the front section of the safe)
6. Place the X Bracket in the bottom of the console so that the factory holes in the X bracket line
up with the 4 PIM Studs located on the side brackets (two studs to each side bracket)
a. Apply the LOCK’E DOWN PROVIDED acorn nuts to the studs and secure using an
8mm socket wrench.
7. Re-insert the padding that was removed from the safe before installation.
8. Enjoy your purchase!
Tools Needed:
• IMPACT DRILL or SOCKET WRENCH
• 8mm Socket Bit
• 13mm Socket bit
Contents Included: 6 13mm Nuts.
4 Acorn Nuts.
Security Products
INSTALLATION INSTRUCTIONS
LD2026X/LD2026XEX
[Late Production Model 2012 ‐ 2014 Ford F150 with Full Floor Console and
Raptor Platinum]