
Instructions / Assembly


CAUTION: Do not keep the keys in the safe.
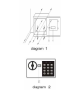
1. OPENING THE SAFE FOR THE FIRST TIME
To open the safe for the first time, remove the small central sticker on the front
panel that has a picture of a key on it (see “Z” in diagram 2 below). This will
reveal a keyhole underneath. Insert the key into the lock and turn it counter-
clockwise, at the same time, turn the doorknob clockwise and pull the safe door
open.
2. INSTALLING THE BATTERIES
The safe requires 4 size “AA”(1.5V) batteries. The battery compartment (see
diagram 1) is located on the back of the door. Remove the battery cover and
install the batteries into the compartment, ensuring the batteries are fitted with
the correct corresponding polarity. Once the batteries are installed, close the
battery compartment.
3. PROGRAMMING THE CODE
A. Press the red button “X” (see diagram 1) on the back of the door near the
hinge, release it and you will hear two beeps.
B. Now enter a code (3 to 8 digits) that you wish to use as a combination, and
confirm by pressing the “B” button within 15 seconds. If you wait too long before
pressing the “B” button you will need to start over.
C. Write down your new combination immediately and test your new
combination to ensure that it has been programmed.
4. INSTALLING YOUR SAFE
A. To install your safe in an existing wall, select the location on the wall where
you want to mount the safe. In the selected space, locate the studs between
which the safe will be mounted. The studs have to be 16" on center and have a
minimum of 14 1/4" open space between them for this safe to fit easily.
B. Draw a line with a pencil between the studs marking where you want the
bottom of the safe and drill a hole a little above this line (the hole will create a
space where you can insert your saw).
www.LockState.com
OPERATING INSTRUCTION for LockState Safe LS-52-EN
Thank you for purchasing the Lockstate LS-52-EN wall safe. This safe will retrofit
easily between existing standard wall studs. This easy quick-start guide will help
you through the installation and programming process.