
Use and Care Manual
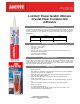

Loctite® Power Grab® Ultimate
Crystal Clear Construction Adhesive
Page 3 of 4
Revision: November 23, 2220
Supersedes: September 2, 2020
Ref. #: 638831, 638835
Tools Typically Required:
Utility knife, caulking gun, tool to puncture cartridge seal, plant mister bottle containing water (if bonding two non-porous surfaces).
Safety Precautions:
Wear gloves to avoid skin contact and wash hands after use.
Preparation:
For best results use above 41°F (5°C). For easier application, ensure the product temperature is 60°F (15°C) or higher but below 90°F (32°C).
Surfaces must be clean and free of frost, standing water, grease, oil, dust, release agents, and other contaminants. Wet surfaces are possible
if they have the possibility to dry. Pre-fit all materials and protect finished surfaces.
Cartridge: Remove nozzle and cut nub on cartridge. Screw on nozzle and cut at a 45° angle to required opening, at least ¼ inch or wider.
Squeeze Tube: Remove cap and puncture inner seal.
Be very careful not to allow Loctite® Power Grab® Ultimate Crystal Clear to cure on a finished surface (removal may not be possible without
surface damage).
• Do Not use building materials that are warped or show evidence of warping. These materials will experience bonding difficulties.
General Application Guidelines:
Apply adhesive to one surface of the materials being bonded. Press the surfaces firmly together within 10 minutes. Materials may be
repositioned within 5-10 minutes after applying the adhesive. If bonding two non-porous surfaces (such as foam, metal and fiberglass) or under
very dry conditions (less than 30% relative humidity), add water in the form of a very light or atomized spray from a plant mister bottle to the
extruded adhesive. The repositioning time will then be reduced to less than 5 minutes. Use mechanical support or temporary bracing for 24-
48 hours depending upon project requirements while the adhesive cures. Cure time is dependent upon temperature, humidity, porosity of
substrate and amount of adhesive used. Low temperature and humidity will slow cure time. When bonding EPS and XPS foam insulation, avoid
cure and surface temperatures above 90°F (32°C).
Application Tips:
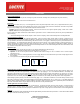
1. For small, relatively smooth and level surfaces, use straight, parallel beads of adhesive (Fig.1).
2. For large areas a parallel serpentine beads work best placed 6-8” O.C. (Fig.2).
• Important: In case of two non-porous surfaces, adhesive beads must not merge or form a continuous area as contact requires
air/moisture to cure.
3. When using in exterior or outdoor applications, it is best to apply adhesive in vertical beads from top to bottom to help support vertical
load conditions.
4. For rough and uneven surfaces using the spot method works best (Fig.3)
Bonding Drywall, Vinyl Board, or Paneling to wall surfaces:
For bonding to relatively smooth and level surfaces apply adhesive as a series of vertical beads 10 inches apart (perimeter gluing is not
recommended). Start the beads approximately 1 inch from the panel edge applying ¼” to ⅜” round beads of adhesive. Immediately after
applying the adhesive place the foam against the substrate and press firmly into place to flatten out the adhesive. Be careful not to over press.
Mechanical fasteners or temporary bracing must be used and kept in place until the adhesive is fully cured depending upon the project
requirements. Cure time will vary depending on the porosity of the material used, the humidity and the temperature at time of application.
When bonding drywall or paneling to wood/metal stud framing, apply ¼” to ⅜” round bead of adhesive to each stud starting 3 inches from top
and ending 3 inches from bottom. All drywall applications require perimeter nailing/screws 16” O.C. and 24” O.C. in the field following the
Adhesive Nail-On Attachment Method for gypsum wallboard. Temporary support or bracing is required for prefinished panels until adhesive is
fully cured. Mechanical fasteners may be required at the top and bottom of each prefinished panel.
Drywall application over foam insulation:
Apply not less than ¼” round beads of adhesive as outlined above. Position drywall, align and press firmly into place. Perimeter fasten to
underlying studs or strapping around entire perimeter. It is recommended to brace the center or field of the panels for at least 24 hours.
Mechanical fasteners must be used and kept in place until adhesive is fully cured. Furring strips are recommended for concrete wall applications.
Clean-up:
Clean tools and adhesive residue immediately with mineral spirits following solvent manufacturers precautions. Loctite® Power Grab® Ultimate
can only be removed mechanically once cured.
Fig 1.
Fig. 2
Fig 3.
DIRECTIONS