
Installation Guide


17
12
TIME SERVER CONNECTION STATUS
After the console has connected to the internet, it will
attempt to connect to the internet time server to obtain
the UTC time. Once the connection succeeds and the
console's time has been updated, the “
” icon will
appear on the LCD.
The time will automatically synchronize Internet time server at 12:00AM and 12:00PM per day.
Also you can press the [REFRESH ] key to get the internet time manually within 1 minute.
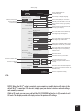
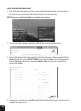
ADVANCE SETTING IN WEB INTERFACE
Press "ADVANCED" key at the top of web interface to enter the advance setting page, this
page allow you to set and view the calibration data of the console, as well as update the
rmware version on PC web browser.
Upload
Browse
Firmware version: 1.00
-560~ 560hpa / -16.54 ~ 16.54inHg / -420 ~ 420mmHg
Setting Range:
Temperature
o
C
Outdoor
Indoor
CH 1
CH 2
CH 3
CH 4
CH 5
CH 6
CH 7
Humidity %
Relative Pressure Offset:
Absolute Pressure Offset:
hpa
Range: -20 ~ 20
(Default: 0.0)
Current offset: 10Current offset: -9
Current offset: -5Current offset: 2
Current offset: -2Current offset: 3
Current offset: -2Current offset: 1.2
Current offset: -5Current offset: -0.2
Current offset: -3Current offset: -20.1
Current offset: -10Current offset: 11.5
Current offset: -3
Current offset: -3
(Default: 0)
Current offset: 10
(Default: 0)
Current offset: 0.2
Current offset: -5Current offset: 1
Pressure
Range: -20.0 ~ 20.0
o
C
-36.0 ~ 36.0
o
F (Default: 0.0)
*UV gain:
Range: 0.01 ~ 10(Default: 1.00)
Current gain: 1.1
*Light gain:
Range: 0.01 ~ 10(Default: 1.00)
Current gain: 1.1
* Depends on the model
*Wind speed gain:
*Wind direction:
*Rain gain:
Range: 0.5 ~ 1.5(Default: 1.00)
Range: -10 ~ 10(Default: 0
o
)
Range: 0.5 ~ 1.5(Default: 1.00)
Current gain: 0.85
Current offset: 2
o
Current gain: 0.75
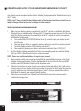
SETUP ADVANCED
Select setting unit
Press "SETUP" icon to
Setup page
Outdoor and Ch 1~7
temperature calibration
section
Pressure calibration
section
version
function only available
in PC web browser
ADVAN
C
ED page
Select setting unit
The rain, wind speed, UV and Light
calibration use gain method. The
wind direction is +/- 10 offset.
Outdoor and Ch 1~7 humidity
calibration section
Current offset value is the value
that you set before to offset the
pressure reading.
SETTINGS
CALIBRATION
1. User can input the offset and/or gain values for different parameters while current offset and
gain values are shown next to their corresponding blank.
2. Once completed, press
Apply
at the bottom of the SETUP page
The current offset value will show the previous value that you entered, please input the new
value in the blank if any changes needed, the new value will effective once you press
Apply
icon in SETUP page.
CALIBRATION
1. You may enter or change the oset and gain values for dierent measurement parameters,
while viewing the current oset and gain values next to the corresponding boxes.
2. Once you have completed your calibrations, press the button on the SETUP tab.
3. The current oset value will update to show the value that you entered (instead of the default
value). If you want to change the value, you can enter a new value in the box beside the number
(as in step 1). To update the value, again, press in the SETUP tab.
NOTE: We do not recommend calibration of most values with the exception of Relative
Pressure, which must be correctly calibrated to reect your distance above sea level to
account for altitude eects.
6
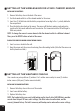
1. Remove the battery door of the console.
2. Insert 3 new AAA batteries as per the polarity indicated,
3. Replace the battery door.
BUILT-IN MEMORY
The console has built-in FLASH memory that holds the vital settings. These include:
- Time Zone, DST status, Time SYNC status, WI-FI and Weather server setting, Latitude /
Longitude, Hemisphere setting, Calibration values, and Sensor ID of paired sensor(s)
RESET AND FACTORY HARD RESET
To reset the console and start again, press the [ RESET ] key once. To hard reset the
console and resume factory settings, press and hold the [ RESET ] key for 6 seconds
RESYNCHRONIZE SENSORS
Press the [ SENSOR / WI-FI ] key once for the console to enter sensor Synchronization mode,
and the console will re-register all the sensors that have already been registered to it before.
i.e. the console will not lose the connection of the sensors that you’d paired up before.
CHANGING BATTERIES AND MANUAL PAIRING OF SENSOR
Whenever you changed the batteries of the wireless indoor or 7-in-1 weather sensor, re-
synchronization must be done manually.
1. Change all the batteries to new ones in the sensor.
2. Press [ SENSOR / WI-FI ] key on the console to enter sensor synchronization mode.
3. Press [ RESET ] key on the wireless indoor or 7-in-1 weather sensor.
SYNCHRONIZING ADDITIONAL WIRELESS SENSOR(S) (OPTIONAL)
The console can support up to 7 additional wireless sensors.
1. Press the [ SENSOR / WI-FI ] key once on the console to enter synchronization mode.
2. Press the [ RESET ] key on the new sensor, and wait for a few minutes for the new sensor
to paired to the console.
NOTE:
- Channel number of the indoor sensor must not be duplicated among the sensors. Please refer
to “INSTALL WIRELESS INDOOR SENSOR” for details
- This console can support different type of additional wireless sensor, e.g. soil moisture and
pool sensor. If you would like to pair up additional sensors, please check with your retailer for
more detail.
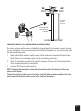
POINTING THE WIRELESS 7-IN-1 SENSOR TO SOUTH
The outdoor 7-IN-1 sensor is calibrated to point to North for the maximum accuracy. However,
for the user's convenience (e.g. users in the Southern hemisphere), it is possible to use the
sensor with the wind vane pointing to South.
1. Install the 7-IN-1 wireless sensor with its wind meter end pointing to South. (Please refer to
INSTALLATION OF THE WIRELESS SENSOR section for mounting details)
2. Select "S' in hemisphere section of the setup UI setup page. (Please refer to SETUP THE
WEATHER SERVER CONNECTION section for setup details)
3. Press
Apply
icon to conrm and exit.
NOTE:
Changing the hemisphere setting will automatically switch the direction of the moon phase on
the display.
6
1. Remove the battery door of the console.
2. Insert 3 new AAA batteries as per the polarity indicated,
3. Replace the battery door.
BUILT-IN MEMORY
The console has built-in FLASH memory that holds the vital settings. These include:
- Time Zone, DST status, Time SYNC status, WI-FI and Weather server setting, Latitude /
Longitude, Hemisphere setting, Calibration values, and Sensor ID of paired sensor(s)
RESET AND FACTORY HARD RESET
To reset the console and start again, press the [ RESET ] key once. To hard reset the
console and resume factory settings, press and hold the [ RESET ] key for 6 seconds
RESYNCHRONIZE SENSORS
Press the [ SENSOR / WI-FI ] key once for the console to enter sensor Synchronization mode,
and the console will re-register all the sensors that have already been registered to it before.
i.e. the console will not lose the connection of the sensors that you’d paired up before.
CHANGING BATTERIES AND MANUAL PAIRING OF SENSOR
Whenever you changed the batteries of the wireless indoor or 7-in-1 weather sensor, re-
synchronization must be done manually.
1. Change all the batteries to new ones in the sensor.
2. Press [ SENSOR / WI-FI ] key on the console to enter sensor synchronization mode.
3. Press [ RESET ] key on the wireless indoor or 7-in-1 weather sensor.
SYNCHRONIZING ADDITIONAL WIRELESS SENSOR(S) (OPTIONAL)
The console can support up to 7 additional wireless sensors.
1. Press the [ SENSOR / WI-FI ] key once on the console to enter synchronization mode.
2. Press the [ RESET ] key on the new sensor, and wait for a few minutes for the new sensor
to paired to the console.
NOTE:
- Channel number of the indoor sensor must not be duplicated among the sensors. Please refer
to “INSTALL WIRELESS INDOOR SENSOR” for details
- This console can support different type of additional wireless sensor, e.g. soil moisture and
pool sensor. If you would like to pair up additional sensors, please check with your retailer for
more detail.
POINTING THE WIRELESS 7-IN-1 SENSOR TO SOUTH
The outdoor 7-IN-1 sensor is calibrated to point to North for the maximum accuracy. However,
for the user's convenience (e.g. users in the Southern hemisphere), it is possible to use the
sensor with the wind vane pointing to South.
1. Install the 7-IN-1 wireless sensor with its wind meter end pointing to South. (Please refer to
INSTALLATION OF THE WIRELESS SENSOR section for mounting details)
2. Select "S' in hemisphere section of the setup UI setup page. (Please refer to SETUP THE
WEATHER SERVER CONNECTION section for setup details)
3. Press
Apply
icon to conrm and exit.
NOTE:
Changing the hemisphere setting will automatically switch the direction of the moon phase on
the display.