
User's Guide
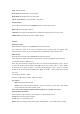
Table Of Contents
- Universe User Guide
- Thank you for choosing this Spreadtrum Platformpho
- Safety
- Contents
- Introduction
- Insert SIM card and battery
- Insert memory card
- Warning:
- Please don’t insert or remove the memory card quic
- Battery charging
- The phone battery may be charged with travel charg
- Note:
- Power on and off
- Power on
- Warning:
- Please don’t turn on this phone where it is prohib
- Call
- Making an overseas call.
- Dialing via Contacts
- Calling an extension number
- Making an emergency phone
- Answer or reject incoming calls
- Menu during a call
- Adjust volume:You can volume the receiver by side
- End a call
- Press “Hang up” to end a call.
- Call logs
- Show the phone numbers missed recently
- Commonly Used Functions
- More Functions
- Contacts
- Browsing contacts
- Quick search
- New contact
- Note: Name may be empty, but phone number shall no
- Function Menu of Contacts
- Multimedia
- Camera
- Browse Shooted Photos or Videos
- DV
- Image
- Audio
- Play songs:
- List
- Create New List
- Video
- Play:
- Open: Open local browse, local list.
- FM Radio
- Search Broadcast Channel
- Background Play
- Record
- Sound Recorder
- My file
- Copy Files
- New Folders
- Message
- Write message
- SMS/MMS
- Inbox
- Save the received SMS/MMS.
- Outbox
- Draftbox
- Sendbox
- Voice mail server
- Application
- Alarrm
- New Alarm
- Calendar
- Add new schedule
- View schedules
- 2. Select [All agenda], and check all the records
- World clock
- Calculator
- Memo
- Memo refers to any kind of help menory,simple even
- Cheat or retain use informal record in the future
- E-book
- Bluetooth
- Start Bluetooth Wireless Function
- Search Other Started Bluetooth Devices and Pair
- Send Dtata by Bluetooth Wireless Function
- Receive Data by Bluetooth Wireless Function
- Torch Light
- Internet
- Note:
- Internet is an application platform integrating wi
- Browser
- Current Page:
- Settings
- Settings
- Call settings
- Call Divert:
- Call Waiting:
- Call Barring:
- Phone Settings
- Display Settings:
- Security settings
- Warning
- Connection
- Profile
- Additional Function
- U Disk Function
- U disk is used as follows:
- Maintenance of Mobile Phone
- Safety Information
- Usage Environment
- Medical Equipments
- Pace Maker
- Staff wearing pace maker:
- Hearing Aids
- Emergency Call
- Dial emergency call
- Password Access
- Power-on Password
- PIN Code
- PIN2 Code
- PUK Code
- PUK2 Code
- Attentions on Charging of Battery
- Attentions on Use of Battery
- Attention on Use of Accessories
Introduction
Insert SIM card and battery
Long press power supply key for 3s to turn it off;
Slide the back cover downwards and remove it;
Remove the battery. Insert SIM1 (per the mark “SIM” on the card slot. The contactor shall face
down (note the notch on the SIM card is in line with the slot). Push the SIM card inwards from the
card slot until it absolutely fits the slot. Insert the battery with metallic contact aligned to the
phone battery contact and replace the back cover.
Note:
1. This User Guide is designed for both SIM cards inserted by selecting [Settings→Call
Settings→Dual-SIM→Standby mode→Dual SIM dual standby]. If only one card is inserted
or no Dual SIM dual standby is set up, the screen and options may differ from this manual.
Insert memory card
This phone supports the T-Flash memory card. After it is inserted, you can browse or copy, etc. the
files stored in the memory card. Also, the disk space of this phone can be expanded.
Remove the back cover and battery and turn over the cover of the memory card in the
direction as shown thereon;
Let the side of the memory card bearing metallic contact face down, insert the narrower end
into the slot until absolutely fitted by it, and replace the back cover
Warning:
Please don’t insert or remove the memory card quickly or frequently to avoid damage
Battery charging
The phone battery may be charged with travel charger
Insert the battery in the phone correctly;
Open the rubber cover on the left side of this device below the screen,,let the charger arrow
towards the screen, insert the charger plug into the screen, and connect the charger to the
standard power supply socket.