PORTABLE DVD PLAYER User Guide LPD850 Playable Format: DVD/DVD R/DVD RW/Audio CD/MP3/Kodak Picture CD/JPEG Picture CD 82-227-00140
Contents Usage and Safety Information ............ 3 Safety Warnings ............................. 6 Product Overview ...............................6 Remote Control............................7 Battery Pack.................................9 Connection...........................................10 Pausing Playback ............................... 16 Basic DVD Playback ................................... 13 Stopping Playback ....................................
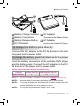
Usage and Safety Information This product incorporates copyright protection technology that is protected by method claims of certain U.S. patents and other intellectual property rights owned by Macrovision Corporation and other rights owners. Use of this copyright protection technology must be authorized by Macrovision Corporation, and is intended for home and other limited viewing uses only unless otherwise authorized by Macrovision Corporation. Reverse engineering or disassembly is prohibited.
Safety Warnings Follow Instructions - All operating and maintenance instructions should be followed and warnings adhered to. Screen Burn - ATTENTION! Please note that some programmes are broadcast with a logo that will appear in the corner of your TV screen. Some of these logo’s can be very bright and may cause damage by permanently marking the logo on the screen. To prevent this, avoid leaving channels displaying a logo for a prolonged periods of time, particularly when the TV is not being watched.
Safety Warnings - continued d) e) f) If the product does not operate normally even if you follow the operating instructions. Adjust only those controls that are covered by the operating instructions. Improper adjustment of other controls may result in damage and will often require extensive work by a qualified technician to restore the product to its normal operating condition. If the product has been dropped or the cabinet has been damaged. When the product exhibits a distinct change in performance.
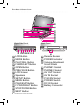
Product Overview 1 7 8 1 2 3 4 5 6 Right Side Panel 17 1 2 3 4 5 6 7 8 9 10 11 12 13 14 6 9 10 11 12 13 14 15 16 Back Panel 18 19 20 21 22 23 LCD Button MODE Button PLAY/SEL. Button F.BWD/LEFT Button OPEN Button PREVIOUS Button LCD Screen Speakers SETUP Button MENU Button PAUSE/UP Button F.
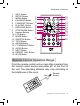
Remote Control 1 2 3 4 5 6 7 8 9 10 11 12 13 14 15 16 17 18 19 INFO. Button SETUP Button 1 MENU Button 2 PAUSE/UP Button F.BWD/LEFT Button 3 PLAY/SEL. Button 4 5 PREVIOUS Button STOP/DOWN Button 6 7 Number Buttons 8 LCD Button MODE Button 9 SUBTITLE Button TITLE Button ANGLE Button F.
Remote Control - continued Battery Installation for the Remote Control Pull CR2025 2 + Insert the battery and match the (+) and (-) on battery to the marks inside the battery compartment. Remember to remove the insulating mylar strip from the battery if the battery is first-time used. 1 Push • • • 8 Note: The battery in the Remote Control normally lasts for about one year, although this depends on how often and for what operations the Remote Control is used.
Battery Pack 1 3 4 7 2 6 5 1 2 3 4 Battery Charge Indicator 5 AC Adapter (Connect to the Battery Pack) Battery Connectors Battery Release Button 6 AC Adapter DC IN Socket (Connect to the Portable DVD Player) To charge the battery pack directly Connect the AC adapter to the DC IN Socket on the battery pack and to power outlet. To charge the battery pack that attached to the player Joint the battery connectors of the portable DVD player and the battery pack.
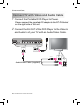
Connection Connect TV with Video and Audio Cable 1 Connect the Portable DVD Player to Power. Please connect the supplied AC adapter to the DC IN Socket on the right side of the unit. 2 Connect the AV OUT of the DVD Player to the Video In and Audio In of your TV with an Audio/Video Cable.
Connection - continued Connect TV with Component and Audio Cable 1 Connect the Portable DVD Player to Power. Please connect the supplied AC adapter to the DC IN Socket on the right side of the unit. 2 3 4 Connect the P-SCAN Out of the DVD Player to the Pr Y Pb In of your TV with a Component Cable. Connect the AV Out of the DVD Player to the Audio In of your TV with an Audio/Video Cable. Select P-SCAN mode in the OSD Setup Menu or press Mode on the remote control to switch to P-SCAN mode.
Connection - continued Input From External Equipment 1 Connect the Portable DVD Player to Power. Please connect the supplied AC adapter to the DC IN Socket on the right side of the unit. 2 Connect the Video/Audio In of the DVD Player to the Video/Audio Out of external devices.
DVD Playback Basic DVD Playback 1 2 3 • • 4 • Frame Advance (Step) Turn on the player. Press OPEN to 1 open the disc cover. • Hold the edge of the disc to put it in the disc tray with the printed side up. 2 Press Pause to pause playback. The disc is advanced by one frame each time pressing Pause. To return to normal playback, press Play/Sel.. Close disc cover. Close the disc cover and the portable DVD player starts playback if the disc does not have any menus recorded on it.
DVD Playback - continued Repeat Viewing During playback, press 1/All Repeat repeatedly to select the following options: REPEAT:[CHAPTER] : Repeat Chapter REPEAT: [ TITLE ] : Repeat Title REPEAT: [ OFF ] : Repeat Off Viewing from Different Angles 1 2 • Displaying Scene Information 1 • 2 Press To stop displaying scene information, press Info. a number of times until the information disappears. Press Angle during playback. Press Angle a number of times until the preferred viewing angle is selected.
Audio/MP3 CD Playback Basic Audio CDs Playback [ I TA L I A N OP E R A ] 0 8 – – – – – – . • 1 • • Note: If the disc is placed incorrectly, damaged, or in unknown format , the screen will appear “UNKNOWN DISC”. If no disc is placed in the tray, the screen will appear “NO DISC”. 01. CITY JAZZ 02. CLASSICAL 03. MOVIE OST 04. ITALIAN OPERA 05. MUSICAL 06. US POP 07. UK POP 08. HEAVY METAL 09. SONATA 10. RAP 01. 02. 03. 04. 05. 06. 07. 08. 09. 10.
Kodak and JPEG Picture CDs Playback Basic Picture CDs Playback 1 • • 2 For Kodak Picture CDs, the DVD player starts slide show playback. For picture CDs with a menu screen, the menu appears after a few seconds. Press Left to enter the folder list on the left screen. Press Up / Down to highlight a folder and then press Play/Sel.. 01. JAPAN 02. CANADA 03. FRANCE 04. BRAZIL 05. EGYPT 001. 002. 003. 004. 005. 006. 007. 008. 009. 010. 001 002 003 004 005 006 007 008 009 010 001. 002. 003. 004. 005. 006.
MPEG-4 Playback Basic MPEG-4 Playback 1 Load a disc containing MPEG-4 files. A menu appears on the screen. 2 Press Left to enter the folder list Up / on the left screen. Press Down to highlight a folder and then press Play/Sel.. [ F il e N a m e - 1 ] 0 0 1 – – – – – – . 01. File Name-1 02. File Name-2 03. File Name-3 04. File Name-4 05. File Name-5 06. File Name-6 07. File Name-7 08. File Name-8 09. File Name-9 10. File Name-10 3 001. 002. 003. 004. 005. 006. 007. 008. 009. 010.
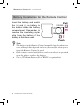
OSD Setup Language Setup 1 2 Press Subtitle Language Setup in stop mode. LANGUAGE SETUP Press Left / Right to select LANGUAGE SETUP icon. OSD AUDIO SUBTITLE MENU LANGUAGE SETUP OSD AUDIO SUBTITLE MENU CHINESE ENGLISH JAPANESE FRENCH SPANISH PORTUGUESE GERMAN OFF Menu Language LANGUAGE SETUP 3 OSD AUDIO SUBTITLE MENU Press Up / Down to select an option and then press Right.
OSD Setup - continued Video Setup 1 2 Press Setup in stop mode. a b Press Left / Right to select VIDEO SETUP icon. - To leave SETUP MENU, press VIDEO SETUP VIDEO OUTPUT TV TYPE TV SYSTEM • • Video Output 3 Press Up / Down to select VIDEO OUTPUT and then press Right. If your TV supports P-Scan feature, select “OK” and press Play/Sel.. If your TV does not support P-Scan feature, select “NO” and press Play/Sel.. Setup.
OSD Setup - continued b 4:3 Letter Box : Select “4:3 Letter Box” for a conventional size TV set. Black bands appear at top and bottom of screen (letter-box style). Screen Saver 3 Press Up / Down to select SCREEN SAVER and then press Right. SYSTEM SETUP SCREEN SAVER PARENTAL PASSWORD ANGLE MARK DEFAULT c ON OFF : Select “16:9 Wide” for a wide-screen TV set to played in “FULL” size. 16:9 Wide 4 Press Up / Down to select a preferred option and then press Play/Sel..
OSD Setup - continued 4 • Enter 4-digit password and press Play/Sel.. Enter factory pre-set password “0000” for the first time setup. Password 3 SYSTEM SETUP SCREEN SAVER PARENTAL PASSWORD ANGLE MARK DEFAULT X X X X 5 SYSTEM SETUP 1.KID 2.G 3.PG 4.PG-13 5.PG-R 6.R 7.NC-17 8.ADULT SCREEN SAVER PARENTAL PASSWORD ANGLE MARK DEFAULT Press Up / Down to select a preferred rating and then press Play/Sel.. - To leave SETUP MENU, press Setup. Rating Explanations 1.
OSD Setup - continued • Note: Pressing Angle will change camera angles for movies that support this feature regardless of whether the ANGLE MARK feature is “On” or “Off”. Default 3 Press Up / DEFAULT. Down to select SYSTEM SETUP SCREEN SAVER PARENTAL PASSWORD ANGLE MARK DEFAULT 4 READ Press Right to select READ and then press Play/Sel.. - To leave SETUP MENU, press 22 PORTABLE DVD PLAYER USER GUIDE Setup.
LCD Setup Panel Setting Brightness Setting 1 Press LCD a number of times to select PANEL. 1 Press LCD a number of times to select BRIGHT. 2 Press Left / Right to choose a preferred panel setting. 2 Press Left / Right to choose a preferred brightness setting. BRIGHT: BRIGHT: BRIGHT: BRIGHT: BRIGHT: BRIGHT: BRIGHT: PANEL: <− NORMAL −> PANEL: <− 4:3 −> - Press LCD again until the LCD setting box disappears. Color Setting - Press 1 Press LCD a number of times to select COLOR.
Troubleshooting Before requesting service for the DVD Player, check the chart below for a possible cause of the problem you are experiencing. Some simple checkups or a minor adjustment on your part may eliminate the problem and restore proper operation. SYMPTOM (COMMON) REMEDY No power. The player does not start playback when PLAY is pressed. The player starts playback but stops immediately. No picture. No sound. Distorted sound. No audio at Digital Output. Distorted picture.
Disc Handling and Maintenance Handling Precautions • • • • • • • Hold the disc by the edges so the surface will not be soiled with fingerprints. (A) Fingerprints, dirt and scratches can cause skipping and distortion. Do not write on the label side with a ball-point pen or other writing utensils. (A) Do not use record cleaning sprays, benzine, thinner, static electricity prevention liquids or any other solvent. Be careful not to drop or bend the disc. Do not install more than 1 disc on the disc tray.
Specifications LPD850 Disk Format. DVD, VCD, CD, CD-R, CD CD-RW, MP3, Kodak Picture Video System PAL Video Decompression MPEG-4, MPEG-2, MPEG-1 Video Output 1.0 Vpp / 75Ω Sync , minus Aduio: Audio Characteristic 2-Channel Analog 5.1-Channel Digital Output Analog Output 2.0 V / 10KΩ Frequency Response DVD:48 KHz sampling : 4Hz ¡ª 22 KHz 96 KHz Sampling : 4Hz ¡ª 44 KHz CD : 4Hz ¡ª 20KHz S / N ratio < = - 65 dB Dynamic Range < = - 85 dB Speaker Stereo speakers, 0.
Visit Partmaster.co.uk today for the easiest way to buy electrical spares and accessories. With over 1 million spares and accessories in stock we can deliver direct to your door the very next day.Visit www.partmaster.co.uk or call 0870 6001 338 (UK customers only) Calls charged at National Rate.