Untitled DocumentSST Programming Software Contents Page 1 of 23 SST Programming Software Introduction Getting Started Simple Commands or Keystrokes Multiple Keystrokes/Combined Keystrokes Macros Advanced Commands Shift Modes Programming Hat/POV Switches Hat Programming Tricks Axis Programming (Rotaries, thumb wheels etc.
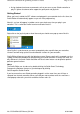
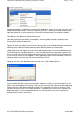
Untitled DocumentSST Programming Software Contents Page 2 of 23 Assign keyboard and mouse commands so that you can use your Saitek controller to play PC games that do not offer support for game pads and joysticks. Getting Started When you have installed the SST software and plugged in your controller for the first time, the Profile Editor will automatically appear so you can start programming. After this, an icon will appear in taskbar next to your clock every time you plug in your controller.
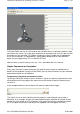
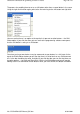
Untitled DocumentSST Programming Software Contents Page 3 of 23 The Profile Editor consists of a 3D model of your controller with a list of buttons down the right hand side of the screen. To assign game commands to the controls you must first press one of the buttons on your controller. This button will light up on the 3D model and the appropriate line in the list of buttons is highlighted by a slightly darker background to show you which button you are programming. This is called the 3D View.
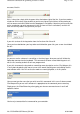
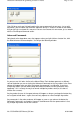
Untitled DocumentSST Programming Software Contents Page 4 of 23 onscreen; like this. If this is okay then simply click the green tick at the bottom right of the line. If you have made a mistake or wish to clear a keystroke that you have assigned, right click on the keystroke you wish to remove and click Delete from the drop down list of options.
Untitled DocumentSST Programming Software Contents file://Z:\WinXP64\SST Manual_EN.htm Page 5 of 23 03.04.
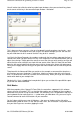
Untitled DocumentSST Programming Software Contents Page 6 of 23 Multiple keystrokes/Combined keystrokes You are not limited to single keystrokes when programming commands. You can input as many keys into one command as you like, or combined keys, such as Ctrl+F, for example. The process is the same as inputting single keystrokes – just press the keys you wish to program into the command. In the example below we have input a Ctrl+F command.
Untitled DocumentSST Programming Software Contents Page 7 of 23 Before proceeding, it’s important to examine this drop-down menu. As you can see, we have a number of possible choices. The first is New Key Presses – clicking this would enable you to input keystrokes for a new command, just like we have been doing in the above examples. New Macro is the option we will be clicking next. New Advanced Command offers more options involving repeat functions (amongst other things) which will be covered later.
Untitled DocumentSST Programming Software Contents Page 8 of 23 Click OK when you have finished inputting the macro sequence that you want. Just as with keystrokes, you will notice that the entire sequence of keys is shown in the bar for the button that you have just assigned this macro to. You can also rename this new macro, just as we did with the Fire Weapon command earlier.
Untitled DocumentSST Programming Software Contents Page 9 of 23 You will notice that unlike the other keystroke input windows, when pressed each key places two instances of the key in the command input window – like below. This is because when you press a key on a keyboard it actually produces two signals – one when you press it and another when you let go. In the above example you can see that the T key was held down for 0.12 seconds and the H key for 0.13 seconds.
Untitled DocumentSST Programming Software Contents Page 10 of 23 The process for enabling them to act as a shift button rather than a normal button is the same. Using the right click function again, point to the line referring to the shift button and right click. You can see that there is an option at the top that isn’t present on other buttons – the Shift Button option. If you click that then you can see that the programming software now reports that the shift button is acting as a shift button.
Untitled DocumentSST Programming Software Contents Page 11 of 23 You can see that the commands created in the unshifted mode are carried over into this mode too – the little arrow in the box at the bottom left corner of each command line indicates this. You can now assign the commands you wish to the different buttons, exactly as you have been doing already.
Untitled DocumentSST Programming Software Contents Page 12 of 23 This enables you to see what commands you have assigned to each button in all modes. You can also input keystrokes, macros etc. in this view, exactly as you did in the 3D view. For the X36 and X45 users, note that while these controllers have only one shift button you do have the three different modes made available to you by the mode switch on the throttle.
Untitled DocumentSST Programming Software Contents Page 13 of 23 Programming Hat/POV (Point of View) Switches All of the controllers supported by SST have a Hat, or POV switch. On the joysticks and pads a POV switch is usually used as a device for looking through the different views from a cockpit in a flight simulator, but you can assign it to do whatever you want.
Untitled DocumentSST Programming Software Contents Page 14 of 23 And adjusting that will simply change the speed of the mouse cursor when you push the POV in the appropriate direction, slow being to the left of the scale and fast being to the right. However, clicking the Buttons option adds more options to configure, one for each position of the hat switch.
Untitled DocumentSST Programming Software Contents Page 15 of 23 Hat Programming Tricks One thing that you can do to ensure that the hat ‘lets go’ of a command assigned to one of its directions is to program the centre position of the hat with a ‘release’ command for any of the keystrokes assigned to any of its positions. This sounds complicated but is actually quite straightforward. As an example we will take the programming of the GM2/GM3’s hat switch for movement in a first person shooter game.
Untitled DocumentSST Programming Software Contents Page 16 of 23 Before you click OK to finish make sure that you right-click on the keys in the Press row, point to Quantize Time and then select 0.00. This will have the effect that when you let go of the POV and it returns to its centre position it will issue a ‘release command’ for those keys to ensure that the program thinks that those keys have been ‘let go’.
Untitled DocumentSST Programming Software Contents Page 17 of 23 Axis Programming (rotaries, thumb wheels etc) The final parts of your controller that can be programmed are the axes. These are basically anything that has a range of movement on your controller, be it the joystick, a throttle, rudder, thumb wheel (GM2/GM3) or a rotary (X36/X45). You can program the axes on your controller with keyboard commands.
Untitled DocumentSST Programming Software Contents Page 18 of 23 Your mouse cursor will change so that it looks like a horizontal line with a vertical, doubleheaded arrow running through it – don’t click anything yet! The red line in the window represents the current position of the axis that you are programming. In this case it is the rotary 1 on the X45 and if you move that axis on the actual controller it will change the position of the red line.
Untitled DocumentSST Programming Software Contents Page 19 of 23 We could also have done this by actually physically moving the axis to that point (so that the red line was at that point) and then clicking the left icon just underneath where it says Rotary 1= Bands. We should now also create a second split and then click the middle icon which spaces the areas out evenly. We can then click the green tick to set those split positions in place. This leaves us with something like this.
Untitled DocumentSST Programming Software Contents Page 20 of 23 the middle of the axis movement with no command assigned to it. You can create as many splits as you want but too many can become very complicated. Mouse Emulation You can also program an axis to emulate the movements of the mouse cursor if you wish.
Untitled DocumentSST Programming Software Contents Page 21 of 23 Activating the Profile Activating the profile couldn’t be easier. Simply right click on the little joystick icon next to your clock and you will now notice that the profile that you saved is at the top of the pop-up menu. In the example below you can see that we called our profile ‘Test’.
Untitled DocumentSST Programming Software Contents Page 22 of 23 Product Specific Features X36/X45 The X36 and X45 flight controllers include several unique features that are nonetheless programmable using the same principles as functions on the Cyborg. The mode switch simply allows you to program all the other functions of the controller so that they can do something different depending on which mode the switch is in.
Untitled DocumentSST Programming Software Contents Page 23 of 23 To program a keystroke (or set of keystrokes) ‘on the fly’, simply press the Smart button on your pad, press the button you want to assign the keystroke(s) to and then press the key(s) on the keyboard. To save this, press the Smart button on the pad again. Those keystroke(s) should now happen when you press the button you programmed. This can be done in-game or in Windows.