User User Manual Manual Logitech® Harmony® 700 Remote English Version 1.0 Version 1.
Contents Introduction........................................................................................................................................4 Getting to know your remote.........................................................................................................4 How your Harmony 700 works.............................................................................................4 Activities, devices, and inputs...................................................................
Changing your setup.......................................................................................................................16 Adding and changing your Activities.................................................................................. 16 Renaming an Activity......................................................................................................... 16 Adding and changing your devices....................................................................................
Introduction The Logitech Harmony 700 Universal Remote is your answer to effortless home entertainment. The Activities buttons puts you in control of all your devices. You can go from watching TV to watching a DVD to listening to music with the touch of a button.
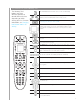
The buttons on your Harmony 700 The Harmony 700’s buttons may have different functions or control different devices depending on which Activity you’re in. For more information, see Changing how buttons work in an Activity. The All Off button turns off all the devices in the current Activity. The Activity buttons start the appropriate Activity. The More Activities button opens a list of all Activities on the remote screen. The Help button starts the on-remote help.
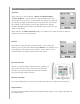
What’s on the Harmony 700’s screen Activities When you press an Activity button – Watch TV, Watch a Movie, or Listen to Music -- the Activity starts and the commands for that Activity appear on the screen. The commands that appear are related to the Activity, and apply to all of the devices that you use for that Activity. For example, if you’re watching a DVD, your remote screen displays functions and commands for your DVD and other devices you use in the Watch a DVD Activity.
Using your Harmony 700 Using your screen features The arrow buttons help you move through each page of options, while the side buttons allows you to choose a command or function. The center button lets you choose devices or Activities, or lets you back out of pages. The upper right corner of the screen shows which page is being shown, and how many total pages there are for the options you are viewing. Selecting an Activity The Activity buttons are assigned to the Activities you have created for the remote.
Using the Help button Because obstacles or distance can interfere with the signals the Harmony 700 sends when it starts an Activity (for example, someone walks between your Harmony 700 and the TV when you press Watch TV, or you’re very far away from the system when you start an Activity), your Harmony 700 can become “out of sync” with your devices. To fix the problem, use the help feature on your Harmony 700. 1. 2. 3. On the remote, press the Help button.
Using your favorite channels To set up your favorite channels, go to the Harmony Remote Software: 1. 2. 3. Select the Activities tab. Under Watch TV, click Settings. Select Set up Favorite Channels and follow the online instructions. When you have favorite channels set up on your Harmony 700, your favorites appear on the remote’s screen when you select the Watch TV Activity. To use your favorite channels: 4. 5. 6. 7. Press the Watch TV button.
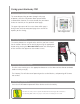
Charging your remote Your Harmony 700 comes with an AC adaptor for charging the batteries in your remote. To charge the batteries, just insert the USB cable into the top of the remote, plug the other end of the cable into the AC adaptor, and then plug the AC adaptor into a wall outlet and charge. Use only NiMH replacement batteries, size AA R6 with a minimum of 1800 mA. Caution: Risk of explosion if battery is replaced by an incorrect type.
Setting up your Harmony 700 for the first time Overview of the setup process The Harmony Remote Software leads you through a setup process and allows you to change your setup later if you wish. To begin, connect your remote to your computer using the USB cable provided and go to www.logitech.com/myharmony. Follow the instructions to download the Harmony Remote Software. After the software installs, start the Harmony Remote Software.
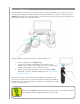
1. Creating your user account When you start the Harmony Remote Software for the first time, you must create your user account. From the Harmony Remote Software, on the Getting Started page: 1. Click Create New Account. 2. Complete the required account information. 3. Follow the instructions in the setup wizard. 2. Connecting your Harmony 700 to your computer To connect your Harmony 700 to your PC, use the USB cable provided. 1. Connect the smaller end of the cable to the USB port on your remote. 2.
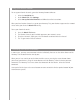
3. Setting up the devices you want to control On the Add Devices page, the guided online setup asks you to enter your device information. Enter the information for all the entertainment components you want to control with your Harmony 700. You should use the Device Worksheet to gather all your device information before starting the setup process. 1. 2. 3. Select the Device type for each of your devices. Select the Manufacturer for each device. Enter the Model number for each device.
5. Updating the remote After you enter your device and Activity information, the software saves your information and shows the Finish Setup page. It also transfers the information to your Harmony 700. After the software updates your remote, you’re ready to test your setup. For specific details about testing your setup, see the chapter on Testing your Setup.
Testing your setup Every time you update your Harmony 700, you should test your remote to ensure it’s working the way you expect. This chapter gives you the information you need to test your remote. It also has some suggestions on what to check while you’re testing your setup. If you run into specific issues while testing your remote, refer to the Troubleshooting section of this manual for suggestions and possible fixes for your problems. The process of testing your Harmony 700 is straightforward.
Changing your setup Whether you get a new device or want to change the behavior of some buttons, you may need to make changes to your Harmony 700’s setup. The following sections provide you with the information to help you with these tasks. Adding and changing your Activities In the Harmony Remote Software, select the Activities tab. • To add an Activity, click Add Activity. • To remove an Activity, click the icon for the Activity you want to remove.
Adding an extra device (passthrough) to an Activity A passthrough device is a device that you add to your system that a signal passes through unaltered. For example, if you use your DVD recorder (or VCR) to record shows from your satellite or set top box, you may need to add your DVD recorder as a passthrough device. In these examples, the DVD Recorder and the A/V Switch are used as passthrough devices.
Changing how buttons work in an Activity When you select an Activity, your Harmony 700 turns on all the required entertainment devices, sets up the device inputs correctly, and sets up the remote’s buttons to control the devices in the Activity. For example, when you select the Watch TV Activity, the volume button on the Harmony 700 changes the volume on the device you use to control volume. However, there may be some commands you want to add to buttons or display on the remote’s screen.
Controlling the Remote Assistant The Harmony 700’s Remote Assistant guides you through starting Activities. It also gives you more information about the status of your remote and the Activity you selected. For example, when you select the Watch TV Activity, the Remote Assistant asks you if the TV is on and if the other devices in the Activity are configured properly. You can turn this feature on or off from the Harmony Remote Software or from the remote.
Adding additional features to your Harmony 700 It’s possible that a device’s commands are not recognized. Maybe you have a very rare device? Or a new one? Although we update our device list regularly, there are always new devices in the market. To remedy this, you can teach your Harmony how to control this device by using the device’s original remote.
• • Start infrared commands that select inputs (for example, on a stereo receiver) with the prefix “Input”. Don’t name the input based on what you’ve connected to your device, rather name it based on what it’s called on the front of the device, or on the remote control (for example, InputAux, InputVideo1, InputTape, InputDVD). Types of delays or speed settings If your device doesn’t react to a command from the Harmony 700, it may be because the delay setting needs to be adjusted.
Repeats The Repeats are the number of times the remote repeats a command for a device to properly respond to the command. For instance, many devices need longer or shorter command repetitions to respond properly. Example: Any time I press channel up, my Digital Set Top Box skips two channels at a time.
Maintaining your Harmony 700 Upgrading your Harmony 700 firmware Your Harmony 700 contains internal software, called firmware. The remote’s firmware is similar to your computer’s operating system. Logitech updates the firmware for your remote to ensure you’re always getting the most from your Harmony 700. Generally, when you connect your remote to your computer the Harmony Remote Software updates your remote automatically if new firmware is available.
Troubleshooting problems with your Harmony 700 In this section, you’ll find some commonly reported issues and the suggested solutions. These solutions may help you fix problems you’re experiencing. If you still cannot fix the problem, refer to Getting help with your Harmony 700. The TV doesn’t turn on when starting an Activity, but using the Help button on the remote fixes the issue. • Try increasing the Inter-Device Delay for your television.
The On Demand command isn’t on the Harmony 700 for the Watch TV Activity. • You can map the command to any unused button on the Harmony 700 or on the remote’s screen. The command is likely in our database, but wasn’t mapped to the Activity. If we’re missing the command, the Harmony 700 can learn it from your original remote. For more information, see Teaching your Harmony 700 new commands using your old remote. The Harmony Remote software in unable to communicate with the Harmony 700.
Figuring out which inputs your system uses One of the most important parts to creating your Activities for your Harmony 700 is determining which inputs your system uses for each device. This chapter gives you some suggestions on how to figure out which inputs your entertainment system uses if you’re not sure. Inputs are how the devices in your entertainment system are connected. For example, your DVD or cable box is connected to your TV through an input.
Option 3 — Select the input from an on-screen menu In this case, your device uses an on-screen menu from which you can select the input you want. When you press the source button, the menu appears on your TV screen. Then, you use another button on the remote to choose the input you want, and then a third button to select the input. For example, you press the source button to display the on-screen menu, the arrow keys to select an input, and then the OK button enter your selection.
Step 2 — Watch the TV In this step, you must use your TV’s original remote control to switch between inputs. 1. 2. 3. Using your TV’s original remote, select each input one-at-a-time. For each input, note which device appears to be connected to that input. For example, if you switch to VIDEO 1 and see your DVD playing, you know your DVD player is connected to VIDEO 1. Repeat step 2 for each input.
Getting help with your Harmony 700 Contacting Customer Support If you’re experiencing problems and can’t find the solution, our courteous and expert professionals can assist! From your home page, click the More Support button located in the Tip Center and then select the Contact Us tab. Finding answers to questions You can access our online help to search for topics or Frequently Asked Questions (FAQs). From your home page, click the More Support button located in the Tip Center.
Using the On-Remote Help When one or more of your devices don’t power on or off, or when they don’t switch inputs correctly, you can use the Help button on the remote for simple troubleshooting. Answer the questions on your Harmony 700 to re-synchronize it with your entertainment system. See Using the Help button. Logitech’s Harmony Remote user forums You can also access the user forums to see what other users like you’re discussing. Simply go to http://forums.logitech.com/.
Appendix a - Device Information In the Add Devices step of the setup software, you will need to enter information about the components in your entertainment system. Fill out this worksheet to use as your guide. List the entertainment components below that you would like your new remote to control.
Appendix B - Glossary 32 Amplifier A stereo component that outputs to speakers, and increases the gain or level of an audio signal. An amplifier doesn’t typically include a radio. Anamorphic views Also referred to as Enhanced for Widescreen, or Enhanced for 16:9. The process that horizontally shrinks a 16:9 image into a 4:3 space to convert images between widescreen and typical television image aspect ratio. Used on many DVDs. Aspect ratio The ratio of image width to image height.
Output Device A device that produces the sound or picture, for example, a TV or speakers. PAL (Phase Alternating Line) A video format that is used in the UK, and parts of Europe and Asia. Passthrough A device that routes video or audio from one device to another device. Personal Video Recorder (PVR) Contains an internal recorder and player that records and plays video without the use of a removable tape or disc.
Stereo receiver Also referred to as a tuner or a receiver. a stereo receiver is any component that receives or tunes, broadcast signals, or AM/FM radio. Typically refers to the single component that includes a preamplifier, surround processor, multi-channel amplifier, and AM/FM tuner. Tuner Also referred to as a receiver or a stereo receiver. a tuner is any component that receives or tunes, broadcast signals, or AM/FM radio.
Appendix C - Product Specification LCD Size LCD Resolution LCD Screen Power Source Power Type Brands Supported Devices Supported Maximum number of devices per account Backlit keypad Backlight Color IR Learning Learning Capabilities IR Transmitters IR Transmission Range Memory Type Memory Amount Weight Dimensions Warranty Supported Platforms 1.
© 2009 Logitech Inc. All rights reserved. Logitech's trademarks are either registered trademarks or trademarks of Logitech in the US and other countries. All other trademarks are the property of their respective owners.