INSTALLATION AND OPERATION MANUAL EPA Certified Wood-Burning Fireplace Inserts Retain These Instructions For Future Reference Performer™ C210 P/N 775,212M, Rev. A, 04/2007 Performer™ CA210 Wood Fireplace Inserts Performer™ Models C/A210 A French manual is available upon request. Order P/N 775,212CF. Ce manuel d’installation est disponible en francais, simplement en faire la demande. Numéro de la pièce 775,212CF.
Contents Testing Information..........................................................................3 General Safety Precautions.................................................................3 Drafting......................................................................................4 Negative Pressure Warning ............................................................4 Creosote......................................................................................4 Ash Disposal.......................
Testing Information This manual describes the installation and operation of the Performer™ C/A210 non-catalytic wood heaters. These heaters meet the U.S. Environmental Protection Agency’s emissions limits for wood heaters sold on or after July 1, 1990. This heater has been developed, tested and constructed in accordance with the requirements of UL 1482, ULC S628-93 and HUD standards and is listed by OMNI Test Laboratories, Beaverton, OR. It has been approved for residential and alcove installations.
Drafting Negative Pressure Warning Your wood stove is dependent upon a properly functioning chimney for optimum performance. It is a high efficiency appliance that loses much less heat up the chimney than older appliances and fireplaces. For this reason it is important to match the stove to the chimney. The chimney has two functions: 1) It draws combustion air into the appliance (without air, no fuel will burn) and 2) It exhausts combustion by-products.
Ash Disposal Ashes should be scooped out of a cool stove with a small metal shovel. Ashes should be placed in a metal container with a tight fitting lid. The closed container of ashes should be placed on a non-combustible floor or on the ground, well away from all combustible materials, pending final disposal. If the ashes are disposed of by burial in soil or otherwise locally dispersed, they should be retained in the closed container until all the cinders have thoroughly cooled.
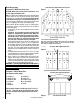
Brick Installation Firebox Brick Lay-Out Viewed From the Front Performer™ C/A210 Brick Installation CAUTION: Wear gloves during brick installation in case of sharp edges behind the stove. Note: Installation of the baffle bricks and insulating blanket is easier when you can still access the flue outlet, (before connecting the flue pipe). Be sure the insulating blanket is placed flat on the bricks so as not to block the flue.
Required Clearances Maximum Mantel Depth = 9” (229 mm) COMBUSTIBLE MANTEL WARNING: BE ABSOLUTELY SURE THE DISTANCE BETWEEN THE HEATER AND THE SURFACE OF ANY COMBUSTIBLE CONSTRUCTION IS NOT LESS THAN SHOWN ON THIS PAGE.
Chimney Requirements The Performer™ C/A210 inserts are approved for use in masonry fireplaces built to UBC Chapter 37 or equivalent with a minimum 22” (559mm) opening at the front of the fireplace. These heaters are designed to be installed into an existing masonry fireplace (built to UBC 37 or ULC S628 standards) or factory-built, solid-fuel and wood-burning fireplaces (listed to UL 127 or ULC S610) only. Do not remove brick or mortar from masonry fireplace to accommodate insert.
Installation Procedure - Factory-Built Zero Clearance Fireplaces Fireplace and Chimney Requirements The Performer™ C/A210 insert must only be installed in a zero clearance factory-built fireplace using 6” (152mm) stainless steel pipe extending from the insert’s flue into the chimney of the fireplace. For optimum safety and performance we recommend a full length stainless steel liner directly connected to the insert’s flue outlet.
Post Installation Checks Chimney Liner Installation Remove the existing chimney cap and install a stainless steel liner into the chimney (if a special section has been used or drilled to attach to the insert, it must be the bottom piece). The next piece should be a dripless slip joint, followed by the rest of the chimney liner. Fasten the chimney at the top when it is positioned so that the slip joint will allow the lowest piece to slide up enough to clear the insert during installation.
Operating Hints 1. Burn only dry, well-seasoned wood for maximum heat output. In some states it is illegal to burn wet wood or anything other than clean, dry wood products. 2. Your stove is designed to operate with the door closed! Operate only with the door shut tightly at all times except when loading wood. 3. DO NOT hit or move the baffle brick while loading wood. Occasionally check the baffle. Make sure the insulating blanket is always flush with the front of the baffle brick.
3. Place a small amount of crumpled paper in front of the firebox and cover it with a few pieces of kindling. 4. Light the paper and allow sufficient time for the kindling to become fully engulfed in flames. Close the door. Your door may or may not need to be left slightly open during this process, depending on your stove model and chimney draft. Once the kindling is burning well, larger pieces of wood may be added. Figure 8 5.
Clean Glass SEE MAINTENANCE ON PAGE 15 FOR GLASS CLEANING TIPS The operator plays an important part in keeping the glass clean and free of build-ups. The first and most important part the operator plays is making sure to burn only well-seasoned firewood. Wet wood = Dirty glass. Keeping your glass door clean is partly accomplished by the air wash system of the stove, which sends clean, fresh air for combustion, over the window before it enters the fire.
Maximizing Your Stove’s Overall Efficiency It is important to know that for high, combustion efficient, clean burns, you will need to have sufficient temperatures inside the firebox for thorough combustion. The best method for determining if you have sufficient temperatures is to watch the brick lining in your firebox. When you first light your stove, the bricks will turn a dark brown or black.
Experiment with different loading configurations to achieve longer burns. Try loading the wood from side to side and nesting it in the ashes to prevent airflow under and around the wood. Fresh wood should be loaded to the back of the firebox or to the sides. Hot coals or half burned wood should be brought toward the front of the firebox. The way you load your wood can seriously affect burn times.
Troubleshooting 16 Problem Solution POOR DRAFT: Extend chimney in length or have the chimney realigned to the proper size flue. Oversized chimneys normally have poor drafts. Remember, the stoves’ draft depend solely on the natural draft of the chimney (See Drafting section on page 4). If your stove is not drafting properly, your chimney is the problem. All stoves are thoroughly tested to ensure proper draft with the correct size chimney flue.
Do’s and Don’ts DO NOT: Install or operate this stove before reading this manual. DO NOT: Close the draft beyond the point at which the flames are completely extinguished. DO NOT: Open the stove door without fully opening the draft first. DO NOT: Burn driftwood or wood that has been in salt water. This includes some mill ends and scrap lumber that has been floated in salt water on the way to the mill. (This will void your warranty). DO NOT: Handle the Nickel or Gold faceplate unnecessarily.
The manufacturer reserves the right to make changes at any time, without notice, in design, materials, specifications, prices and also to discontinue colors, styles and products. Consult your local distributor for fireplace code information. Printed in U.S.A. © 2007 by Lennox Hearth Products P/N 775,212M REV.