
Specification

Lokk•Latch
®
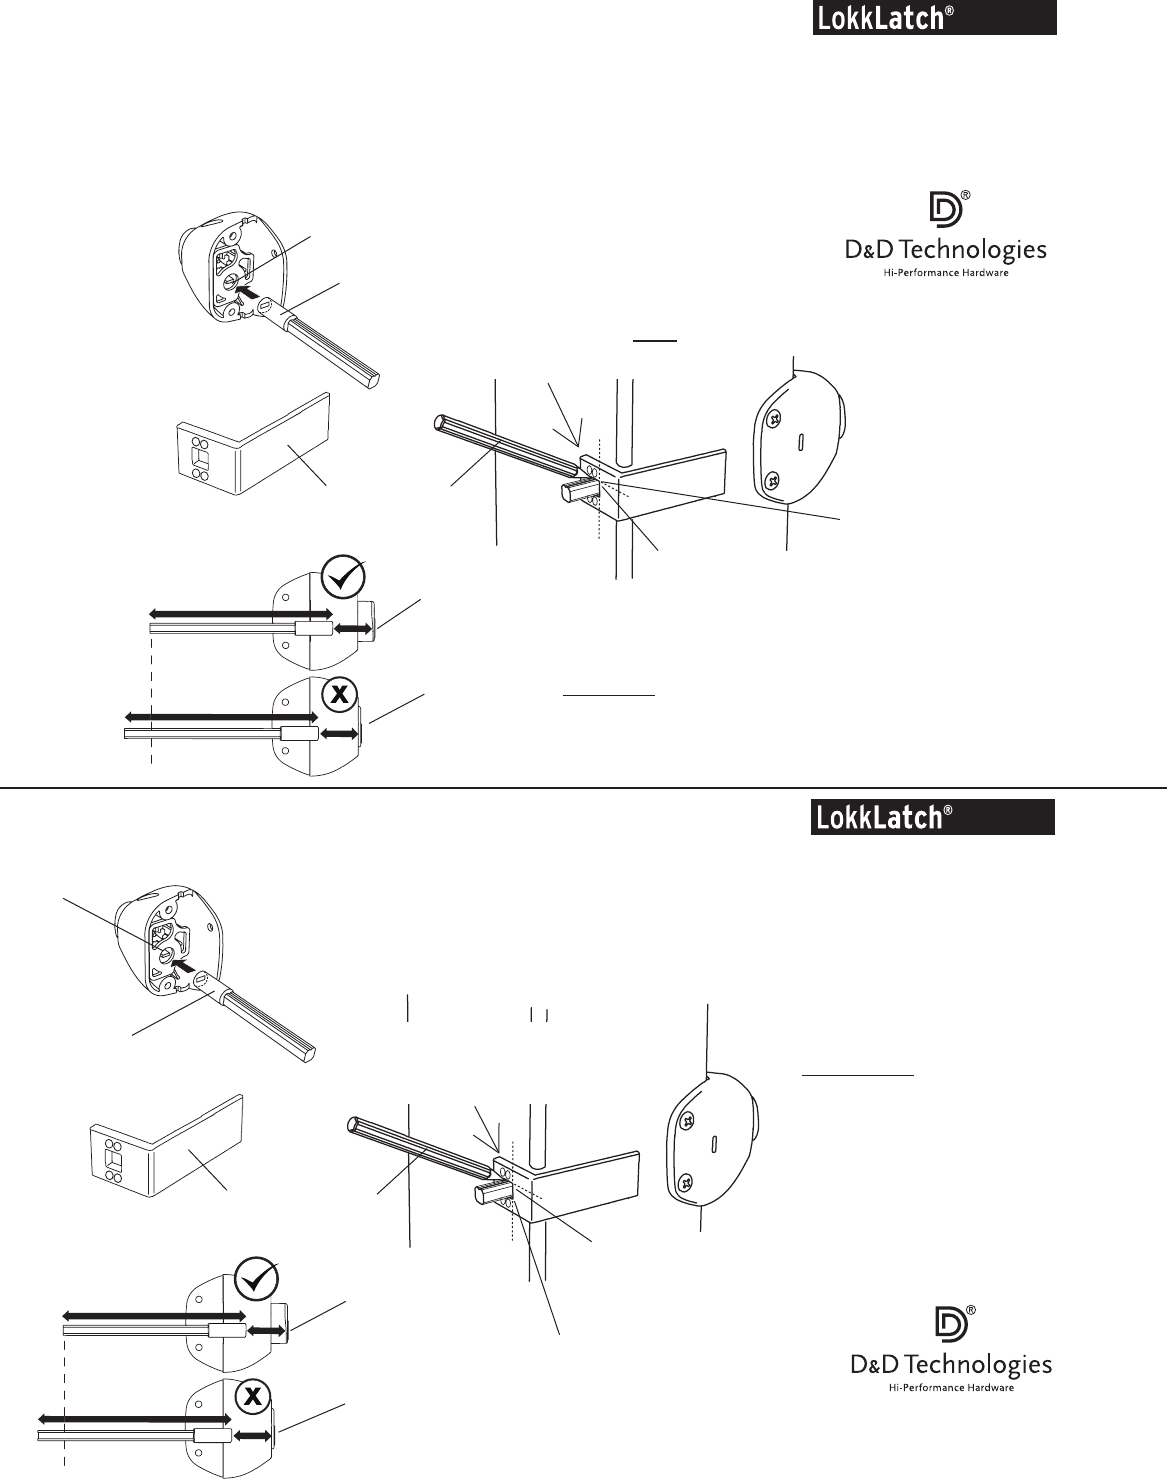
DELUXE Push Rod Length:
Insert Push Rod
firmly over
Lock Tail
Push Button
fully extended
outward
Lock Tail
Push Rod should protrude by
3
/16” (4.5mm) after cutting
CUT PUSH ROD
SQUARE AND NOT
AT AN ANGLE
Draw a line across
the Push Rod against
the Fitting Jig
DELUXE
USA: 7731 Woodwind Drive, Huntington Beach, CA 92647
Australia: U6, 4-6 Aquatic Drive, Frenchs Forest NSW 2086
www.ddtechglobal.com
LLDINSTR003PA 1.0 •instr_LLD_24/7/07
IMPORTANT: To avoid cutting the Push Rod too short, push it
forward so that the Push Button is fully extended outward.
Then slide the Fitting Jig over the Push Rod and mark with a
pencil. Then cut the Push Rod using a hacksaw.
Fitting Jig
Push Button
depressed
Pencil
The Lokk•Latch
®
DELUXE comes with Push Rods for both 5” and 6” (125mm & 150mm) fence posts.
Only one is required, so use the other as a back-up. When installing the latch to post depths other
than these, follow the detailed instructions and cut the rod using the Fitting Jig included in the
package. It’s a good idea to verify the length of the Push Rod on 5” & 6” (125mm & 150mm) posts
as well to ensure it is cut to the proper length.
YES
NO
DELUXE
IMPORTANTE: Para evitar cortar el pasador
de empuje demasiado corto, empujarlo
hacia adelante de manera que el pasador
de empuje se encuentre totalmente hacia
afuera. Luego deslizar la guía de encaje
encima del pasador de empuje y marcar
con un lápiz. Cortar el pasador de empuje
usando una sierrra para metales.
Longitud del pasador de empuje del Lokk•Latch
®
DELUXE:
Botón de oprimir
presionado
Botón de oprimir
totalmente hacia afuera
Guía de encaje
extremo de la barra
de la cerradura
Insertar el pasador de empuje
firmemente encima del
extremo de la barra
Lápiz
CORTAR EL PASADOR DE
EMPUJE EN ESCUADRA Y
NO EN ÁNGULO
Trazar una raya a
través del pasador de
empuje contra la guía
de encaje
El pasador de empuje deberá
sobresalir
3
/16” (4.5mm)
después de cortar
El Lokk•Latch
®
DELUXE se presenta con pasadores de empuje para postes y cercas de 5” y 6” (125mm & 150mm).
Se requiere uno solamente de manera que puede usar el otro como reserva. Al instalar el cerrojo en postes con una
profundidad distinta a las mencionadas se deben seguir las instrucciones detalladas y cortar el pasador usando la guía
de encaje que se incluye en este paquete. Es recomendable verificar la longitud del pasador de empuje en los postes de
5” y 6” (125mm & 150mm) como también asegurarse de que sea cortado de acuerdo con la longitud correspondiente.
USA: 7731 Woodwind Drive, Huntington Beach, CA 92647
Australia: U6, 4-6 Aquatic Drive, Frenchs Forest NSW 2086
www.ddtechglobal.com