
Installation Guide

Competitor Product Comparison
Confidential – for internal use only
IMPORTANT: READ CAREFULLY BEFORE INSTALLING THE FIXTURE. RETAIN FOR FUTURE REFERENCE.
GENERAL: Upon receipt of the fixture, thoroughly inspect for any freight damage which should be brought to the attention of the delivery carrier.
INSTALLATION:
1. Remove the lens.
2. Pinch brackets together on both ends of the LED board and using finger hole, remove the LED board. Allow LED board to hang from plastic
hanging cables.
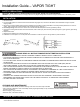
3. Remove two mounting brackets and screws from hardware bag (provided in housing) and attach to mounting surface. (Measure 33.5“ center to
center). Push housing into mounting brackets until luminaire is secure. (See Fig. 1)
4. For through wiring: Use knock out on other end of luminaire and add waterproof connector (provided by others).
5. Connect the
incoming electrical wires to the terminal block; black to black (hot), white to white (neutral),and green to green (ground). (See Wiring
Diagram)
6. Replace LED board.
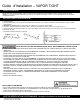
7. Replace lens and attach the 10 latches. (see Fig. 2)
8. Installation is now complete. Turn on the power at circuit breaker or fuse box then turn the light switch to power the fixture.
SAFETY PRECAUTIONS:
Figure 1
Figure 2
Wiring Diagram
Latches
Mounting Bracket
CLEANING AND MAINTENANCE
• To maintain the fixture efficacy occasional cleaning of the outer lens surface may be needed.
• Use a mild soap or detergent, which is essentially neutral pH (pH approximately 6 to 8), nonabrasive, and which contains no chlorinated or
aromatic hydrocarbons.
• Wash thoroughly, using a soft cloth.
• Rinse with clean, cold water and wipe dry.
TROUBLE SHOOTING CHECKLIST: If luminaire does not work
– Check your power source.
– Check electrical connections.
• CONSULT A QUALIFIED ELECTRICIAN TO ENSURE CORRECT BRANCH CIRCUIT CONDUCTOR.
• TO PREVENT PERSONAL INJURY OR PRODUCT DAMAGE ONLY LICENSED ELECTRICIANS SHOULD PROVIDE ALL
INSTALLATION SERVICES.
• TO AVOID ELECTRIC SHOCK OR COMPONENT DAMAGE DISCONNECT POWER BEFORE ATTEMPTING INSTALLATION
OR SERVICING.
• THIS PRODUCT MUST BE INSTALLED IN ACCORDANCE WITH THE NATIONAL ELECTRIC CODE (NEC) AND ALL
APPLICABLE FEDERAL, STATE AND LOCAL ELECTRIC CODES AND SAFETY STANDARDS.
• USE CAUTION WHEN HANDLING THIS PRODUCT DURING OR AFTER OPERATION AS IT MAY BECOME HOT AND CAUSE
BURNS. DISCONNECT PRODUCT AND ALLOW COOLING PRIOR TO SERVICING.
• AN
Y ALTERATION OR MODIFICATION OF THIS PRODUCT IS EXPRESSLY FORBIDDEN AS IT MAY CAUSE SERIOUS
PERSONAL INJURY, DEATH, PROPERTY DAMAGE AND/OR PRODUCT MALFUNCTION.
• TO PREVENT PRODUCT MALFUNCTION AND / OR ELECTRICAL SHOCK THIS PRODUCT MUST BE PROPERLY
GROUNDED.
• WARNING; ANY CHANGES OR MODIFICATIONS TO THIS UNIT NOT EXPRESSLY APPROVED BY THE PARTY
RESPONSIBLE FOR COMPLIANCE COULD VOID THE USER’S AUTHORITY TO OPERATRE THE EQUIPMENT.
• SUITABLE FOR WET LOCATIONS.
PLEASE READ ALL INSTRUCTIONS BEFORE ATTEMPTING INSTALLATION
Installation Guide – VAPOR TIGHT