
Instructions / Assembly


TIGWELD® 250 EX
www.longevity-inc.com
Starting a TIG Weld: Filler rod selection is critical to a TIG welds density, strength and purity.
Check out our filler rod selection chart on our website for optimum filler rod to properly
complete a weld. In certain applications, TIG welding can be performed without the use of a
filler rod. One of the biggest issues for beginning welders is holding and maintaining an arc.
Starting an arc with your High Frequency welder is quite simple. Set the machine for TIG
operation then select the desired amperage. Grasp the torch in a manner that is comfortable to
you. Place the torch so that the tungsten is no more than 1/8 inch from the weld surface.
Depending upon the setup, either press the foot pedal down or press the trigger to initiate the
high frequency arc. A small blue glowing cone may be observed. This is the high frequency arc.
Immediately after that, you should see a strong and stable arc flowing from the torch. As the arc
begins to grow, a molten puddle will appear. If it does not appear, stop your weld and increase
the amperage. Repeat the start sequence.
1. To help the molten puddle form, slowly make small circles with the torch to build the heat in
the weld area. A bright, fluid puddle will begin to form.
2. Once a uniform puddle is established, tilt the torch head about 75 degrees from the weld
surface into the direction of the weld. This will direct the arc to the front of the weld puddle.
3. Grip the filler rod at a 15 degree angle to the weld surface with the other hand. Hold the rod in
the iridescent cone of gas that surrounds the weld puddle. Do not hold it in the arc. Keep it close
to the weld. A “skeleton” keyhole will begin to form in front of the weld. The keyhole is
evidence that you are ready to add filler material and move forward. Introduce the filler rod into
the key hole area underneath the arc. Wait for a single molten drop to fall off the tip of the rod.
4. When a molten drop falls from the rod, quickly remove the rod, keeping it inside the gas cone.
The molten drop of filler metal should blend quickly into the puddle.
5. Move the torch forward slightly, carrying the keyhole with the weld. If the key hole is lost,
then forward travel was too fast or too far. When the keyhole shows good development, repeat
the steps 3-5 until you have a proper weld bead established.
6. Weld termination. When the weld bead has reached the desired length, add a final drop of
filler and slowly circle the torch over the end of the weld to fill the crater. If the weld crater is not
correctly filled, cracking and weld failure may occur. This is a small but important step to
properly completing a weld. Release the foot pedal or release the trigger to stop. Keep the TIG
torch in place until the post flow ends--usually around 5 seconds.
7. When finished welding always let the welder's fan run for a minute or two to cool the machine
before turning the power switch off.
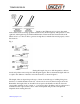
Basic Diagrams of Welding
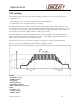
Fig.1
Figure 1: Comparison chart of welds
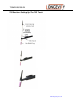
Fig. 2