
Installation & Assembly

Steel Swing Stand
Congratulations on your purchase of the Steel Swing Stand.
We believe that you will find it a product of unsurpassed quality and durability
This swing stand is designed to accommodate the Single
Swing, Double Swing, or any 4’ wide porch swing.
NOTE: These assembly instructions have been developed to make it as
easy as possible for you to assemble the Steel Swing Stand by yourself.
However, there are several points during assembly of this stand when
you may find it helpful to have “an extra pair of hands” to help you.
Box should contain: You will also need:
1 - Top crossbar 1/2” Wrench
1 - Bottom crosbar (w/out a center hole) Rubber Mallet or
2 - Main uprights Padded Hamer
4 - Legs
Hardware Pack:
3 - Eye Bolts 10 - Flat Washers
7 - Nuts 2 - S-Hooks
8 - Plastic End Caps 4 - Bolts (5/16" x 5" carriage bolts)
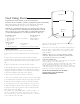
Top Brace
Side Poles
Bottom
Brace
Legs
11. Grasp the stand by the straight pole and set it upright.
Tighten top nuts at this time.
12. Now you are ready to hang your double or single swing on
the stand. Place an S-hook in the center eyebolt for a single
swing installation; or in the outer two eyebolts for a double
swing installation.
WARNING: Before use, be certain that all joints are firmly
connected. This inspection also should be performed after
your stand has been moved or reassembled.
CARE AND MAINTENANCE:
•You may want to disassemble your stand for more convenient
storage during the cooler part of the year.
•To clean your stand, simply wipe it off with a soft, damp cloth;
then dry it off immediately using a clean, dry, soft towel.
•If the finish on your stand gets scratched, it can be touched up
easily with automotive touch-up paint, available at most auto
parts stores and many department stores.
ASSEMBLY INSTRUCTIONS
1. Place plastic end caps on both ends of the four legs.
2. Place bottom crossbar on ground with curved portion pointed
up.
3. Place one leg next to bottom crossbar and insert a bolt into
bottom hole in leg, through the bottom cross bar and into a second
leg. Place a flat washer and nut on the bolt. Do not tighten at this
time.
4. Repeat step three (3) at other end of bottom crossbar.
5. Insert straight pole into opening in the bottom crossbar. Tapered
end of pole should be sticking up. Insert a bolt into top hole in leg,
through the straight pole and into a second leg. Place flat washer
and nut on bolt. Tighten all carriage bolts at this time.
6. Repeat Step 5 at the other end of the bottom brace.
7. Place a sheet or blanket on the ground. Grasp one of the upright
poles and flip stand onto its sides using the legs to support the stand.
8. Take top crossbar and insert over the tapered ends of straight
poles. You may need to use a rubber mallet to get a proper seat.
9. With stand still on its side place flat washer on an eyebolt and
insert into one hole in the top crossbar. Place another flat washer
and a nut on other end. Tighten.
10. Continue step eight (8) until all three eyebolts are in place. If
you do not intend to use a single swing, you may elect to leave
the center hole empty; but, we recommend you use a center bolt
to keep rain water out of the inside.
DO NOT ALLOW CHILDREN TO USE THE SWING
WITHOUT DIRECT ADULT SUPERVISION.
WARRANTY INFORMATION: