
Assembly And Installation Instructions


ASSEMBLY AND INSTALLATION
INSTRUCTIONS
WARNING: BE SURE TO SHUT OFF POWER AT THE MAIN FUSE OR CIRCUIT
BREAKER BOX BEFORE INSTALLING OR SERVICING THIS FIXTURE.
NOTE: 1.
Before installing, consult local electrical codes for wiring and grounding requirements.
2. READ AND SAVE THESE INSTRUCTIONS.
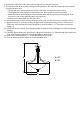
Loop
Parts:
Bulb Type A Max.60W
(not included)
Mounting Strap (A)
Mounting Screw (B)
Green Grounding
Screw (C)
Wire Nut (D)
Canopy (I)
Loop Lock (K)
Chain (L)
Outlet Box
House Grounding Wire
Wire Nut (D)
Fixture Wire
Fixture Grounding Wire
Mounting Strap (A)
Green Grounding Screw (C)
Mounting Screw (B)
Nipple(G)
Canopy (I)
Top Loop (H)
Hex Nut (E)
Washer (F)
Collar (J)
Loop Lock (K)
Chain (L)
Hex Nut (E)
Washer (F)
Nipple(G)
Top Loop (H)
Collar (J)
1. Attach nipple to the mounting strap, then secure it with a washer
and hex nut.
2. Attach the mounting strap to the outlet box by
using two mounting screws.
3. Adjust the arms of the fixture according to the
drawing of the package.
Important:
a. The arms should be positioned with equal
distances between them.
b. The arms should be fixed securely.
4. Attach loop to the center body.
5. Choose the length of the chain you need, then
weave the fixture wire and the fixture grounding
wire through the chain.
6. Secure the top loop to nipple.
7. Thread the fixture wire and fixture grounding wire
through the collar, canopy, top loop, nipple and
mounting strap.
Center Body
Nipple (-1) (O)
Hex Nut (N)
Small Cap (U)
Tube (P)
Glass Shade (M)
Cover (Q)
Hex Nut (N)
Finial (R)
Glass Shade (M)
Coupling
Finial (R)
Cover (Q)
Hex Nut (N)
Nipple (O)
Tube (P)
Metal Cap (Ø55mm) (S)
Metal Cap (Ø48mm) (T)
Small Cap (U)
Metal Cap (Ø55mm) (S)
Hex Nut (N)
Metal Cap (Ø48mm) (T)