
Installation & Assembly


Assembly Instructions for Porch Swing
T
ools Needed: 9/16” Wrench, Socket or Impact Drill, Rubber Mallet
Before beginning assembly, please take a few moments to carefully read the instructions, familiarize yourself with
the components and understand each step of the process. Likewise, please ensure that the hardware package
contains the items as described below.
Parts List: (1) Back Assembly, (1) Seat Assembly, (1) Right and Left Arm Assemblies
Hardware List: (4) 3” Lag Bolts, (4) 4” Eye Bolts, (8) Washers, (2) Long Chains, (2) Short Chains, (8) “S” Hooks
Swing Assembly Instructions:
Step 1. Remove components from shipping boxes. You may lay the cardboard on the floor to prevent marring of
finish.
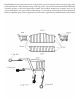
Step 2. Lay one arm assembly (“A” in the image shown on these instructions) on the floor with holes facing
upward.
Step 3. Insert the two tenons of the seat assembly “B” into the holes on the shortest part of the arm assembly.
Step 4. Insert the two tenons of the back assembly “C” into the holes on the longer, angled part of the arm
assembly.
Step 5. Repeat steps 3 and 4 above for opposite arm.
Step 6. Insert lag bolts “D” with washers “E” and eye bolts “F” into holes on outside of arms and tighten fully.
See diagram on reverse for detail.
Hanging the Swing:
Step 1. Separate the two different lengths of chain and the “S” shaped hooks.
Step 2. Count eight links from the end of one long chain “G” and insert an “S” hook into the 8th link. Attach the
other end of this “S” hook into porch header hardware (not included).
Step 3. Count forty links from the opposite end of the long chain that is now hanging from the porch header
and insert another “S” hook into the 40th link.
Step 4. Attach one end of the short chain “H” to the remaining end of the “S” hook from the last step.
Step 5. Insert an “S” hook into the remaining end of the short chain.
Step 6. Counting nine links from the bottom of the long chain hanging from the porch header, insert “S” hook
into 9th link.
Step 7. Attach the opposite end of the “S” hook from last step into the eye bolt at the front/bottom of the swing
assembly.
Step 8. Insert the remaining end of the middle “S” hook (Step 5 Above) into the eye bolt at the swing back/top
of the swing assembly.
Step 9. Repeat steps 2 through 8 to hand the other side of the swing
*Adjust the height and balance of the swing by moving the “S” hooks one link at a time until satisfied