
Installation & Assembly


Assembly Instructions for Lawn Swing
Thank you for purchasing your heirloom quality furniture.
T
ools Needed: 1/2” & 9/16” Wrench, Socket or Impact Drill, Rubber Mallet, Tape Measure, Drill & 3/16” Drill
Bit, Carpenter’s Square
Before beginning assembly, please take a few moments to carefully read the instructions, familiarize yourself
with the components and understand each step of the process. Likewise, please ensure that the hardware package
contains the items as described below.
Parts List: (1) Back Assembly, (1) Seat Assembly, (1) Right and Left Arm Assemblies, (4) 84” Swing Legs, (2) 40”
Cross Braces, (4) 26” Half Log Braces
Hardware List: (16) 4” Lag Bolts, (4) 4” Eye Bolts, (2) 6”Hex Head Bolts, (2) Hex Head Nuts, (24) Washers,
(2) Long Chains, (2) Short Chains, (8) “S” Hooks
Swing Assembly Instructions:
Step 1. Remove components from shipping boxes. You may lay the cardboard on the floor to prevent marring of
finish.
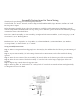
Step 2. Lay one arm assembly (“A” in the image shown on these instructions) on the floor with holes facing
upward.
Step 3. Insert the two tenons of the seat assembly “B” into the holes on the shortest part of the arm assembly.
Step 4. Insert the two tenons of the back assembly “C” into the holes on the longer, angled part of the arm
assembly.
Step 5. Repeat steps 3 and 4 above for opposite arm.
Step 6. Insert lag bolts “D” with washers “E” and eye bolts “F” into holes on outside of arms and tighten fully.
See diagram on reverse for detail.