21” FLAT SCREEN CRT / DVR OBSERVATION SYSTEM WITH 4 NIGHT VISION CAMERAS THE NETVIEWER SOFTWARE APPLICATION for SG21FD3044-161 Network Installation English Version 2.0 MODEL: SG21FD3044-161 www.lorexcctv.com Copyright © 2006 Lorex Technology Inc.
CONTENTS 1 Introduction...........................................................................................................2 1.1 2 Netviewer Software Installation Requirements 2 Install the Netviewer Application in your Computer..............................................3 3 The Netviewer Main Screen .................................................................................6 4 Configure the Netviewer for Network Viewing......................................................7 4.1 4.
1 Introduction This manual describes the functionality of the Netviewer application software which is used to access the DVR/Monitor from your computer over a local or remote network. When installed on your computer, the Netviewer can perform the following functions: NOTE 1.
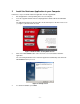
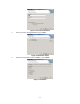
2 Install the Netviewer Application in your Computer Follow these steps to install the Netviewer application from the supplied CD. 1 Exit all applications currently running in the selected computer. 2 Insert the supplied Network Video Security Application software CD into the CD ROM drive. The CD automatically starts when the CD is inserted and opens to the first menu screen (see Figure 1) when the CD is inserted.
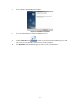
Figure 3: Customer Information 5 Enter your name and organization then press Next. Figure 4: Destination Folder 6 Enter the desired folder for the installation, or press Next.
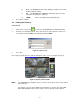
7 Press Install to start installing the program. Figure 6: Installation Complete 8 Press the Finish button to end the installation process. 9 , located on your desktop (the installation process will Find the Netviewer icon put 2 icons on your desktop), and click on it to run the program. 10 The NetViewer main window will appear on the screen as shown below.
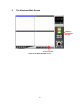
3 The Netviewer Main Screen CONNECT/ DISCONNECT BUTTON SETUP BUTTON Figure 7: The Netviewer Main Screen -6-
4 Configure the Netviewer for Network Viewing The Netviewer allows you to access your DVR/Monitor from a computer in a networking environment: • Local Network Operation (Connected to a Computer on the Local Network) • Remote Network Operation (Connected to a Computer using the internet) To access the DVR/Monitor from a local or remote network requires you to configure your Netviewer application: 4.
3 4.2 b) Port: The DVR/Monitor port entry is 5000 (by default) for Local and Remote Network viewing. c) ID: The User ID entry is admin by default and cannot exceed a maximum of 5 characters, lowercase. d) VIDEO: Choose the NTSC format (North America). Press OK to continue. Viewing the Cameras PROCEDURE to connect to the DVR/Monitor for Network Viewing. 1 Click on the connect icon 2 Enter the User ID and password. Note each cannot exceed 5 characters, lower case. The default User ID is admin.
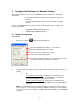
5 5.1 Netviewer Configuration Netviewer Panel Description 13 14 12 11 10a 10b 9b 9a 1 15 2 3 4 5 6 7 8 Figure 10: Netviewer Panel 1 These controls are used to “PLAY, STOP, PAUSE, REW and FF” the recordings saved on the HDD of the DVR/Monitor When the PLAY button is pressed the most recent recorded data will be played regardless of the search data set on the DVR/Monitor. 2 Select the display mode. Available display modes are QUAD, FULL, PIP, POP.
Choose the channel. Set the Brightness Value. Set the Contrast Value. Set the Hue Value. Set the Saturation Value. 7 TIME SEARCH. This feature allows you to Search events on your DVR/Monitor . a) Press the Search button, the window shown below will open. b) Select the desired date and time then press the Search button. The DVR will start searching the data. If the data is found, it will be played automatically.
5.2 Record Video Images Using the Netviewer Using the Netviewer software, you can initiate recording onto the DVR/Monitor’s hard drive or onto the computer’s hard drive where the Netviewer software is installed. To start / stop recording video onto the DVR/Monitor’s Hard Drive, press the the Netviewer application). starts or stops recording on the DVR/Monitor. To start / stop recording video onto the computer’s hard drive, press the button (on button.
• Encoding Codec • Recording Directory • Recording Format • Setting the Recording Channels 5.2.2 Encoding Codec NOTE If you choose the Encoding Codec, you can select the relevant Codec you want to use. You could use any Codec out of the preinstalled Codec on your computer. To view an example of the selection window, see Figure 12 (the actual display could be different depending on your computer system). PROCEDURE 1 Click on the Encoding Codec button from the REC window.
5.2.3 Recording Directory Choose the directory (or folder) in which to save your files of recorded video. PROCEDURE 1 Choose the Recording Directory button from the REC window. A Browse for Folder window will open and allow you to choose the directory in which to save your file. 2 Choose the Folder where you wish to save your video files. 3 Click OK. 5.2.4 Recording Format Use this setting to select the format of the image to be saved.
5.2.5 Setting the Recording Channels Use the AVI Channel setting to select the channels from which the images will to be saved. PROCEDURE 1 Click on the check box to select the channels from which images will be saved.
5.3 Change the Password for the Admin User ID or Guest PROCEDURE 1 NOTE Click on the Setup icon to open the SETUP window. You must be connected (as the administrator) to the DVR/Monitor to change the password. Click on the admin (or guest) icon 2 Select the Login tab to open the Login window. 3 Click on the admin (guest) button to open the Change Password message window.
5.4 Remote DVR/Monitor Settings The DVR window allows you to configure some DVR/Monitor settings from a remote location over your network. (i.e. if your DVR/Monitor is connected to a remote computer by the internet or is on a local network). 1 Click on the Setup icon (to open the SETUP window) 2 Select the DVR tab to see the DVR window. Used to Change the DVR Setting over the Network. Set the data and time. ↵ Press the button to apply the changes.
5.6 Setting the Priority Level for the DVR/Monitor Set the priority level to High for the best possible program performance. When you set the priority level to High, the Netviewer will run smoothly on your computer with multiple programs open. NOTE If you are not logged on as an Admin User you can NOT use the DVR/Monitor Setting menu.
6 6.1 APPENDIX A Port Forwarding the Router If you are remotely connected to your DVR/MONITOR (i.e. the DVR/Monitor is connected to a computer using the internet) port forwarding must be enabled on your router. By default you must forward ports: 5000, 5001, 5002, and 5003 on your router if you are using the default port forward settings. For instructions on how to port forward your router for this product choose one of the following methods. 1 Make sure you set up port forwarding on your router.
2 Choose “Create Account” and fill in the information. NOTE For the Product License entry: Product Code: SG21FD3044-161 (this is the model number found on the back of the unit, or the front of the packaging) MAC Address: use the MAC Address of the DVR/Monitor unit URL Request: Enter your name (maximum 8 characters, lower case) and additional information After registering for the DDNS service and creating an account you will receive an email which confirms your registration and gives you a domain name.
It’s all on the web Product Information Specification Sheets User Manuals Software Upgrades Quick Start Guides Firmware Upgrades VISIT www.lorexcctv.com www.lorexcctv.com Lorex Technology Inc.