
User manual


- 10 -
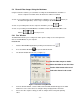
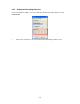
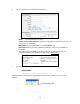
7 TIME SEARCH. This feature allows you to Search events on your DVR/Monitor .
a) Press the Search button, the
window shown below will open.
b) Select the desired date and time
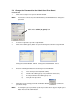
then press the Search button.
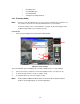
The DVR will start searching the data. If the data is found, it will be played automatically. If there
is no data available for the specified date and time a “DATA NOT FOUND” message will be
displayed.
8 Adjust the PAN/TILT of the camera (PTZ cameras only).
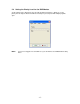
9 a. Print the displayed image.
b. Capture the displayed image of the Netviewer in JPEG file format
10 a. Starts / Stops recording the streaming video viewed over the network on to the
computer’s hard drive.
b. Starts / Stop recording on the DVR/Monitor’s hard drive.
11 Local Player button: Press this button to open the Local Viewer (Player) window to play
your video recordings saved as a file on your computer. The files are saved with a .DVR
extension after the filename to show the file is a recorded video.
12 Connect/ Disconnect button (to the DVR/Monitor from the computer) to view images from
the cameras connected to the DVR/Monitor.
13 Information Display Screen
• Displays the status of DVR/Monitor (NORMAL / ALARM / MOTION /
SCHEDULE REC).
• Indicates if the currently shown video is LIVE or PLAYBACK.
14 Display area for the video image.
15. WM: If the box is ticked up, the “WMK” (which is the water mark) will be displayed and
saved.
NOTE The Admin User has full access. The Guest User can ONLY use the No. 5 and No. 11
buttons.
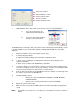
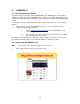
Choose the channel.
Set the Brightness Value.
Set the Contrast Value.
Set the Hue Value.
Set the Saturation Value.