20’’ WIDE SCREEN LCD MONITOR WITH BUILT-IN DIGITAL VIDEO RECORDER Frequently Asked Questions Version: 080718-01 MODEL: L20WD800 www.lorexcctv.com Copyright © 2008 Lorex Technology Inc.
What is included in the box? Table of Contents What are the features? ..............................................................................Error! Bookmark not defined. What is included in the box? ..................................................................................................................... 3 How do I Startup / Shutdown the system? ................................................................................................
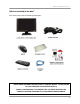
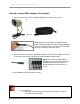
What is included in the box? What is included in the box? The system comes with the following components: * HARD DRIVE SIZE AND CAMERAS VARY BY SPECIFIC MODEL. PLEASE REFER TO YOUR PACKAGE FOR CONTENT DETAILS. CHECK YOUR PACKAGE TO CONFIRM THAT YOU HAVE RECEIVED THE COMPLETE SYSTEM, INCLUDING ALL COMPONENTS SHOWN ABOVE.
What is included in the box? How do I Startup / Shutdown the system? System Loading Sequence • Press the POWER button located on the front panel of the System to start the unit, or press the Power Button on the Remote Control. • The System will perform a Hard Drive check The unit will initially load to a split screen view, displaying all channels (if available). Empty channels will be displayed in Blue. NOTE: If a new HARD DRIVE is detected, the system will prompt you to FORMAT the drive.
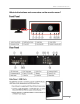
What is included in the box? What do the buttons and connectors on the monitor mean? 5
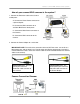
How do I connect DIN cameras to the system? How do I connect DIN cameras to the system? 1. Connect the female end of the supplied DIN extension cable to the camera. NOTE: Confirm that the arrows on the DIN Camera Cable and the DIN Extension cable are pointed together when connecting the cable. If the pins in the DIN Cable are bent, the Camera will NOT function. 2. Connect the male end of the supplied DIN extension cable to an open DIN camera input on the back of the System.
How do I connect DIN cameras to the system? How do you connect BNC cameras to the system? 1. Connect the Extension cable to the Camera and System: A. Connect the Barrel Power connector to a power adaptor. B. Connect the BNC connector to an available BNC Port of the System. C. Connect the Male Power connector to the Camera. D. Connect the BNC connector to the Camera. 2. Connect the Power Adaptor to a wall outlet.
How do I connect DIN cameras to the system? What is DVR Mode and how do I use is? DVR Mode is the primary mode for the System, and is displayed when the system is powered on. In DVR Mode, the system performs the following functions: • • • • • View and Record live video channels in Single, Quad, Multi-Display or Sequence Mode. Customize the recording on up to 8 camera channels in continuous, motion or alarm recording modes.
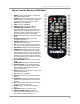
How do I connect DIN cameras to the system? How do I use the Remote in DVR Mode? 1. MODE: Press the Mode Button to display the Multi-Function Mode Menu. 2. POWER: Press the Power Button to turn off the Monitor Display. Press and hold the button for 3 seconds to shut down the entire system. 3. DVR: Change to DVR Mode. 4. VGA: Change to VGA Mode. 5. RETURN: Exits from a System Menu. 6. NAVIGATION/PLAYBACK: Press the Navigation Controls to move Up, Down, Left or Right in System and Mode menus.
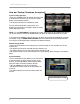
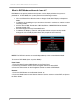
How do I connect DIN cameras to the system? How do I use the On-Screen Display Menu? The On-Screen Display Menu is accessed by either: • Pressing the Up or Down Arrows on the Front Panel • Right Clicking the Mouse The Menu options include: 1. CHANNELS: Select a Channel Number (1~8) to display a camera in Full Screen Mode. 2. SETUP: Displays the System Setup Menu. Please refer to the System Setup section for detailed configuration. 3.
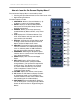
How do I connect DIN cameras to the system? What do the icons on the System Display mean? 5 1 2 3 4 1. Camera Title 2. Network Indicators • Green: Indicates that the network connection is stable. • Blue: Indicates that the network connection is experiencing difficulties. • Red: Indicates that the network connection is not strong. 3. Date and Time 4. Hard Drive Recording Settings • If displaying a % under 100% (example: ), the drive is not yet full.
How do I connect DIN cameras to the system? What are the Display Modes, and how do I use them? Cameras can be displayed in several different modes by pressing the Display Button on the Remote Control or Mouse Menu A Display Selection window will appear onscreen. Select from the available display types: Benefits! Business: • Use the 8 Channel Split View to view multiple cameras simultaneously. Residential: • Us the Quad (4) Channel to monitor the front door, back door, car port, and garage door.
How do I connect DIN cameras to the system? What is PIP and how do I use it? PIP means “Picture In Picture”. VGA/Component Mode/Picture Frame: When using the PIP function, the DVR screen is displayed in the PIP Video Display DVR Mode: When using the PIP function, the VGA or Component screen is displayed in the PIP window (referred to as Reverse PIP). This function could be used to watch a Movie while still monitoring the Live Video display. 1.
How do I connect DIN cameras to the system? VGA Mode PIP in DVR Mode Note: When in VGA, Component, or Picture Frame Mode, the PIP window will only display DVR Mode. 2.
How do I connect DIN cameras to the system? Remote Control: • Push the PIP button once to display the VGA (computer) screen in the PIP • Push the PIP button again to display the Component (DVD) in PIP • Push the PIP button again to close the PIP window DVR Mode PIP in VGA Mode Benefits! Business: • Multi-task o Work on your computer while monitoring your cameras o Monitor company stocks online Residential: • Space Saver o Watch a movie while keeping an eye on your cameras 15
What is DVR Mode? What is DVR Mode? DVR (Digital Video Recorder) Mode is the default mode, and it gives access to the system menus. How do I access DVR Mode? To access DVR Mode (from any other Mode): Front Panel: 1. Press the Multi-Function Mode Button on the Front Panel. 2. Use the Up and Down arrows on the Navigation Control to select DVR. 3. Press the Enter button on the Navigation Control to switch to DVR Mode. Remote: 1. Press the DVR Button on the Remote Control -or2.
What is VGA Mode? What is VGA Mode? VGA Mode is used to display a device (i.e. a Computer) connected to the VGA Port on the monitor. If you press the PIP button on your remote control, you can view your DVR in a Picture In Picture. This provides you with the ability to view images from your cameras while working on your PC.
How do I access and use VGA Mode? How do I access and use VGA Mode? To access VGA Mode: Front Panel: 1. Press the Multi-Function Mode Button on the Front Panel. 2. Use the Up and Down arrows on the Navigation Control to select VGA. 3. Press the Enter button on the Navigation Control to switch to VGA Mode. Remote: 1. Press the VGA Button on the Remote Control -or2. Press the Mode button on the Remote Control. 3. Use the arrows to select VGA, and press the Enter button. How to Use VGA Mode: 1.
What is Component Mode? What is Component Mode? Component Mode is used to display a device connected to the Component green, blue, and red inputs (Y/Pb/Pr) in high resolution (i.e. DVD Player, Set Top Box, Satellite Receiver) The Audio from the Component Device is connected to the Red and White component audio inputs. If you press the PIP button on your remote control, you can view your DVR in a Picture In Picture. This provides you with the ability to view images from your cameras while watching a movie.
How do I access and use Component Mode? How do I access and use Component Mode? To access Component Mode: Front Panel: 1. Press the Multi-Function Mode Button on the Front Panel. 2. Use the Up and Down arrows on the Navigation Control to select COMPONENT. 3. Press the Enter button on the Navigation Control to switch to COMPONENT Mode. Remote: 1. Press the COMPONENT Button on the Remote Control -or2. Press the Mode button on the Remote Control. 3.
What is Picture Frame Mode? What is Picture Frame Mode? Picture Frame Mode is used to display JPG images located on a USB Thumbstick (connected to a USB Port on the side of the monitor). If you press the PIP button on your remote control, you can view your DVR in a Picture In Picture. This provides you with the ability to view images from your cameras while looking at your pictures. Benefits! Business: • Advertizing o (ie.)Restaurant: Display a menu with prices o (ie.
How do I access and use Picture Frame Mode? How do I access and use Picture Frame Mode? To access Picture Frame Mode: Front Panel: 1. Press the Multi-Function Mode Button on the Front Panel. 2. Use the Up and Down arrows on the Navigation Control to select PICTURE FRAME. 3. Press the Enter button on the Navigation Control to switch to PICTURE FRAME Mode. Remote: 1. Press the PICTURE FRAME Button on the Remote Control -or2. Press the Mode button on the Remote Control. 3.
What is Installation Guide Mode? What is Installation Guide Mode? Displays the system installation video (12 minutes) IT IS HIGHLY RECOMMENDED TO VIEW OUR EASY TO FOLLOW INSTALLATION VIDEO. YOU CAN PAUSE, REWIND OR FAST FORWARD TO ALLOW YOU TO INSTALL THE SYSTEM WITH STEP BY STEP INSTRUCTIONS. How do I access Installation Guide Mode? How to access Installation Guide Mode: Front Panel: 1. Press the Multi-Function Mode Button on the Front Panel. 2.
How do I access Installation Guide Mode? It’s all on the web Product Information Specification Sheets User Manuals Software Upgrades Quick Start Guides Firmware Upgrades VISIT www.lorexcctv.com www.lorexcctv.com Lorex Technology Inc.