
- Lorex Digital Video Surveillance Recorder Instruction Manual


43
Using the Main Menu
2 Select the camera you wish to configure.
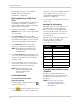
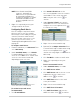
The Motion Detection configuration
window opens.
Motion detection
is off
Motion Detection configuration window
Motion detection
is on
Area Selectors
3 Click the area or areas where you would
like to disable / enable motion detection.
Areas covered by motion detection are
indicated by yellow dots. Use the Area
Selectors to enable or disable a larger
area.
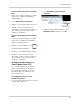
4 Click the Sensitivity bar and scroll up /
do
wn to adjust the motion detection
sensitivity. A higher sensitivity means that
motion events will be triggered by smaller
movements. A lower sensitivity means
motion events require larger movements
to trigger.
Sensitivity bar
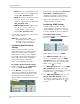
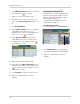
Backup
The Backup Menu allows you to
backup recorded video to a USB
flash drive (not included) and format a
connected USB flash drive.
You must format your USB flash drive before
yo
u can backup video from your DVR.
NOTE:
The system supports most brands of
USB flash drives from 1~ 16GB.
Backup Menu
To access the Backup Menu, click then .
For firmware upgrade instructions, see
“Appendix G: Upgrading Firmware” on
page 118.
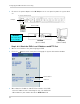
Formatting the USB Drive
Prior to backing up data, you must
format the USB flash drive so it will
work properly with the DVR.
ATTENTION: Formatting erases
all data
on the USB flash drive. This step
cannot
be undone.
To format the USB drive:
1 Connect a USB flash drive to one of the
US
B ports on the front or rear panel of the
DVR.
2 From the Backup Menu, click Fo
rmat
Device.
3 Click Yes to format
the USB flash drive or
click No to cancel.
Please allow a few moments for