
- Lorex Digital Video Surveillance Recorder Instruction Manual


3
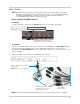
5 Navigation Buttons:
•
: Press to move cursor up.
•
: Press to move cursor down.
•
: Press to move cursor left.
•
: Press to move cursor right.
6 Hard Drive / Power LED:
• Solid: Device is on / powering up.
• Flashing: Device is recording to hard drive.
7 IR Receiver:
Internal IR receiver for the remote control.
8 Flex IR Extender Port: Connect the Fl
ex IR Extender to increase the remote control range or
use the remote control without needing line of sight to the DVR (must have line of sight to Flex
IR Extender).
9 USB Ports:
Connect a USB mouse (included), touch screen monitor (not included), or a USB
flash drive (not included) for data backup and firmware updates.
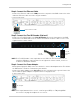
Rear Panel (8-Channel)
1 2 3 4 5
6 7 8
9
1 DC 12V: Connect the included DC power adapter to power on the DVR.
2 LAN: Connect a CAT 5 RJ45 Ethernet cable for local and remote connectivity.
3 HDMI: Connect to an HDMI-compatible TV or monitor (not included). Note that the DVR
c
annot use a VGA and HDMI monitor at the same time.
4 RS485: Connect RS485 ca
bles for compatible PTZ cameras (not included).
5 VGA: Connect to a V
GA monitor (not included). Note that the DVR cannot use a VGA and HDMI
monitor at the same time.
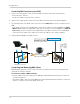
6 USB: Con
nect
to a Windows 7® Touch compatible touch screen monitor (not included),
mouse (included), USB flash drive (not included) for data backup and firmware updates), or
self-powered external hard drive (not included) for disk mirroring (PC required) or expansion.
NOTE: The DVR supports a single external hard drive up to a maximum size of 2TB. The
e
xternal hard drive must be self-powered to work with the system; it cannot receive
power from the DVR’s USB port.
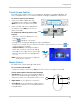
7 Audio Ou
t: Output for audio channel.
8 Audio In:
Input for audio channel.
9 BNC Video
In: Connect up to 8 BNC cameras.