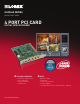
QLR0440 Series Quick Start Guide 4 PORT PCI CARD DIGITAL VIDEO RECORDER PACKAGE CONTENTS: 1 x 4 Port PCI Capture Card 1 x User’s Manuals 1 x Quick Start Guide 1 x Software CD ENGLISH REVISION # R3 NOTE: QLR0444 includes: 4 x Cameras 4 x 60ft extension cables 4 x Power adaptors 4 x 4 PIN to RCA Convertor cables (ACC425 - optional)
STEP 1 For detailed setup information, please refer to your User’s manual. Hardware Installation NOTE: Please turn off the computer’s power prior to installing the QLR Capture Card. If you are unfamiliar with installing PC hardware, it is recommended to have a PC technician perform the installation. 1. Using a screw driver remove the screws from the cover of your computer. 2. The picture shown is of a computer with its cover removed. 3. Insert the PCI Capture card into an available expansion slot. 4.
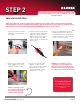
STEP 2 Before you install a camera, carefully plan where and how you will position the camera, and where you will route the cables. Camera Installation NOTE: The 4 Port PCI card has 4 Video inputs, allowing you to connect up to 4 cameras (the instructions below apply to the cameras included with QLR0444). You may connect your own cameras, however please make sure to use a proper power adaptor NOT EXCEEDING 12V DC for each camera. * 1.
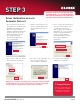
STEP 3 Driver Installation on Local Computer (Server) VistaPro4 software CD includes both Video and Audio Drivers. It is recommended that you install the Video Driver first and follow the same steps to install the Audio driver. 1. Once you turn on your PC after inserting the PCI Card, Microsoft Windows™ will automatically detect the newly installed hardware and will prompt you to install the drivers. Insert the VistaPro4 Software CD and proceed with the driver installation.
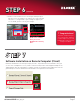
STEP 4 It is recommended to connect the cameras to your PC prior to installing the VistaPro4 software application VistaPro4 Software Installation on Local Computer (Server) 1. Browse to your CD drive and open the VistaPro4 software. 2. Open to view the contents from within the Install folder. 3. Double click to execute the Setup.exe file. 4. Click “Next” and proceed with your installation. 5. Enter the necessary information and press the “Next” button.
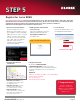
STEP 5 Register for Lorex DDNS Port Forward Your Router First before proceeding with the set-up. You must forward Ports: 2000, 2001, 2002, 2003 (TCP/IP). All routers are different. To port forward your router, please refer to your router’s user manual. A router configuration guide featuring the most commonly used routers in the market is available on www.lorexcctv.com/support in the Consumer’s Guide Section. 1.
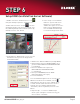
STEP 6 Setup DDNS (on VistaPro4 Server Software) 1. Double click on the “VistaPro4 Server” icon from your desktop to open the VistaPro4 Server icon. You software and click on the “Setup” will now be asked to enter the User Confirm “User ID” (admin by default) and “Password” (master by default). Press the “OK “ button. 2.
STEP 6 (continued) 4. Double click the VistaPro4 Server icon from your desktop to open it. You will see the live images if the cameras are connected. You will also see “IP registered” if your settings are right. If you see “IP failed”, please recheck your settings. Congratulations! Note: Click “Unblock” when you see the Windows XP™ Security Alert. You have completed Step 6 successfully. Your computer is now ready to view, record and play back video remotely using Lorex DDNS.
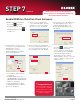
STEP 7 (continued) NOTE: Please make sure that VistaPro4 Server Software is running while configuring the VistaPro4 Client Software. Enable DDNS (on VistaPro4 Client Software) 1. Double click on the VistaPro4 Client icon from your desktop to open the Client 2. On the “Select Setup System” screen and from under “System” you will see “Local” selected by default. Press the “Ok” button. software and click on the “Setup” icon. 4.
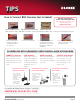
TIPS How to Connect BNC Cameras (not included) Camera with BNC Connector BNC Male to RCA Female Connector Kit (Model BNC-4PK) You can order the connector kit from our website at www.lorexcctv.com RCA Male to Male cable BNC Male to RCA Female Connector BNC Cameras require BNC Male to Female connector & RCA Male to Male cable to connect to the VistaPro4 PCI Card. 1. Connect BNC female end of the camera to the BNC Male end of the connector. 2. Connect the RCA Cable. 3.