
Troubleshooting

4
Copyright 2013 Lorex Technology Inc.
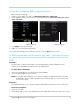
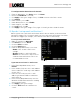
3 Under Channel, select the channel you wish to configure.
4 Beside th
e Record Mode drop-down menu, select Schedule.
NOTE: If y
ou select Continuous, the DVR will record all video from this channel on a 24/7 basis.
5 Cl
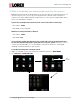
ick the Schedule button. The Record Schedule Setup window opens.
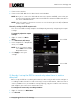
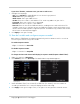
Select recording type: Alarm, Continuous or No Record
Schedule shows recording
type for each hour:
• Alarm (Red):
Record alarms only
• Continuous (Green):
Record all video data
• No Record (Blank):
Do not record
6 Click in the box next to Alarm.
7 Click on
every hour in the SUN
(Sunday) row. The row turns red
to show that the DVR will only
record events on Sundays.
NOTE: You can also configure a
custom schedule. For
example, you might want
to create a schedule to
record all data during
business hours and
record events only
outside of business
hours.
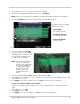
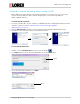
8 Set
the Copy drop-down to SUN. and the To drop-down to All.
9 Cl
ick Copy; then click Ok. The entire schedule turns red to show that the DVR will only record
when there is an event.
10 Cl
ick Apply to save your changes. Then, click Exit to return to the Record menu.
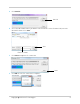
To copy a recording schedule to all channels:
1 F
rom the Record menu, under Channel, select the channel with the schedule you wish to
copy.
2 Under Copy T
o, select All.
3 Cl
ick Copy; then click Ok.
4 Cl
ick Apply to save your changes. Click Exit to return to the Main Menu.