
User's Manual


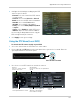
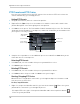
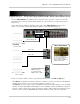

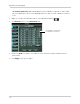


Table Of Contents
- Front Panel
- Rear Panel
- Basic Setup
- Step 1: Connect the BNC Cameras
- Step 2: Connect the Mouse
- Step 3: Connect the Ethernet Cable
- Step 4: Connect the Monitor
- Step 5: Connect the Power Adapter and Power on the DVR
- Step 6: Verify Camera Image
- Step 7: Set the Time
- Default System Password & Port Numbers
- Quick Access to System Information
- Connecting Cameras
- Mouse Control
- Remote Control
- Using the On-Screen Display
- Setting the Date and Time
- Recording
- Playback and Backup
- Managing Passwords
- Using the Main Menu
- Display
- Configuring Custom Channel Names
- Changing the Position of the Channel Name
- Adjusting Camera Color Settings
- Enabling Covert Recording
- Configuring the Time and Recording Time Display
- Configuring Sequence Time
- Changing the Video-out Resolution
- Restoring the System’s Resolution if you see a Blank Screen
- Adjusting Menu Transparency
- Adjusting the Video Margin
- Adding Privacy Zones
- Record
- Search
- Network
- Alarm
- Device
- System
- Advanced
- Display
- Setting up your DVR for Remote Connectivity
- Lorex Client 11: Client Software for PC
- Remote Viewing Interface
- Logging into the System
- Changing Viewing Modes
- Taking Screen Shots
- Recording Video
- Showing / Hiding Channels
- Adjusting Sub-menu Options
- Changing the Save Directory of Screenshots or Recorded Video
- Changing the Format of Recorded Video (PC Only)
- Configuring PTZ Settings
- Video Playback
- Configuring Display Settings
- Configuring Privacy Zone Settings
- Configuring Recording Parameters
- Configuring the Recording Schedule
- Configuring System Recording Quality
- Configuring Basic Network Settings
- Configuring the System Substream
- Configuring Email Notification Settings
- Changing the Mobile User Name and Password
- Configuring DDNS Settings
- Configuring Motion Detection Settings
- Configuring your System to "Beep" During Motion
- Configuring Alarm Notifications
- Configuring Hard Drive Recording Mode
- Configuring PTZ Parameters
- Configuring the System Time and Date
- Changing the System’s Menu Time Out
- Configuring System User Accounts
- Viewing System Information
- Upgrading System Firmware
- Restoring Default Settings
- Configuring Event Settings
- Configuring Auto-Reboot
- Lorex Player 11: Playing Backed up Video on PC
- Lorex Player for Mac: Viewing Backed up Video on Mac
- Mobile Apps: Accessing your DVR Using a Mobile Device
- Appendix A: System Specifications
- Appendix B: Connecting a PTZ Camera
- Appendix C: Connecting Additional External Monitors
- Appendix D: Recording Audio
- Appendix E: Replacing the Hard Drive
- Troubleshooting
- Getting Started
107
Appendix B: Connecting a PTZ Camera
3 Configure the following according to your PTZ
camera’s specifications:
• Channel: S
elect the channel the PTZ camera
is connected to.
• Pr
otocol: Select from Pelco-D or Pelco-P
• Baud
rate: Select the PTZ camera’s baud rate
• Data B
it: Select from 5~8 data bits.
• Stop Bit: Sel
ect from 1 or 2 stop bits.
• Pa
rity: Select from None, Odd, Even, Mark
or Space.
• Crui
se: Select Enable to enable PTZ cruise.
• Addr
ess: Enter the PTZ camera’s address
Use the Copy To drop-down menu to copy the
PTZ
settings to multiple channels.
4 Cl
ick Apply to save your settings.
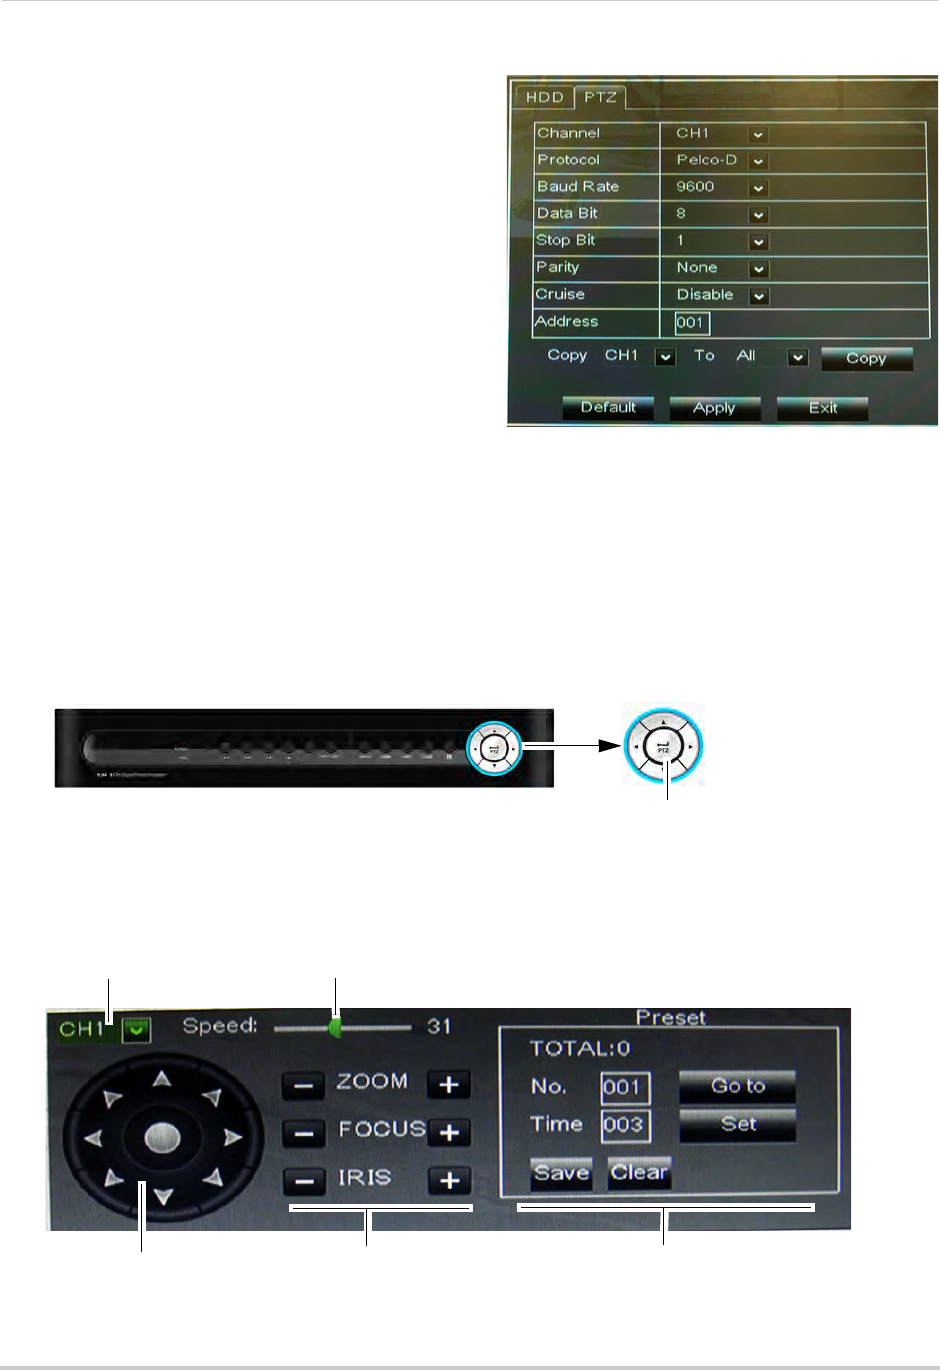
Using the PTZ Menu (Local DVR)
To control the PTZ camera locally on your DVR:
1 Sel
ect the channel that the PTZ camera is connected to.
2 Pr
ess and hold the PTZ button on the front panel of the system for 6 seconds. Enter the
system password. The PTZ menu opens.
3 Use
the on-screen PTZ controls to control the camera.
PTZ button
Press & hold 6 seconds
Channel:
Select the channel the PTZ
camera connects to.
Click the + and - symbols to
adjust the camera Zoom,
Focus and Iris settings
Direction keys:
Click to pan and tilt the camera
Speed Slider:
Increase or decrease the pan and tilt
speed
Camera Pre-set
controls