
User's Manual
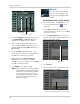
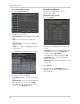
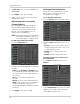
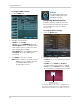
Table Of Contents
- Front Panel
- Rear Panel
- Basic Setup
- Step 1: Connect the BNC Cameras
- Step 2: Connect the Mouse
- Step 3: Connect the Ethernet Cable
- Step 4: Connect the Monitor
- Step 5: Connect the Power Adapter and Power on the DVR
- Step 6: Verify Camera Image
- Step 7: Set the Time
- Default System Password & Port Numbers
- Quick Access to System Information
- Connecting Cameras
- Mouse Control
- Remote Control
- Using the On-Screen Display
- Setting the Date and Time
- Recording
- Playback and Backup
- Managing Passwords
- Using the Main Menu
- Display
- Configuring Custom Channel Names
- Changing the Position of the Channel Name
- Adjusting Camera Color Settings
- Enabling Covert Recording
- Configuring the Time and Recording Time Display
- Configuring Sequence Time
- Changing the Video-out Resolution
- Restoring the System’s Resolution if you see a Blank Screen
- Adjusting Menu Transparency
- Adjusting the Video Margin
- Adding Privacy Zones
- Record
- Search
- Network
- Alarm
- Device
- System
- Advanced
- Display
- Setting up your DVR for Remote Connectivity
- Lorex Client 11: Client Software for PC
- Remote Viewing Interface
- Logging into the System
- Changing Viewing Modes
- Taking Screen Shots
- Recording Video
- Showing / Hiding Channels
- Adjusting Sub-menu Options
- Changing the Save Directory of Screenshots or Recorded Video
- Changing the Format of Recorded Video (PC Only)
- Configuring PTZ Settings
- Video Playback
- Configuring Display Settings
- Configuring Privacy Zone Settings
- Configuring Recording Parameters
- Configuring the Recording Schedule
- Configuring System Recording Quality
- Configuring Basic Network Settings
- Configuring the System Substream
- Configuring Email Notification Settings
- Changing the Mobile User Name and Password
- Configuring DDNS Settings
- Configuring Motion Detection Settings
- Configuring your System to "Beep" During Motion
- Configuring Alarm Notifications
- Configuring Hard Drive Recording Mode
- Configuring PTZ Parameters
- Configuring the System Time and Date
- Changing the System’s Menu Time Out
- Configuring System User Accounts
- Viewing System Information
- Upgrading System Firmware
- Restoring Default Settings
- Configuring Event Settings
- Configuring Auto-Reboot
- Lorex Player 11: Playing Backed up Video on PC
- Lorex Player for Mac: Viewing Backed up Video on Mac
- Mobile Apps: Accessing your DVR Using a Mobile Device
- Appendix A: System Specifications
- Appendix B: Connecting a PTZ Camera
- Appendix C: Connecting Additional External Monitors
- Appendix D: Recording Audio
- Appendix E: Replacing the Hard Drive
- Troubleshooting
- Getting Started
37
Using the Main Menu
Changing the file size changes the
duration of backed up files. For
example, if you select 15 minutes as
your file size, the system stores video
files in 15 minute durations.
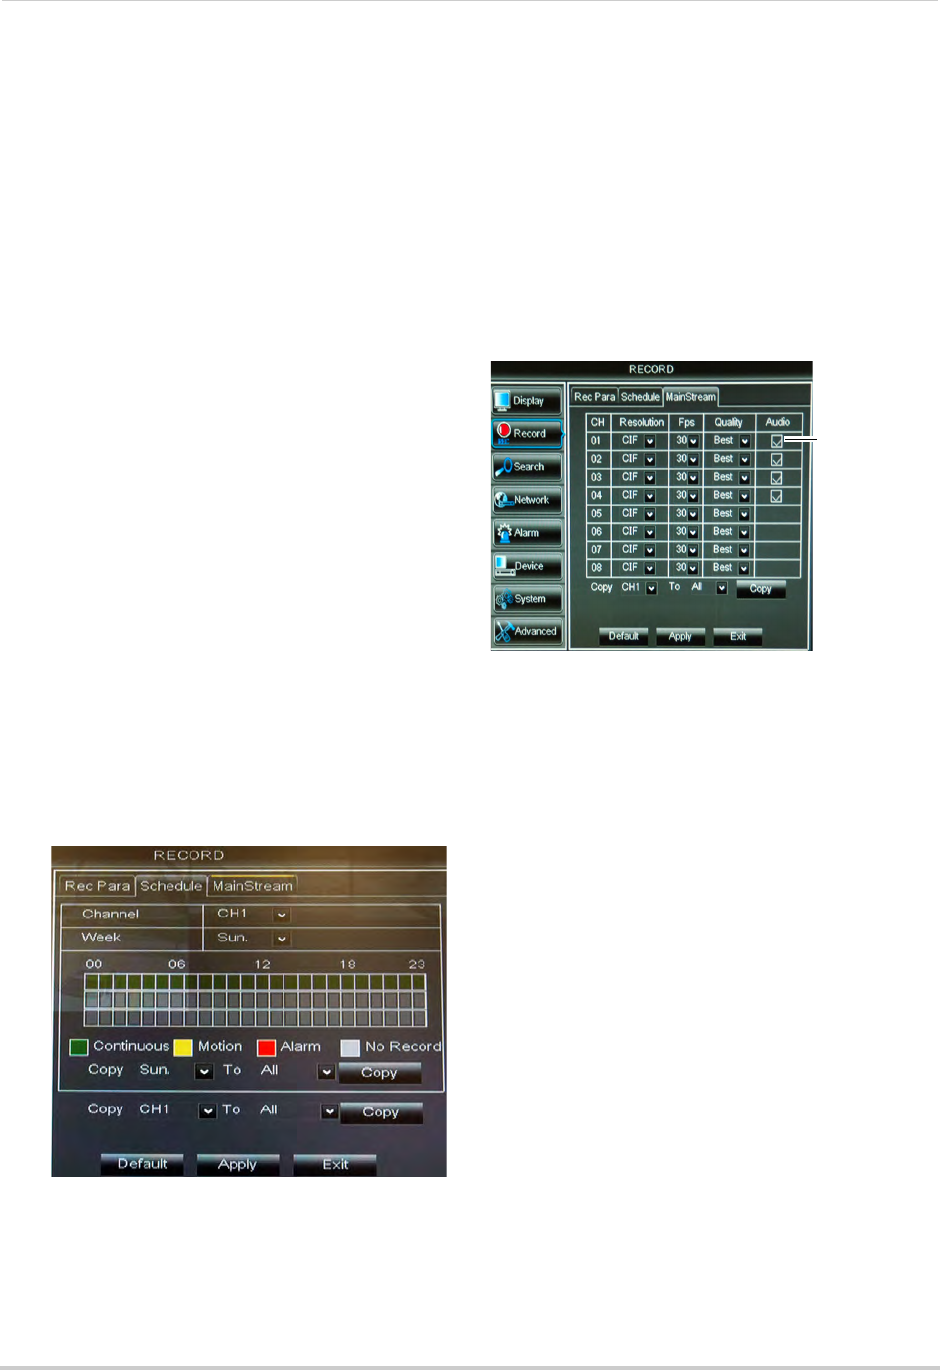
Configuring the Recording
Schedule (Continuous, Motion,
Alarm)
To configure the recording schedule:
1 Cl
ick the Schedule tab.
2 Co
nfigure the following:
• Channel: Sel
ect the channel you wish to
configure the schedule for.
• We
ek: Select the day of the week you wish
to configure.
3 Click inside
the grid to configure the
recording schedule:
• The recording schedule is arranged as a
g
rid. Each row represents a recording type
(Continuous, Motion, and Alarm), and each
box represents an hour.
• Recording for each recording type is
enabl
ed during the selected hour when the
box is filled in with the corresponding
color. Recording for each recording type is
disabled for the selected hour when the
box is gray.
4 (Optional): Use the
top Copy and Copy To
drop-down to copy the recording schedule
to a specific day or all days. Click Copy to
copy the schedule.
5 (Optio
nal): Use the bottom Copy and Copy
To drop-down to copy the recording
schedule to a specific channel or all
channels. Click Copy to copy the schedule.
6 Click Appl
y to save your settings.
Enabling Audio Recording
Audio-capable cameras are required
(not included) for audio recording.
To enable audio recording:
1 Click the Ma
inStream tab.
2 Beside the
corresponding channel, select
or deselect the checkbox under Audio to
enable or disable audio recording.
3 Click Appl
y to save your settings.
Configuring Recording Quality,
Resolution, and Video Frame Rate
You can configure the recording quality,
recording resolution and video frame
rate for each channel.
To change the recording quality,
re
cording resolution, and video frame
rate:
1 Click the Ma
inStream tab.
Audio
checkbox