
Owner's Manual


Table Of Contents
- NVR Overview
- Basic Setup
- Step 1: Connect the IP Cameras
- Step 2: Connect the Mouse
- Step 3: Connect the Ethernet Cable
- Step 4: Connect the Monitor
- Step 5: Connect the Power Adapter and Power on the NVR
- Step 6: Verify Camera Image
- Step 7: Set the Time
- Default System Password & Port Numbers
- Quick Access to System Information
- Installing Cameras
- Mouse Control
- Remote Control
- Using the On-Screen Display
- Setting the Date and Time
- Recording
- Playback
- Backing Up Video
- Managing Passwords
- Using the Main Menu
- Manual
- HDD
- Record
- Camera
- Configuration
- Maintenance
- Shutdown
- Setting up your NVR for Remote Connectivity
- Client Software for PC
- Control Panel
- Main View
- Video Player
- E-Map
- Event Search
- Remote Playback
- Add Camera
- Local Log Search
- Account Management
- Device Management
- Configuring an NVR Through Device Management
- Camera Settings
- Adjusting Picture Settings
- Configuring Video Quality
- Configuring Camera Recording Schedules
- Configuring the Camera Video Display (OSD) and Privacy Masks
- Configuring Motion Detection Settings
- Configuring Tampering Alarm Settings
- Configuring Video Loss Alarms
- PTZ Control (Not Supported)
- Network Connection (Not Supported)
- System Configuration
- Connecting to your NVR Using a Web Browser
- Mobile Apps: Accessing your NVR Using a Mobile Device
- Appendix A: System Specifications
- Appendix B: Installing or Replacing the Hard Drive
- Troubleshooting
- Getting Started
88
Client Software for PC
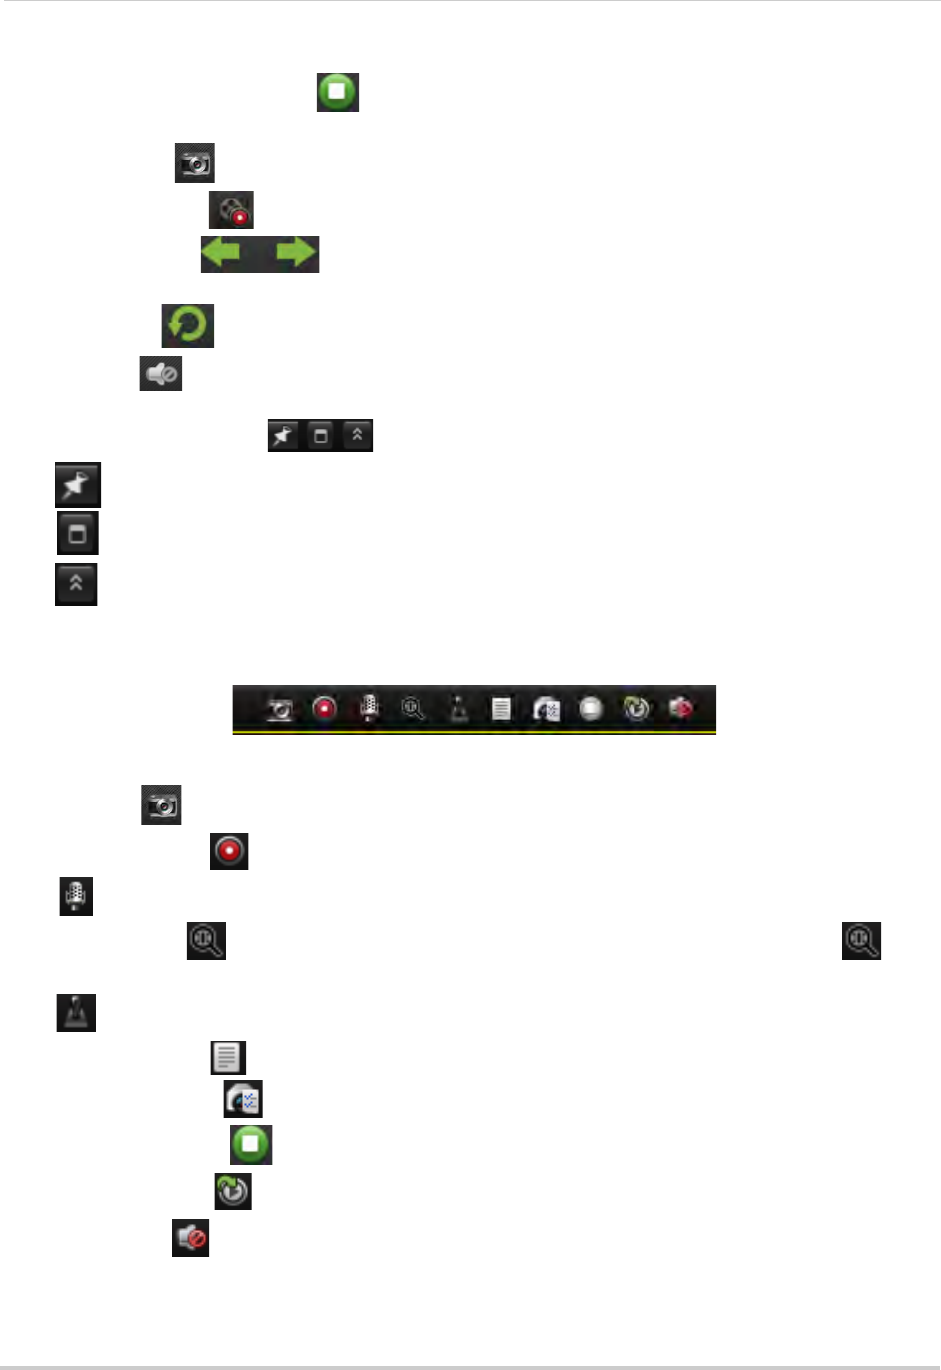
• Stop/Resume Live Display : Click to stop camera streaming on all channels. Click again
to resume camera streaming.
• Screenshot
: Click to save a screenshot of the currently selected channel.
• Manual Reco
rd : Click to start/stop manually recording the currently selected channel.
• Previous/Next
: C l i c k t o g o t o t h e p re v i o u s o r n e x t c a m e r a o r p a g e w h e n S e q u e n c e
mode is enabled.
• Sequence
: Click to start/stop Sequence mode.
• Volume
: Click to control volume.
7 Alarm Panel Contr
ols:
• Auto-hide: Click to enable/disable alarm panel auto-hide.
•
Maximize Alarm Panel: Click to open the Alarm Panel in its own tab.
•
Show/hide Alarm Panel
8 Camera Display: Click t
o select a channel. Hold the mouse over the channel to access the
Camera Toolbar. The camera toolbar contains the following options:
Camera Toolbar
• Capture : Click to take a screenshot from the currently selected camera.
• Manual Record
: Click to start/stop manual recording of the currently selected camera.
•
: Not supported.
• Digital Zoom
: Click to enable digital zoom mode. The cursor will change to a icon.
Then, click and drag on the camera picture to zoom in. Click again to zoom out.
•
: Not supported.
• Camera Status
: Show the camera status menu.
• Camera Settings
: Open the Camera Settings menu. See “Camera Settings” on page 115.
• Stop Live Display
: Click to stop streaming the selected camera.
• Quick Playback
: Click to open Quick Playback mode.
• Mute audio
: Click to mute/unmute audio from the selected camera. Audio-enabled
cameras required (not included).
9 CPU and Network Statu
s: Shows the level of CPU and network use on your computer.