
Owner's Manual


Table Of Contents
- NVR Overview
- Basic Setup
- Step 1: Connect the IP Cameras
- Step 2: Connect the Mouse
- Step 3: Connect the Ethernet Cable
- Step 4: Connect the Monitor
- Step 5: Connect the Power Adapter and Power on the NVR
- Step 6: Verify Camera Image
- Step 7: Set the Time
- Default System Password & Port Numbers
- Quick Access to System Information
- Installing Cameras
- Mouse Control
- Remote Control
- Using the On-Screen Display
- Setting the Date and Time
- Recording
- Playback
- Backing Up Video
- Managing Passwords
- Using the Main Menu
- Manual
- HDD
- Record
- Camera
- Configuration
- Maintenance
- Shutdown
- Setting up your NVR for Remote Connectivity
- Client Software for PC
- Control Panel
- Main View
- Video Player
- E-Map
- Event Search
- Remote Playback
- Add Camera
- Local Log Search
- Account Management
- Device Management
- Configuring an NVR Through Device Management
- Camera Settings
- Adjusting Picture Settings
- Configuring Video Quality
- Configuring Camera Recording Schedules
- Configuring the Camera Video Display (OSD) and Privacy Masks
- Configuring Motion Detection Settings
- Configuring Tampering Alarm Settings
- Configuring Video Loss Alarms
- PTZ Control (Not Supported)
- Network Connection (Not Supported)
- System Configuration
- Connecting to your NVR Using a Web Browser
- Mobile Apps: Accessing your NVR Using a Mobile Device
- Appendix A: System Specifications
- Appendix B: Installing or Replacing the Hard Drive
- Troubleshooting
- Getting Started
43
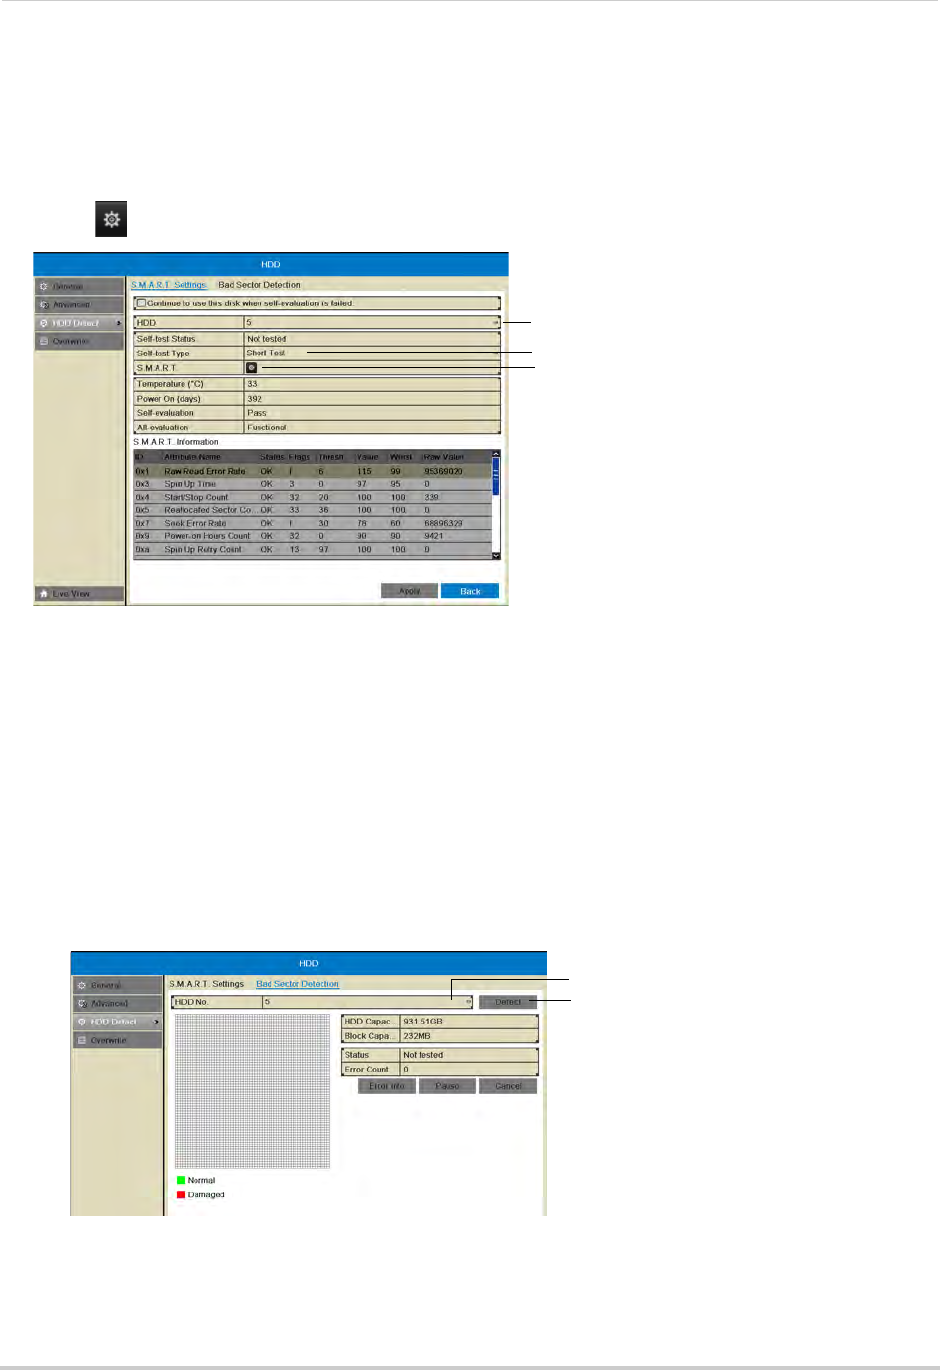
HDD
2 Under HDD, select the hard drive you would like to check.
NOTE: You can see the HDD No. of installed hard drives under the HDD>G
eneral sub-menu.
3 Under Sel
f-test Type, select the type of S.M.A.R.T. test you would like to run.
4 Click
next to S.M.A.R.T. to begin the S.M.A.R.T. test. Wait for the test to complete.
Select S.M.A.R.T. test type
Click to start test
Select hard drive
Checking the Hard Drive for Errors
The NVR can check the hard drive for errors or bad sectors.
To check the hard drive for errors:
1 Right-click and then click Menu>HDD>HDD Detect>Bad
Sector Detection.
2 Under HDD, sel
ect the hard drive you would like to check.
NOTE: You can see the HDD numbers of installed hard drives under the HDD>G
eneral
sub-menu.
3 Click De
tect to begin the scan. The NVR will scan the hard drive for bad sectors and show the
results in the chart. Green blocks are normal sectors, and red blocks are damaged sectors.
Select hard drive
Start bad sector test
The hard drive scan may take up to a couple hours. If you exit the Bad Sector Detection
sub-menu, the scan will be paused.