
Owner's Manual


Table Of Contents
- NVR Overview
- Basic Setup
- Step 1: Connect the IP Cameras
- Step 2: Connect the Mouse
- Step 3: Connect the Ethernet Cable
- Step 4: Connect the Monitor
- Step 5: Connect the Power Adapter and Power on the NVR
- Step 6: Verify Camera Image
- Step 7: Set the Time
- Default System Password & Port Numbers
- Quick Access to System Information
- Installing Cameras
- Mouse Control
- Remote Control
- Using the On-Screen Display
- Setting the Date and Time
- Recording
- Playback
- Backing Up Video
- Managing Passwords
- Using the Main Menu
- Manual
- HDD
- Record
- Camera
- Configuration
- Maintenance
- Shutdown
- Setting up your NVR for Remote Connectivity
- Client Software for PC
- Control Panel
- Main View
- Video Player
- E-Map
- Event Search
- Remote Playback
- Add Camera
- Local Log Search
- Account Management
- Device Management
- Configuring an NVR Through Device Management
- Camera Settings
- Adjusting Picture Settings
- Configuring Video Quality
- Configuring Camera Recording Schedules
- Configuring the Camera Video Display (OSD) and Privacy Masks
- Configuring Motion Detection Settings
- Configuring Tampering Alarm Settings
- Configuring Video Loss Alarms
- PTZ Control (Not Supported)
- Network Connection (Not Supported)
- System Configuration
- Connecting to your NVR Using a Web Browser
- Mobile Apps: Accessing your NVR Using a Mobile Device
- Appendix A: System Specifications
- Appendix B: Installing or Replacing the Hard Drive
- Troubleshooting
- Getting Started
47
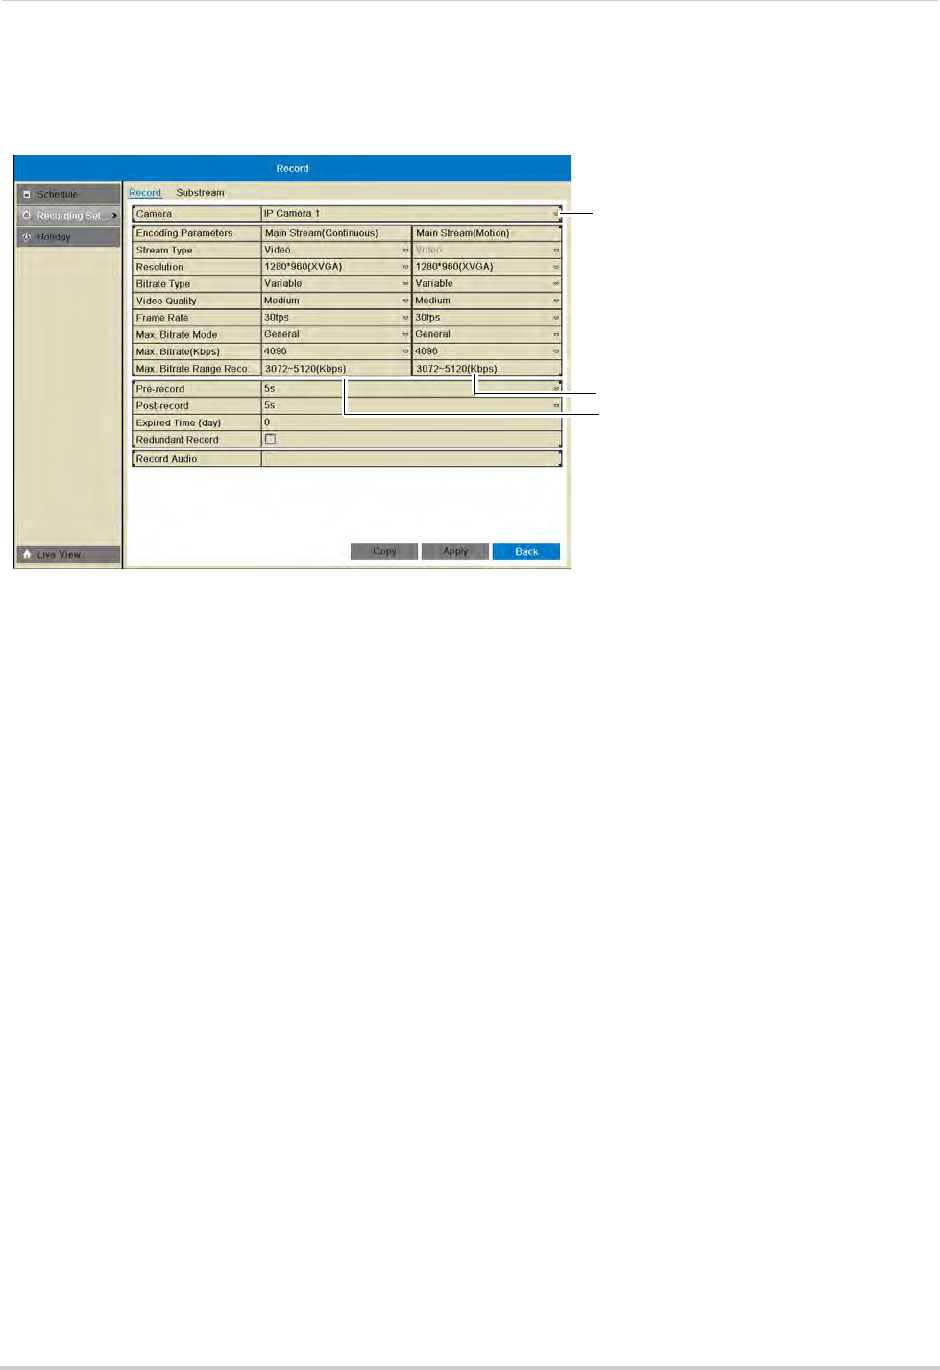
Record
• Under Max Bitrate, select the bitrate that will be used for video streaming in Kbps. It is
recommended to select a value within the range shown under Max. Bitrate Range
Recommended.
Enter image quality settings for
continuous recording
Enter image quality settings for
motion recording
Select camera
4 Configure the above settings under Mainstream (Motion) to set the parameters for motion
recording.
5 (Optional) Use
the Copy butt
on to copy the selected settings to other channels. A warning
message may appear when copying settings to unconnected channels, but the NVR will copy
settings to all connected channels.
6 Click A
pply to save changes. Right-click repeatedly to return to live viewing.
Configuring the Pre-Record and Post-Record Times
The NVR supports pre-recording to record video from before events (such as motion or
video loss) occur. The Pre-Record time determines how long the NVR will record before an
event occurs.
The Post-Record time determines how long the NVR will record after an event occurs.
To configure the Pre-Record and Post-Recor
d
times:
1 Right-click and then click Menu>Rec
ord>Recording Setup.
2 Under Camera, sel
ect the camera you would like to modify.
3 Under Pre
-record, select the time the NVR will record before an event.