
Owner's Manual


Table Of Contents
- NVR Overview
- Basic Setup
- Step 1: Connect the IP Cameras
- Step 2: Connect the Mouse
- Step 3: Connect the Ethernet Cable
- Step 4: Connect the Monitor
- Step 5: Connect the Power Adapter and Power on the NVR
- Step 6: Verify Camera Image
- Step 7: Set the Time
- Default System Password & Port Numbers
- Quick Access to System Information
- Installing Cameras
- Mouse Control
- Remote Control
- Using the On-Screen Display
- Setting the Date and Time
- Recording
- Playback
- Backing Up Video
- Managing Passwords
- Using the Main Menu
- Manual
- HDD
- Record
- Camera
- Configuration
- Maintenance
- Shutdown
- Setting up your NVR for Remote Connectivity
- Client Software for PC
- Control Panel
- Main View
- Video Player
- E-Map
- Event Search
- Remote Playback
- Add Camera
- Local Log Search
- Account Management
- Device Management
- Configuring an NVR Through Device Management
- Camera Settings
- Adjusting Picture Settings
- Configuring Video Quality
- Configuring Camera Recording Schedules
- Configuring the Camera Video Display (OSD) and Privacy Masks
- Configuring Motion Detection Settings
- Configuring Tampering Alarm Settings
- Configuring Video Loss Alarms
- PTZ Control (Not Supported)
- Network Connection (Not Supported)
- System Configuration
- Connecting to your NVR Using a Web Browser
- Mobile Apps: Accessing your NVR Using a Mobile Device
- Appendix A: System Specifications
- Appendix B: Installing or Replacing the Hard Drive
- Troubleshooting
- Getting Started
64
Configuration
3 Click Apply to save changes. Right-click repeatedly to return to live view.
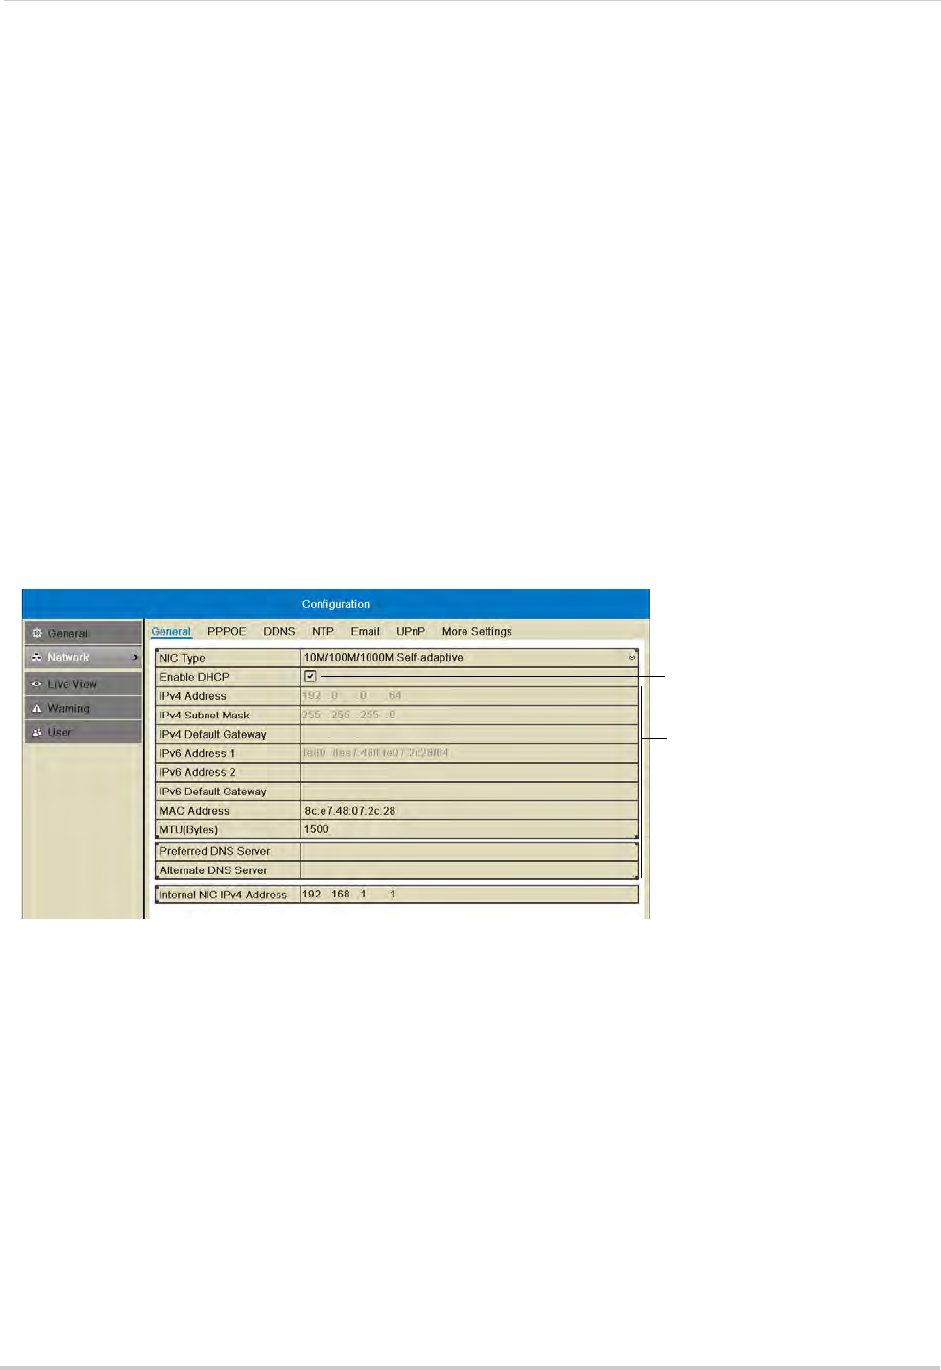
Network
Selecting Fixed IP or DHCP
The system is capable of operating in DHCP or fixed IP address modes. In DHCP, the
system will automatically be assigned an IP address from the router. A fixed IP address is
one that is permanently assigned to the system.
After setting up your system, it is highly recommended to set your system to use a fixed
IP
address. This ensures that the IP address will not change if the power goes out or your
router resets.
To setup a fixed IP address or DHCP:
1 Right-click and then click Menu>Configur
ation>Network.
2 Check Enab
le DHCP to have the system automatically obtain an IP address from the router.
Un-check Enable DHCP to assign a fixed IP address.
• If you un-check Enable DHCP, configure the IPv4 Addr
ess, IPv4 Subn
et Mask, IPv4 Default
Gateway, and Preferred DNS Server, and Alternate DNS Server.
Check to enable DHCP; un-check
to use a fixed IP address
Configure network parameters
3 Click Apply to save changes. The IP address information will be updated immediately.
Right-click repeatedly to return to live view.
NOTE: If y
ou have already completed router port forwar
ding, you will need to re-configure your
router to forward the newly selected IP address.
Configuring Email Alerts
You can configure the NVR to send you email alerts when an event occurs (for example,
motion detection or video loss).
Before enabling email alerts, you must
set up your system for DDNS. For details, see
“Accessing your NVR Remotely over the Internet” on page 78.
To configure email alerts:
1 Right
-click and then click Menu>Configur
ation>Network>Email.
2 Configure the following: