Owner's Manual
Table Of Contents
- NVR Overview
- Basic Setup
- Step 1: Connect the IP Cameras
- Step 2: Connect the Mouse
- Step 3: Connect the Ethernet Cable
- Step 4: Connect the Monitor
- Step 5: Connect the Power Adapter and Power on the NVR
- Step 6: Verify Camera Image
- Step 7: Set the Time
- Default System Password & Port Numbers
- Quick Access to System Information
- Installing Cameras
- Mouse Control
- Remote Control
- Using the On-Screen Display
- Setting the Date and Time
- Recording
- Playback
- Backing Up Video
- Managing Passwords
- Using the Main Menu
- Manual
- HDD
- Record
- Camera
- Configuration
- Maintenance
- Shutdown
- Setting up your NVR for Remote Connectivity
- Client Software for PC
- Control Panel
- Main View
- Video Player
- E-Map
- Event Search
- Remote Playback
- Add Camera
- Local Log Search
- Account Management
- Device Management
- Configuring an NVR Through Device Management
- Camera Settings
- Adjusting Picture Settings
- Configuring Video Quality
- Configuring Camera Recording Schedules
- Configuring the Camera Video Display (OSD) and Privacy Masks
- Configuring Motion Detection Settings
- Configuring Tampering Alarm Settings
- Configuring Video Loss Alarms
- PTZ Control (Not Supported)
- Network Connection (Not Supported)
- System Configuration
- Connecting to your NVR Using a Web Browser
- Mobile Apps: Accessing your NVR Using a Mobile Device
- Appendix A: System Specifications
- Appendix B: Installing or Replacing the Hard Drive
- Troubleshooting
- Getting Started

66
Configuration
on page 75.
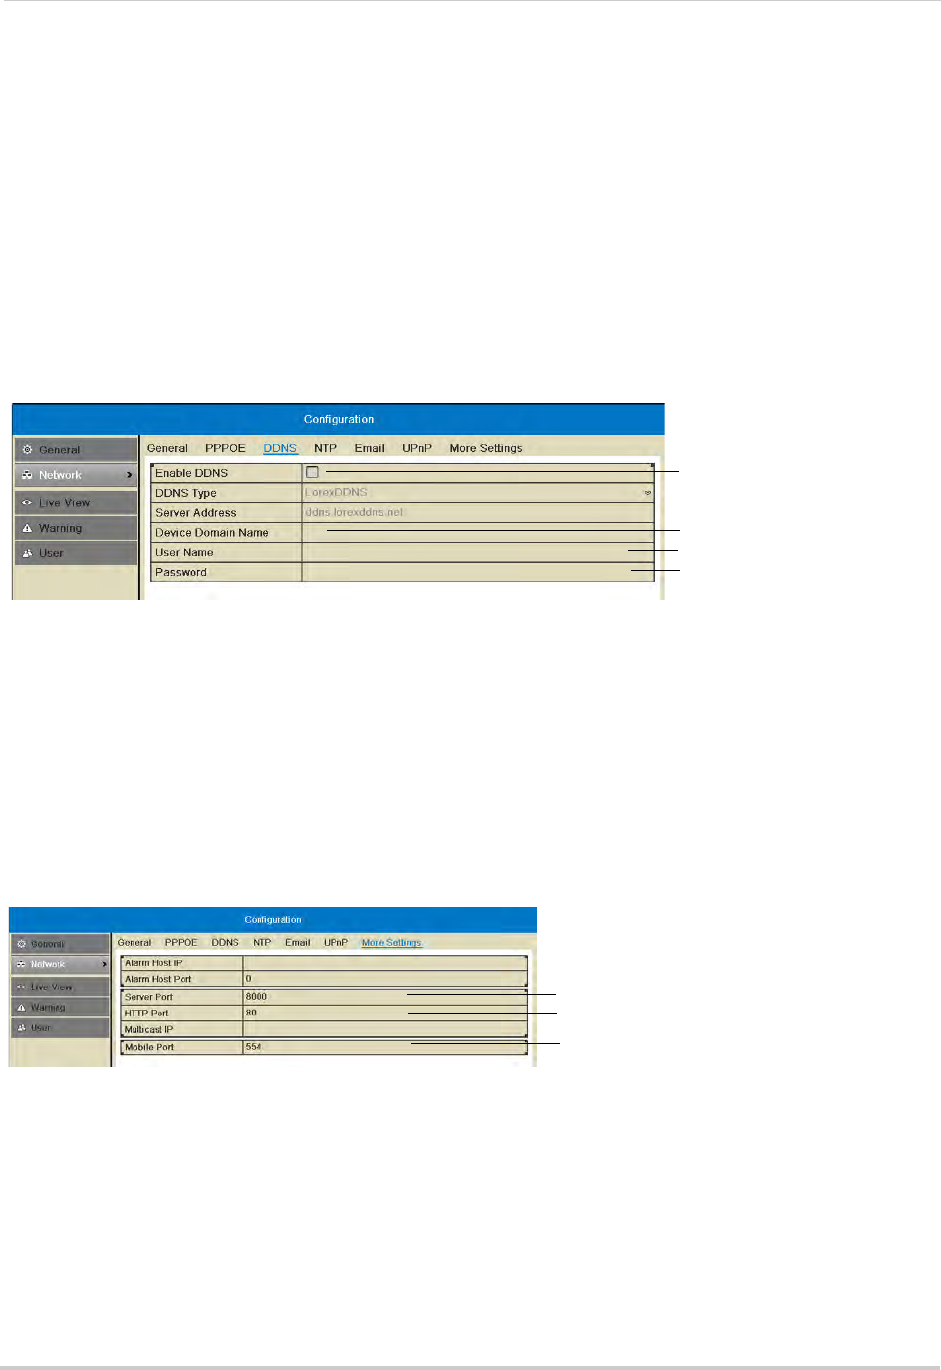
To configure DDNS settings:
1 Right-click and then click Menu>Configur
ation>Network>DDNS.
2 Check Enab
le DDNS.
3 Configure the following:
• DDNS Type: Sel
ect LorexDDNS.
• Device Domain Name: Enter the Domain Name/URL
Request you received in the confirmation
email after you set up your DDNS account.
• User Name: Ent
er the DDNS User Name from the confirmation email.
• Password: En
ter the DDNS Device Password from the confirmation email.
Check to enable DDNS
Enter Domain Name/URL
Request
Enter DDNS User Name
Enter DDNS Device Password
4 Click Apply to save changes. Right-click repeatedly to return to live view.
Changing System Ports
The NVR’s default Client Port is 8000, the default HTTP Port is 80, and the default Mobile
Port is 1025. All ports must be forwarded on your router to your NVR’s IP address to
enable remote access.
To change system ports:
1 Right
-click and then click Menu>Configur
ation>Network>More Settings.
2 Configure the Server Port, HTTP Port, and Mobile Port as needed.
Enter Server port
Enter HTTP port
Enter Mobile port
3 Click Apply to save changes. Right-click repeatedly to return to live view.
NOTE: If you have already completed router port forwar
ding, you will need to re-configure your
router to forward the newly selected ports.
Live View
Configuring Dwell Times
The Dwell Time refers to the amount of time channels or screens are shown before


