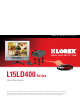
Home & Business Security WWW.LOREXCCTV.COM L15LD400 Series Quick Start Guide Information in this document is subject to change without notice. As our products are subject to continuous improvement, Lorex Technology and our subsidiaries reserve the right to modify product design, specifications and prices, without notice and without incurring any obligation. E&OE © 2007 LOREX. All rights reserved.
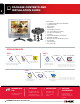
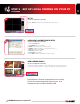
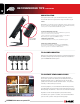
CONTENTS AND PACKAGE INSTALLATION GUIDE: System Contents: 1 - 15” 4 Channel LCD Monitor with 160GB HDD 1 - 10 ft Ethernet Cable 1 - Remote Control 2 - AAA Batteries 1 - Power Adaptor (for monitor) 1 - 4 in 1 Power Adaptor (for cameras) 1 - Lorex Client 2.
STEP 1 - SET UP YOUR MONITOR FIRST 1 CONNECT CAMERAS TO THE MONITOR: Connect the first camera to the CH1 input. Follow the same steps to connect the additional cameras. 1. Connect the Female BNC end of the supplied 60’ extension cable to the camera. Connect the male Power end of the the extension cable to the camera. 2. Connect the Female end of the supplied 60’ extension cable to an open BNC camera input on the back of the System.
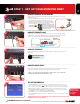
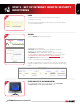
STEP 2 - SET UP LOCAL VIEWING ON YOUR PC RETRIEVE SYSTEM INFORMATION: 1 1. Access the Main Menu Setup screens, and navigate to the SYSTEM MENU - EXTERNAL DEVICE - TCP/IP SETUP - IP SETUP option. 2. Record the MAC Address of your system. This information is NECESSARY for the DDNS Setup process. 3. Confirm that the DHCP MODE is set to AUTOMATIC. This will allow your system to lease an IP ADDRESS from your router.
STEP 2 - SET UP LOCAL VIEWING ON YOUR PC CONTINUED 5 SET-UP: (on your local computer for local viewing) Click the Setup button from the Lorex Client 2.0 Software Screen. 6 Lorex Client 2.0 Remote Access Setup (on your local computer for local viewing): 1. Select the IP/PORT Tab. 2. Click MANUAL (for local viewing). 3. NAME: Enter a name for the system. E.g. Office 4. ADDRESS: Add the IP address recorded earlier at Step 2 - 1 5. Port: By default is set to 50000 6. User Id: By default is admin 7.
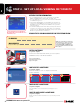
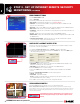
STEP 3 - SET UP INTERNET REMOTE SECURITY MONITORING 1 PORT FORWARD YOUR ROUTER: Port forward your router first before proceeding with the set-up (port 50000). All routers are different. To port forward your router, please refer to your router’s user manual. A router configuration gude is available on your Lorex Client Software CD and also on www.lorexcctv.com/support in the Consumer’s Guide Section.
STEP 3 - SET UP INTERNET REMOTE SECURITY MONITORING 5 LOGIN: Once the account has been created, you will need to login using your credentials (as set in step 4). Once the Username and Password have been entered, press the LOG IN button to access the Configuration Menu. 6 ADD DVR: Select the ADD DVR link from the top of the page. The DVR Setup screen will appear: • DVR NAME - Enter the desired name for your Observation System (e.g. MyBusiness) to a maximum of 20 numbers and letters.
STEP 3 - SET UP INTERNET REMOTE SECURITY MONITORING CONTINUED 8 9 ENABLE DDNS SETTINGS: • Set the DDNS ENABLE to ON • Click on REGISTER The following will automatically complete after clicking the Register option: • DNS SERVER - Confirm that the IP address is set to 202.133.244.128 • INTERVAL - Set an interval for the DVR to auto-update its IP address to DDNS server (Ddays / H- hours / M- minutes).
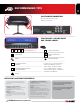
recommended tips LOCATE MONITOR CONNECTIONS: Tilt the monitor UP to loacte your monitor’s connections. FUNCTION ICONS - AVAILABE FOR USE ONLY THROUGH A MOUSE 1 PTZ 2 3 4 FULL SCREEN CH 1 ~4 PLAY IN SEQUENCE QUAD MODE OPENS SEARCH WINDOW MENU QUICK PLAYBACK TO PAN/TILT/ZOOM CAMERA TO VIEW IMAGE IN PICTURE IN PICTURE MODE Function icons can be located at the bottom of the Monitor screen (as shown above).
recommended tips CONTINUED HDD Installation: The System comes with a pre-installed Hard Drive, however the unit will work with a replacement single Hard Drive (up to 400GB). NOTE: Make sure that the System is OFF and the power cable has been disconnected before changing the Hard Drive. For detailed instructions, check your user’s manual included with the system.
product support 11 It’s all on the Web www.lorexcctv.com For detailed setup information, please refer to your User’s Manual. For additional information about determining your IP address, configuring your router, and port forwarding, please visit our website www.lorexcctv.com/support and click Consumer Guides Section or view guides from the Lorex Client 2.0 Software CD included with your system.