
User's Manual
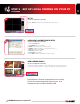

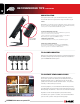

L15LD400 Series Quick Set-up Guide R1
3
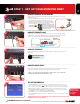
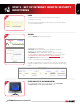
STEP 1 - SET UP YOUR MONITOR FIRST
Congratulations! You have completed Step 1 successfully. You can now view, record
and playback images on your monitor.
Connect the first camera to the CH1 input. Follow the same steps to connect the
additional cameras.
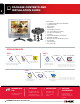
CONNECT CAMERAS TO THE MONITOR:
Connect one end of the ethernet cable to one of the router’s (not included) LAN
PORTS and the other end to Monitor’s Network Port located at the bottom of the
monitor. See picture below showing a generic LAN/WAN connection.
CONNECT ETHERNET CABLE:
Connect the 6 PIN end of the Mouse included with your system to the PS2 port of
the monitor.
CONNECT THE MOUSE:
WAN (WIDE
AREA NETWORK)
LAN (LOCAL AREA NETWORK)
TO YOUR COMPUTER
TO YOUR MONITOR
BACK OF THE ROUTER SHOWN
MOUSE CONTROL
AVAILABLE
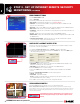
1. Connect the Female BNC end of the supplied 60’ extension cable to the camera.
Connect the male Power end of the the extension cable to the camera.
2. Connect the Female end of the supplied 60’ extension cable to an open BNC
camera input on the back of the System. Connect the female Power end of the
the extension cable to one of end of the 4 in one power adaptor.
1
2
3
Connect one end of the Power adaptor to the monitor, the other end to an electrical
outlet. This unit powers ON once it is plugged in to the power outlet.
** After you see all four (4) camera images on your monitor screen, remove the
protective film from camera(s) and monitor screen.
CONNECT POWER CABLE:
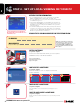
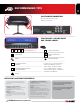
4
1. Press the MENU button from the Front Panel of the Monitor (or Remote Control), or use the
Mouse and Click the Menu Icon located at the bottom of the monitor screen (Show and
hide screen becomes available when the Mouse pointer is placed at the bottom of the Monitor).
2. DVR LOG IN screen appears soon after the Menu button is pressed asking for a password.
Note: USER ID BY DEFAULT IS ADMIN. Password is numeric and not necessarily needed for
initial MENU setup. Press ENTER to enter the MAIN MENU.
3. On the MENU screen select CONFIGURATION and click ENTER.
4. Select TIME AND DATE SETUP to change or alter the factory default settings and press ESC to
exit this menu.
SET THE TIME AND DATE:
5
Make sure that
the Date and Time
are set prior to
recording.
IMPORTANT NOTE: The ends of the extension cable are NOT
the same - one end has a Male power port, and the other has
a Female power port. Before permanently running the Camera
Extension Cable, make sure that the cable has been oriented
between the Camera and the unit correctly