
User's Manual


L15LD400 Series Quick Set-up Guide R1
5
STEP 2 - SET UP LOCAL VIEWING ON YOUR PC
CONTINUED
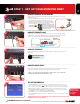
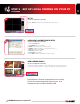
Click the SETUP button from the Lorex Client 2.0 Software Screen.
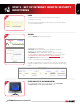
SET-UP:
(on your local computer for local viewing)
1. Select the IP/PORT Tab.
2. Click
MANUAL (for local viewing).
3. NAME: Enter a name for the system. E.g. Office
4. ADDRESS: Add the IP address recorded earlier at Step 2 - 1
5. PORT: By default is set to 50000
6. USER ID: By default is admin
7. PASSWORD: Leave it blank
8. Press SAVE to add the system name you have created.
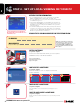
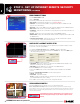
LOREX CLIENT 2.0 REMOTE ACCESS SETUP
(on your local computer for local viewing):
From the Lorex Client 2.0 software - local configuration screen (as shown in the pic-
ture), press the Connect button to connect to Local Live site to view your cameras.
VIEW CAMERAS LOCALLY:
(on your local computer for local viewing):
5
6
7
Congratulations! You have completed Step 2 successfully.
You can now view and playback images on your local
computer over the Local Area Network (LAN).