
User's Manual


L15LD400 Series Quick Set-Up Guide R1
8
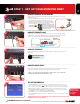
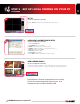
STEP 3 - SET UP INTERNET REMOTE SECURITY
MONITORING
• Set the DDNS ENABLE to ON
• Click on REGISTER
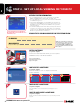
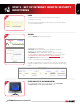
The following will automatically complete after clicking the Register option:
• DNS SERVER - Confirm that the IP address is set to 202.133.244.128
• INTERVAL - Set an interval for the DVR to auto-update its IP address to DDNS server (D-
days / H- hours / M- minutes).
• REGISTER - Connect to the DDNS server and register the DVR information to DDNS database
• DNS STATUS - Indicates the current status of DDNS connection.
• IP ADDRESS - Indicates the local IP address assigned by the router (the internal IP address of
your system).
• IP PORT - Indicates the current port number in the system (50000 by default).
• REMAIN TIME - Indicate the remaining time until the System next updates the IP address with
the DDNS Service.
• LAST REGISTRATION DATE - Indicates the last successful date and time that an update
occurred. Save the changes, and exit from the menu.
ENABLE DDNS SETTINGS:
8
CONTINUED
The remote connection information needs to be added to the Lorex Client software to allow
for a remote connection (using DDNS).
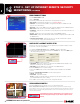
LOREX CLIENT 2.0 REMOTE ACCESS SETUP:
9
1. Load the Lorex Client 2.0 Software. Click on SETUP to add the configuration.
2. The Remote Viewer Setup window will load to the
IP/PORT Tab. Click on the DDNS option
(all settings will be greyed out).
3. Enter your
DDNS Information as follows:
• USER NAME - Enter the user name you configured on the DDNS Website (default is set to
GROUP as an example, and can be deleted).
• DVR NAME - Enter the DVR name you configured on the DDNS Website.
4. Click the
SAVE Button to accept the settings.
5. Click on the
GET IP button to retrieve the IP Address and Port Number from the DDNS
Server.
6. Enter the
USER ID AND PASSWORD for the Observation System:
• USER ID - admin (default)
• PASSWORD - leave blank (default)
NOTE: It is highly recommended that you change the System password. Please refer to
your Hardware Manual for menu settings.
7. Press
OK to save the settings, and close the configuration window.
Remote Viewing with Internet Explorer: Video from the Observation System can be viewed using the
Internet Explorer interface (for remote viewing and backup). All Remote functionality through the Internet
Explorer interface is provided at http://www.lorexddns.com. For more information, please refer to Lorex
Client 2.0 Software Manual.
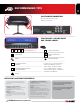
Congratulations! You have completed Step 3 successfully. You can
now view and playback images on your remote computer over the
Internet.
10
Click the CONNECT button to remotely access your Observation System.
MyBusiness
VIEW CAMERAS REMOTELY: